

Oh, when the craving hits for pure, unadulterated comfort food, nothing—and I mean nothing—beats a proper **baked mac and cheese**. Forget those watery, sad versions you sometimes find; we are aiming for perfection today! My goal here at Food Dexterity is making dishes that feel special enough for a celebration but totally achievable for a Tuesday dinner, and this recipe hits that mark perfectly. We’re achieving that dreamy, ultra-creamy interior that oozes out when you cut into it, paired with the absolute best bubbly, browned crust you could ever dream of. Trust me, this baked mac and cheese is going straight into your rotation of family dinner favorites.
If you want to know more about why we focus on achieving this level of deliciousness without the stress, you can always check out our whole story right here.
- Why This Creamy Three Cheese Baked Mac and Cheese Works (Family Favorite Dinner Recipes)
- Gathering Ingredients for Your Homemade Macaroni and Cheese
- Step-by-Step Instructions for Perfect Baked Mac and Cheese
- Tips for Making the Best Make Ahead Mac and Cheese
- Ingredient Notes and Substitutions for this Comfort Food Casserole
- Serving Suggestions for Your Baked Mac and Cheese
- Storage and Reheating Instructions for Leftover Baked Mac and Cheese
- Frequently Asked Questions About Homemade Macaroni and Cheese
- Estimated Nutritional Data for This Comfort Food Casserole
- Share Your Experience Making This Classic Baked Mac and Cheese
Why This Creamy Three Cheese Baked Mac and Cheese Works (Family Favorite Dinner Recipes)
So many recipes promise richness but deliver a grainy mess, right? Not this time! We’re breaking down the science behind why this specific batch of **baked mac and cheese** is so foolproof. It’s all about construction—building the sauce right and topping it perfectly.
- The key is honoring the foundation of homemade macaroni and cheese. We need deep flavor and perfect structure before it even sees the oven.
- We use three distinct cheeses here! That blend gives you the sharp bite of cheddar, the nutty melt of Gruyère, and the creamy pull of Monterey Jack.
The Secret to the Ultra-Creamy Baked Mac and Cheese Sauce
The star here is the roux—that mix of butter and flour. That’s what thickens everything up into a velvety blanket! You absolutely have to whisk in warm milk slowly; cold milk hitting a hot roux is a guaranteed lump festival. Taking this step seriously creates the smoothest base possible for your **baked mac and cheese**.
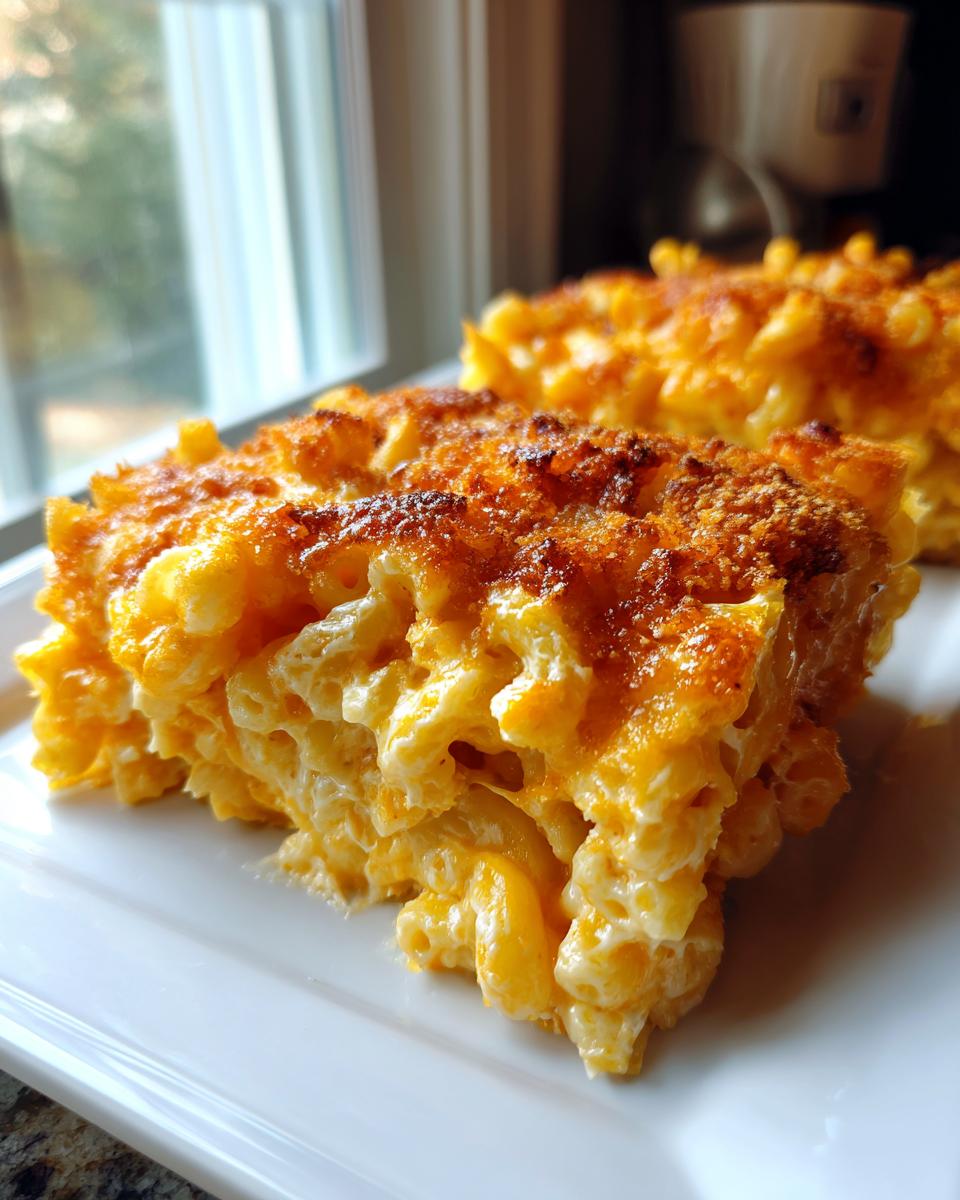
Achieving the Perfect Bubbly, Browned Cheese Crust
You can’t skimp on the topping, honey. We skip those sad, soggy breadcrumbs! Panko breadcrumbs soak up just enough of that melted top layer of cheese while crisping up beautifully during the bake. Baking concentrates that cheese flavor, giving you that delightful crunch that contrasts perfectly with the gooey inside of your **baked mac and cheese**.

Gathering Ingredients for Your Homemade Macaroni and Cheese
Okay, before we dive into the actual cooking, we need to talk about ingredients, because this is where many people accidentally sabotage their **baked mac and cheese**. Listen to me: you MUST shred your own cheese from blocks! Pre-shredded stuff is coated in stuff to keep it from sticking in the bag, and that stuff prevents our sauce from becoming that smooth, luscious texture we are aiming for. This makes 8 generous servings, so feel free to double it if you’ve got a crowd coming over. For more ideas on easy meals that feed a hungry crew, check out my tips on easy weeknight dinners!
Ingredient List: Creamy Baked Pasta Components
Grab everything listed here. Don’t try to substitute the nutmeg, it’s a tiny secret weapon that makes the cheese taste… cheesier!
- 1 pound elbow macaroni
- 6 tablespoons unsalted butter
- 1/2 cup all-purpose flour
- 4 cups whole milk, warmed
- 1 teaspoon salt
- 1/2 teaspoon black pepper
- 1/4 teaspoon ground nutmeg
- 1/4 teaspoon paprika
- 8 ounces sharp cheddar cheese, shredded
- 4 ounces Gruyère cheese, shredded
- 4 ounces Monterey Jack cheese, shredded
- 1/2 cup panko breadcrumbs
- 2 tablespoons melted butter
Step-by-Step Instructions for Perfect Baked Mac and Cheese
This is where the magic happens! We’re turning simple ingredients into that incredible, ooey-gooey **baked mac and cheese** we dream about. Don’t rush anything here, especially the sauce building. If you follow these steps closely, you’ll have a **comfort food casserole** that looks and tastes heavenly. If you need some inspiration for getting that perfect golden bake, check out my best tips for making any comfort food casserole shine!
Preparing the Pasta and Building the Roux
First things first, crank that oven up to 375°F and grease your 9×13 dish! Get your elbow macaroni cooking, but pull it out when it’s just shy of done—that’s al dente. We need it firmer because it’s going to soak up sauce later! Now, grab a big saucepan. Melt those 6 tablespoons of butter over medium heat. Whisk in the flour right away and keep stirring constantly for one solid minute. This is your roux base, and we need to cook out that raw flour taste!
Creating the Three Cheese Macaroni and Cheese Sauce
Now for the liquid magic! Take your warm milk—seriously, warm it first so it doesn’t shock the roux—and whisk it in slowly until everything is wonderfully smooth. Keep stirring until that sauce coats the back of your spoon nicely; this takes about five to seven minutes. Crucial expert tip: Take it OFF the heat before adding any cheese. Stir in your salt, pepper, nutmeg, and paprika. Then, throw in all those gorgeous, freshly shredded Cheddar, Gruyère, and Jack cheeses, and stir until you have the smoothest, creamiest **creamy baked pasta** sauce imaginable.
Assembly and Baking for a Golden Topping
Time to bring it all together! Gently fold your drained macaroni into that decadent cheese sauce until every piece is coated—this is your base layer. Pour the whole glorious mixture into your waiting baking dish. For the topping, just toss your panko breadcrumbs with the final 2 tablespoons of melted butter until they look evenly moistened. Sprinkle these right over the top of the mac and cheese.

Bake it for about 25 to 30 minutes until you see those beautiful bubbles around the edges and the top is perfectly golden brown. And please, please let it rest for 10 minutes after it comes out! This lets the sauce settle so it doesn’t run everywhere when you serve up your amazing **baked mac and cheese**.
Tips for Making the Best Make Ahead Mac and Cheese
I know life gets busy, and sometimes you need to prep things ahead of time, especially when planning for a big gathering! This **baked mac and cheese** is fantastic for that. The most important thing to remember for a successful make-ahead dish is what I mentioned earlier about the cheese. Seriously, shred it yourself! Pre-shredded cheeses just don’t melt with the same buttery smoothness, and we need that richness in the make-ahead version.
If you’re assembling this ahead of time—say, up to a day in advance—just cover your dish tightly and stick it in the fridge. When you bake it straight from the fridge, you’ll need to add about 10 to 15 extra minutes to that bake time. That little bit of extra time ensures you still get that sizzling, bubbly texture.

If you don’t want to take any chances on the crust, you can mix that reserved Gruyère right into the pasta before you top it with the panko—it guarantees you have that extra layer of cheesy goodness holding everything together. I’ve got loads of other make-ahead meals like my crockpot lasagna if you’re stocking up your freezer for busy weeks; you can sneak a peek at that recipe right here!
Ingredient Notes and Substitutions for this Comfort Food Casserole
Let’s circle back to that cheese one more time because it’s *that* important for this **comfort food casserole**. Pre-shredded cheeses have coatings—usually potato starch or cellulose—that stop them from melting into that unbelievably smooth sauce we’re looking for. They tend to clump or turn gritty fast because of those anti-caking agents. I promise, taking an extra five minutes to grate the blocks yourself is the difference between good mac and cheese and truly spectacular **homemade macaroni and cheese**.
If, for some reason, you can’t find Gruyère, don’t panic! You can swap it out. I’d recommend using Fontina since it melts beautifully, or just bumping up the Sharp Cheddar by the same 4 ounces. Either way, you’re still keeping that incredible flavor profile for your **baked mac and cheese**!
Serving Suggestions for Your Baked Mac and Cheese
This **baked mac and cheese** is so decadent, it can totally stand alone as a **family favorite dinner recipe**, especially when you need serious comfort food. But, if you’re piling it high on a holiday table, you need some balance!
Because it’s so rich, I always pair it with something bright or acidic. A simple, crisp green salad dressed with a tangy vinaigrette cuts right through that creaminess beautifully. If you’re serving it as a side, it goes perfectly next to smoked ham or roasted chicken. If you’re looking for more great holiday side dish ideas for your table, you have to check out my recipes that pair well with rich casseroles, like my sweet potato casserole variations or maybe some roasted sweet potatoes with grapes!
Storage and Reheating Instructions for Leftover Baked Mac and Cheese
If you somehow manage to have any **baked mac and cheese** leftover—which, honestly, is a feat in my house—don’t worry! It reheats wonderfully. Make sure you cover the dish tightly, plastic wrap works great, and stick it straight into the fridge. It’ll keep well for about three or four days.
When you’re ready for Round Two, skip the microwave if you can! The oven is your best friend for keeping that creamy texture. Reheat it at 350°F until it’s heated through. If it looks a little dry when you pull it out, just stir in a splash of milk before you pop it back in. That tiny bit of moisture brings back the velvety smooth sauce we love!
Frequently Asked Questions About Homemade Macaroni and Cheese
I always get so many questions after people try this recipe for the first time—it just shows how many people are searching for that truly perfect **baked mac and cheese**! Here are the ones I hear most often about creating the ultimate **comfort food casserole**.
Can I use different cheeses in this creamy baked pasta?
Yes, you absolutely can play around with the cheeses! While the sharp cheddar provides the essential tang, and Gruyère gets us that beautiful nuttiness, feel free to experiment. Swiss or Gouda are great substitutes if you don’t have Jack. Just try to keep at least one cheese sharp and one cheese known for its incredible melt to keep this **creamy baked pasta** just right!
How do I prevent my baked mac and cheese from drying out?
This is all about technique on both ends. First, make sure you let the **baked mac and cheese** rest for that full 10 minutes straight out of the oven—that lets the sauce tighten up just enough. Second, when reheating leftovers, always add a tiny splash of milk or even a dab of butter to your portion before heating it up gently. That instantly brings back the creaminess!
Is this recipe suitable for a large holiday side dish?
It’s absolutely perfect! This recipe yields 8 good servings, which makes it a wonderful **holiday side dish idea**. If you are hosting a huge gathering, you can easily double the entire recipe and use two 9×13 pans instead of one. Just make sure your oven has enough space to circulate the heat evenly between them so both batches brown up nicely.
If you’re looking for quicker cheese fix without the baking time, I have a super simple 3-ingredient stovetop mac and cheese recipe you might love for a weeknight!
Estimated Nutritional Data for This Comfort Food Casserole
When you’re making something this utterly delicious and totally satisfying, the nutrition facts sometimes feel like a formality, but I know it’s good to have a general idea! Keep in mind that because we are using real butter, three kinds of cheese, and whole milk in this **comfort food casserole**, it is definitely a rich dish. These numbers are just guides based on standard measurements for 8 servings.
Please know these figures can swing a bit depending on exactly which brand of sharp cheddar or whole milk you happen to grab off the shelf. These estimations serve as a good baseline for your planning!
- Calories: 550 per serving
- Fat: 32 grams (Watch out for that 19g Saturated Fat!)
- Carbohydrates: 48 grams
- Protein: 25 grams
It’s a truly hearty portion, which is why a little bit goes a long way! Enjoy every bite of your incredible **baked mac and cheese**.
Share Your Experience Making This Classic Baked Mac and Cheese
I truly hope this creamy, bubbly **baked mac and cheese** becomes a legend in your house just like it is in mine! Seriously, I want to know how it turned out for you.
Once you’ve had a chance to dig into that glorious, gooey center and snap a picture of that rich, golden crust, please come back and tell me all about it! Were you serving it as the ultimate **family favorite dinner recipe** or was it stealing the show as a **holiday side dish**?
If you have a second, leave a star rating right below this section—it helps other folks know this recipe is the real deal! And if you made a yummy adaptation, like tossing in some smoked sausage or using just two cheeses instead of three, drop that idea in the comments below. I love hearing your creative kitchen twists!
If you have any pressing questions that I missed, or just want to connect about developing that food dexterity, don’t hesitate to shoot me a line through my contact page. Happy cooking, everyone!
PrintCreamy Three Cheese Baked Mac and Cheese

Make this classic baked macaroni and cheese with three cheeses for a creamy interior and a browned, bubbly top crust. This is a family favorite dinner recipe perfect for gatherings.
- Prep Time: 15 min
- Cook Time: 35 min
- Total Time: 50 min
- Yield: 8 servings 1x
- Category: Casserole
- Method: Baking
- Cuisine: American
- Diet: Vegetarian
Ingredients
- 1 pound elbow macaroni
- 6 tablespoons unsalted butter
- 1/2 cup all-purpose flour
- 4 cups whole milk, warmed
- 1 teaspoon salt
- 1/2 teaspoon black pepper
- 1/4 teaspoon ground nutmeg
- 1/4 teaspoon paprika
- 8 ounces sharp cheddar cheese, shredded
- 4 ounces Gruyère cheese, shredded
- 4 ounces Monterey Jack cheese, shredded
- 1/2 cup panko breadcrumbs
- 2 tablespoons melted butter
Instructions
- Preheat your oven to 375 degrees Fahrenheit. Lightly grease a 9×13 inch baking dish.
- Cook the macaroni according to package directions until al dente. Drain well and set aside.
- In a large saucepan, melt 6 tablespoons of butter over medium heat. Whisk in the flour and cook for 1 minute, stirring constantly to make a roux.
- Gradually whisk in the warm milk until the mixture is smooth. Continue cooking, stirring often, until the sauce thickens enough to coat the back of a spoon, about 5 to 7 minutes. Do not let it boil rapidly.
- Remove the sauce from the heat. Stir in the salt, pepper, nutmeg, and paprika.
- Add the shredded cheddar, Gruyère, and Monterey Jack cheeses to the sauce, stirring until the cheese is completely melted and the sauce is smooth. This creates your creamy base.
- Fold the cooked, drained macaroni into the cheese sauce until everything is evenly coated.
- Pour the macaroni mixture into the prepared baking dish.
- In a small bowl, toss the panko breadcrumbs with 2 tablespoons of melted butter. Sprinkle the breadcrumbs evenly over the top of the macaroni.
- Bake for 25 to 30 minutes, or until the sauce is bubbly and the topping is golden brown. Let it rest for 10 minutes before serving.
Notes
- Shred your own cheese from blocks; pre-shredded cheese contains anti-caking agents that prevent smooth melting.
- For a make ahead mac and cheese option, assemble the dish completely, cover, and refrigerate for up to 24 hours. Add 10 to 15 minutes to the baking time if baking directly from the refrigerator.
- If you want an extra cheesy crust, reserve 1/2 cup of the shredded Gruyère and sprinkle it over the pasta before adding the breadcrumbs.
Nutrition
- Serving Size: 1 serving
- Calories: 550
- Sugar: 6
- Sodium: 580
- Fat: 32
- Saturated Fat: 19
- Unsaturated Fat: 13
- Trans Fat: 1
- Carbohydrates: 48
- Fiber: 2
- Protein: 25
- Cholesterol: 95