

You know how the holidays hit, and suddenly you need something that screams “Christmas!” but you absolutely do not have time for fussy, all-day baking projects? I totally get it. That’s exactly where my “Food Dexterity” kicks in! We need that showstopper without the stress, right? Well, I’ve landed on the absolute best holiday centerpiece for the season: the **christmas tree cheesecake**. Trust me, this isn’t your typical heavy, baked kind; this is creamy, incredibly simple, and uses those adorable Little Debbie Christmas Tree snack cakes we all remember from childhood. It’s nostalgic magic made achievable for your busy holiday schedule. I’ve rounded up even more ideas for no-bake wonders over here: our favorite no-bake Christmas desserts. Get ready, because this dessert tastes like happy memories but comes together faster than you think.
- Why This No-Bake Christmas Tree Cheesecake is Your Holiday Must-Make
- Gathering Ingredients for Your Little Debbie Christmas Tree Cheesecake
- Step-by-Step Guide to Making Your Christmas Tree Cheesecake Recipe
- Decorating Your Showstopper Holiday Cheesecake
- Tips for Success with Your Christmas Tree Cheesecake
- Storage and Make Ahead Christmas Dessert Planning
- Serving Suggestions for Your Decorated Christmas Cheesecake
- Frequently Asked Questions About This Festive Cheesecake Ideas
- Estimated Nutrition for Your Christmas Tree Cheesecake
Why This No-Bake Christmas Tree Cheesecake is Your Holiday Must-Make
If you’re aiming for big impact with minimal fuss, this is the recipe you need pinned right now. It skips the oven entirely, which is huge when your kitchen is already packed with roasting pans and cookie sheets. This dessert hits all the major holiday notes:
- It looks completely show-stopping when decorated.
- It uses nostalgic Little Debbie cakes—hello, instant flavor upgrade!
- It’s a fantastic make-ahead option so you aren’t scrambling on Christmas morning.
Seriously, save yourself the stress and check out my collection of simple dessert recipes while you’re at it!
Achieving the Perfect Creamy Holiday Dessert Texture
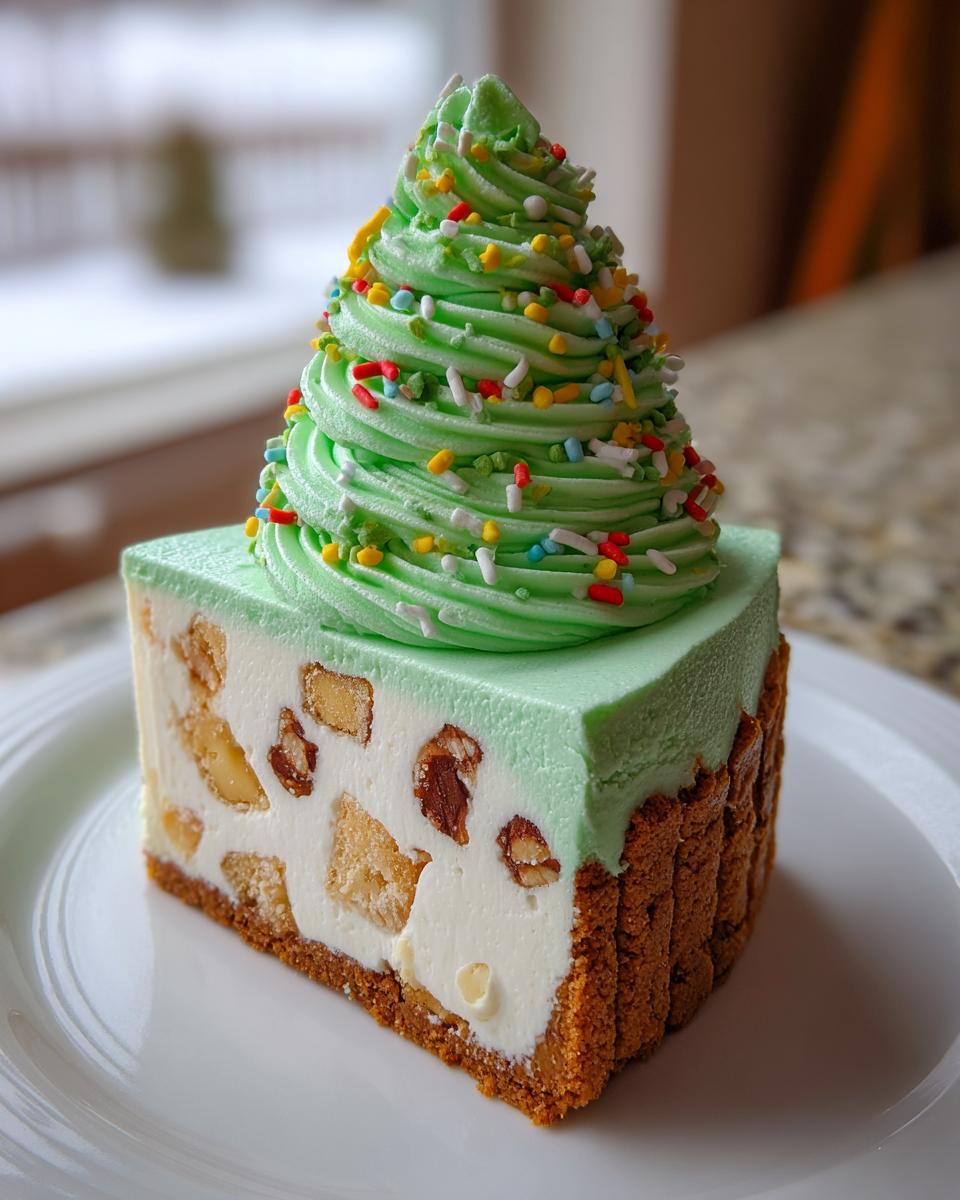
The beauty of keeping this a no-bake version is that we guarantee that dreamy, velvety texture. Unlike baked cheesecakes that can sometimes crack or get dense, this filling stays light and ridiculously smooth. When you fold in those chunks of the snack cakes, they soften ever so slightly, creating pockets of extra sweetness throughout the whole creamy holiday dessert. It’s rich without being heavy—the perfect end to a big meal.

Gathering Ingredients for Your Little Debbie Christmas Tree Cheesecake
Okay, here’s the fun part of this recipe: the ingredient list is short, and it’s all about making that nostalgic magic happen. Forget measuring five different flours or specialty extracts! We rely mainly on cream cheese, sugar, and those cute little snack cakes that bring all the flavor. When you gather these few items, getting your **christmas tree cheesecake** ready for the fridge is just a breeze. See? Cooking doesn’t have to be complicated to be completely festive!
Ingredient Notes and Substitution Guidance
A few little rules make this foolproof. First, that cream cheese absolutely has to be softened—I mean, room temperature soft! If it’s cold, you’ll end up with hard little lumps, and nobody wants that in their velvety filling. Next, when you chop those Little Debbie cakes, don’t pulverize them in the food processor; you want actual chunks; let the spatula do the gentle work later. If you need a gluten-free option, you can easily swap in GF graham cracker crumbs for the crust, just keep everything else the same!
Step-by-Step Guide to Making Your Christmas Tree Cheesecake Recipe
Now we get to the good part—making magic happen! Don’t let the word “cheesecake” scare you; since this is a no-bake **christmas tree cheesecake**, we are skipping all the drama of water baths and oven temperatures. We’re building in layers: crust, filling, and then the absolute best part, the chilling! Think of this as assembling a wonderful holiday gift for your guests. It’s all about layering simple steps correctly. I’ve linked to my favorite no-bake lemon pie recipe if you need another quick win, but let’s focus on the tree!
Preparing the Crust and Initial Chill Time
First things first, we make the base. You’re mixing those graham cracker crumbs with the melted butter until it looks like wet sand—you want it thoroughly moistened. Grab your 9-inch springform pan and press that mixture down *really* firmly into the bottom. I mean it! Use the flat bottom of a measuring cup to really compact it in there. Once it’s solid, pop that pan straight into the freezer for about 15 minutes. This solidifies the butter so your crust doesn’t crumble when you try to slice it later.
Creating the Velvety Cheesecake Filling
While the crust chills, beat your softened cream cheese and granulated sugar until it’s totally smooth—seriously, run that mixer until you feel zero graininess. This step is key for that gorgeous velvety cheesecake filling! Then, take your chopped Little Debbie cakes and gently fold them in with a spatula. Use an under-and-over motion. We want chunks of those nostalgic cakes distributed throughout, so please, don’t just dump them in and mix wildly. A little chunkiness is what makes this truly special, just check out how others have done it here!

Setting the Base: Essential Chilling Instructions
Once those cake bits are folded in, scrape the filling evenly over your chilled crust. Now comes the hardest part: waiting! You must cover the pan securely with plastic wrap. It *needs* a minimum of 6 hours in the refrigerator to set up properly. Honestly, though, if you want that perfect, neat slice that holds its shape when you cut into it, leave it overnight. A good chill is what guarantees this dessert is sliceable, not soupy!
Decorating Your Showstopper Holiday Cheesecake
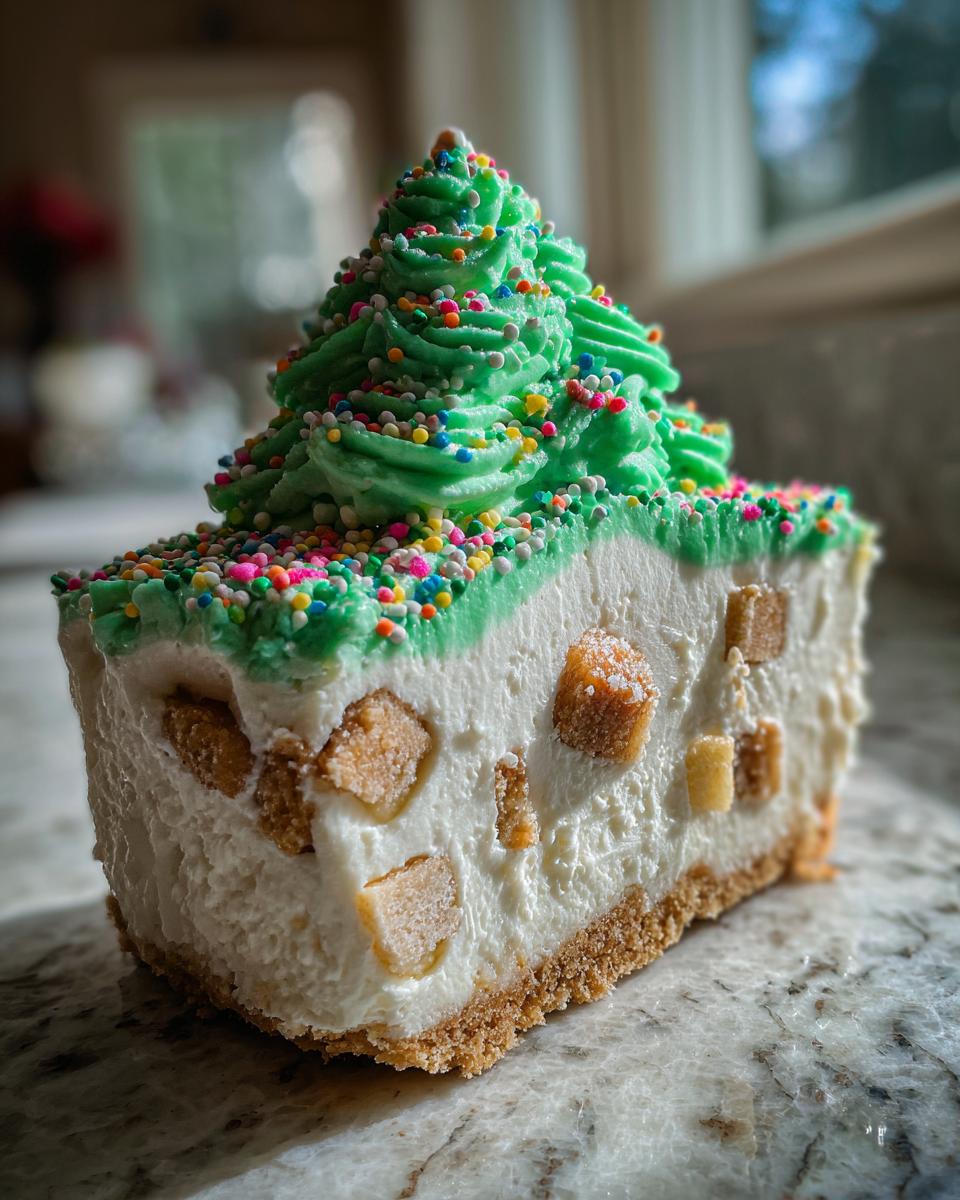
Okay, now that we’ve waited (im)patiently, it’s time to turn this smooth, creamy disk into the ultimate holiday centerpiece! This is where we design our **christmas tree cheesecake**, and honestly, this step is so much fun—even the kids can help here. We’re taking that green whipped cream and making it look like lovely, fluffy evergreen branches. Before you start decorating, carefully unclip the sides of your springform pan; you want a nice, clean edge to work with. If you’re looking for more gorgeous chocolate centers, check out my guaranteed moist fudge cake!
Tips for Perfect Whipped Cream Topping
Time for the “tree” itself! Take your cold heavy whipping cream and start whipping it. You want it to reach stiff peaks—that means when you lift the beaters out, the peaks stand straight up without flopping over. Slowly add in that powdered sugar to stabilize it. Now, if you want that classic Christmas look, add just a drop or two of green food coloring and mix until it’s a lovely, soft spruce shade. Don’t mix too long, or you’ll end up with butter! To spread it onto the cheesecake, use an offset spatula or the back of a spoon and work outward from the center, creating little dips and mounds that mimic tree branches.
Applying Festive Sprinkles Decoration
This is the grand finale! You have to move fast here because the whipped cream needs the decoration to stick right away before it dries out or settles. Grab all your prettiest holiday sprinkles—the reds, greens, and golds work best! Gently sprinkle them over the whipped cream layer, letting them fall where they might look like ornaments. Honestly, I often use small, colorful nonpareils or mini silver balls to look like fairy lights strung across the branches. Remember that little star-shaped candy or cherry we talked about? Place that right on top for the perfect tree topper. Look at that stunning decorated Christmas cheesecake! It’s basically a holiday masterpiece ready for the table.
Tips for Success with Your Christmas Tree Cheesecake
Since this is such a beloved nostalgic treat, I want to make sure yours turns out perfectly every time! Even though it’s easy, a couple of tiny tips will take it from good to truly show-stopping. If you plan on making this **christmas tree cheesecake** ahead of time and need to transport it to a huge holiday party, listen up: I recommend using the gelatin trick mentioned in the recipe notes. Dissolve a teaspoon of unflavored gelatin in a little hot water and mix it right into the cream cheese before you fold in the snack cakes. This gives the whole thing a little extra backbone for the journey! If you’re traveling, check out the great non-baked tips over at Cooking Opulence.
Also, keep in mind that since it’s no-bake, colder is always better for slicing! For more tips on quick make-ahead fillings like this, take a peek at my guide on stovetop fillings.
Storage and Make Ahead Christmas Dessert Planning
One of the best things about this recipe, hands down, is that it’s designed for holiday chaos! Because it’s a no-bake cheesecake, it actually *needs* to chill to set up, so making it ahead isn’t just allowed—it’s encouraged! You can absolutely prepare this entire **make ahead christmas dessert** up to 24 hours in advance. Once it’s fully set, just keep it covered tightly in the fridge. I recommend waiting to add the green whipped cream topping and sprinkles until about an hour before you plan to serve it.
Why wait on the topping? Because whipped cream looks freshest right after you pipe it on! Storing the decorated tree overnight can sometimes cause the cream to weep a little or the sprinkles to bleed color. If you need to prep further out, just store the fully set cheesecake base, and decorate it first thing on the day of your party. For more great planning advice for the busy season, check out my tips on how to make more ahead for Christmas!
Serving Suggestions for Your Decorated Christmas Cheesecake
Once you’ve finished that stunning decorating work on your **decorated christmas cheesecake**, you might wonder what to serve alongside it. Since the cheesecake itself is rich, creamy, and packed with nostalgic sweetness from those Little Debbie cakes, you don’t need anything overly complicated!
Honestly, a piping hot mug of coffee or a cup of homemade hot cocoa—I have my favorite big batch hot cocoa mix recipe if you need it—is the perfect partner. The warmth cuts through the richness beautifully.
If you want a garnish on the plate, a simple dusting of powdered sugar around the edge, or maybe a few fresh raspberries to give a pop of bright red color against the green cream, works wonders without taking away from the main event!
Frequently Asked Questions About This Festive Cheesecake Ideas
It’s totally normal to have questions when you’re trying a new, fun holiday recipe like this! I’ve gathered the ones I hear most often from folks working on their own festive cheesecake ideas. Don’t hesitate to reach out if you have a specific concern!
Can I use a different Little Debbie snack cake?
You’ll get the best flavor and texture if you stick with the original Little Debbie Christmas Tree snack cakes. They have that specific vanilla cake base and that touch of fruit filling that just works magically with the cream cheese. If you’re desperate and use, say, a regular Cosmic Brownie (which would be… interesting!), the flavor profile changes completely, and the texture won’t be quite right because the frosting layers are different. For this recipe, the original tree shape is truly the star.
How do I prevent the cheesecake from weeping?
Ah, weeping cheesecake—the bane of a holiday baker’s existence! Since this is no-bake, the main things to watch out for are under-chilling or overdoing the topping. Make absolutely sure your cream cheese is room temperature soft when you start mixing; lumps of cold cheese destabilize the filling. Also, when you whip that cream for the top, stop mixing the second you hit stiff peaks. If you keep going, the fat separates, and that’s when you get liquid pooling on top later.
Is this recipe suitable for a party centerpiece dessert?
Oh, you bet it is! It’s specifically designed to stop traffic at the dessert table. The whole point of the green whipped cream and sprinkles is to make it a true showstopper holiday cheesecake. As long as you chill it for the full 6 hours (or overnight, which I still recommend!), it cuts beautifully and looks exactly like a decorated little tree. It’s perfect for when you need that wow factor!
Estimated Nutrition for Your Christmas Tree Cheesecake
Since this is a sweeter, dessert-focused recipe, I always want folks to have a general idea of what they are serving. Please remember that these numbers are just estimates based on the common ingredients I use, and they can change a bit depending on the specific brand of cream cheese or snack cake you grab at the store! This is a real-life holiday treat, not a health food, so enjoy that slice guilt-free!
- Serving Size: 1 slice
- Calories: 450
- Sugar: 35g
- Fat: 30g
- Carbohydrates: 40g
- Protein: 6g
This really shows you how rich that creamy filling is, but gosh, it’s worth every single bite when you see how happy everyone is diving into that festive design!
PrintNo-Bake Little Debbie Christmas Tree Cheesecake

Create a show-stopping holiday centerpiece with this easy, no-bake Christmas Tree Cheesecake featuring nostalgic Little Debbie Christmas Tree snack cakes. This recipe delivers a creamy texture and festive look for your next gathering.
- Prep Time: 25 min
- Cook Time: 0 min
- Total Time: 6 hr 25 min
- Yield: 10 servings 1x
- Category: Dessert
- Method: No-Bake
- Cuisine: American
- Diet: Vegetarian
Ingredients
- 180 g graham cracker crumbs
- 85 g unsalted butter, melted
- 675 g cream cheese, softened
- 100 g granulated sugar
- 1 package (approx. 12 count) Little Debbie Christmas Tree snack cakes, roughly chopped
- 1 cup heavy whipping cream
- 1/4 cup powdered sugar (for topping)
- Green food coloring (optional, for topping)
- Assorted holiday sprinkles and small candies for decoration
Instructions
- Prepare the crust: Mix the graham cracker crumbs and melted butter in a bowl until fully combined. Press this mixture firmly into the bottom of a 9-inch springform pan. Chill the crust in the freezer for 15 minutes while you prepare the filling.
- Make the cheesecake filling: In a large bowl, beat the softened cream cheese and granulated sugar with an electric mixer until the mixture is smooth and there are no lumps.
- Fold in the chopped Little Debbie Christmas Tree snack cakes gently with a spatula. Do not overmix; you want visible chunks of cake throughout the filling.
- Spread the cheesecake filling evenly over the chilled crust. Cover the pan with plastic wrap and refrigerate for at least 6 hours, or preferably overnight, until the cheesecake is firm.
- Prepare the topping: In a separate bowl, whip the heavy whipping cream until soft peaks form. Add the powdered sugar and continue whipping until stiff peaks form. If desired, add a few drops of green food coloring and mix until you achieve a festive green color.
- Decorate the cheesecake: Once the cheesecake is set, carefully remove the sides of the springform pan. Spread the green whipped cream over the top of the cheesecake, shaping it like the branches of a Christmas tree.
- Decorate the tree: Immediately press assorted holiday sprinkles and small candies onto the whipped cream to resemble ornaments and lights.
- Serve the cheesecake cold. Keep refrigerated until ready to serve at your holiday party.
Notes
- For a gluten-free option, substitute the graham crackers with gluten-free graham cracker crumbs for the crust.
- If you want a firmer, more stable cheesecake for transport, consider adding 1 teaspoon of unflavored gelatin dissolved in 2 tablespoons of hot water to the cream cheese mixture before folding in the cake pieces.
- To make this a true showstopper holiday cheesecake, use a small star-shaped candy or a maraschino cherry for the tree topper.
Nutrition
- Serving Size: 1 slice
- Calories: 450
- Sugar: 35g
- Sodium: 300mg
- Fat: 30g
- Saturated Fat: 18g
- Unsaturated Fat: 12g
- Trans Fat: 0.5g
- Carbohydrates: 40g
- Fiber: 1g
- Protein: 6g
- Cholesterol: 95mg