
If you’re like me, you love a dessert that looks like you spent all day on it but secretly took about fifteen minutes of active time. That’s the sweet spot where all my best recipes live! And nothing hits that mark quite like individual portions. Forget the fuss of slicing a full pie; we’re talking about effortlessly elegant treats served right in the cup.
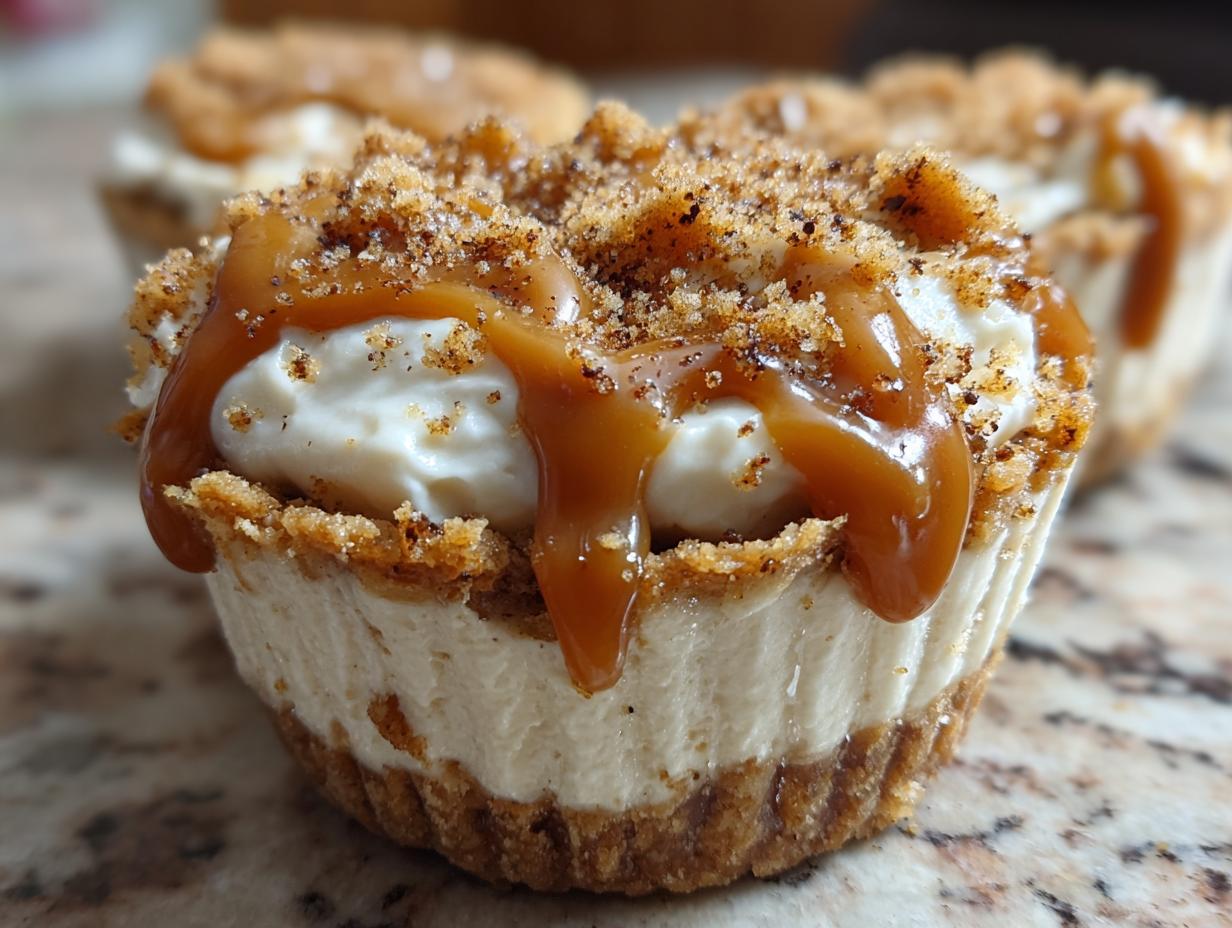
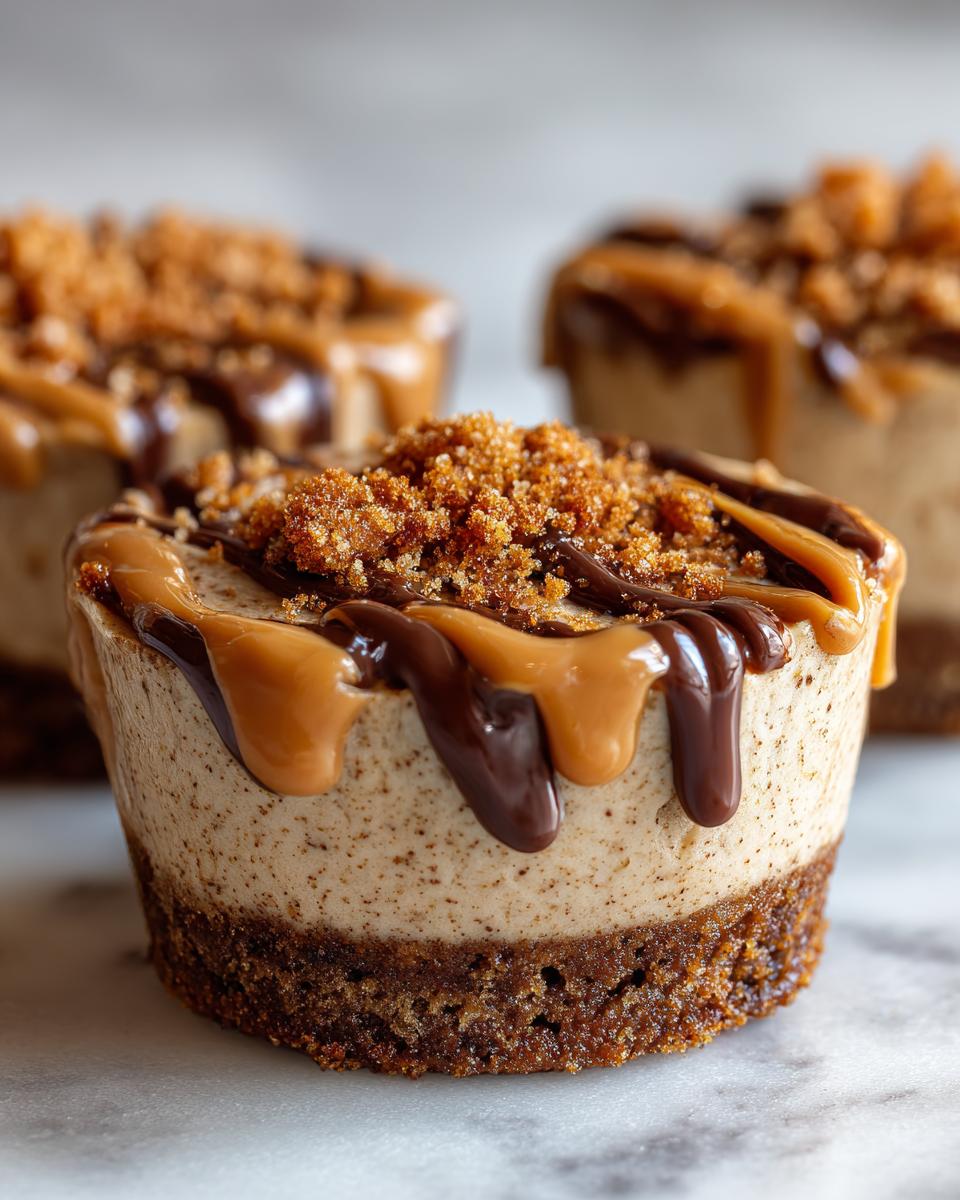
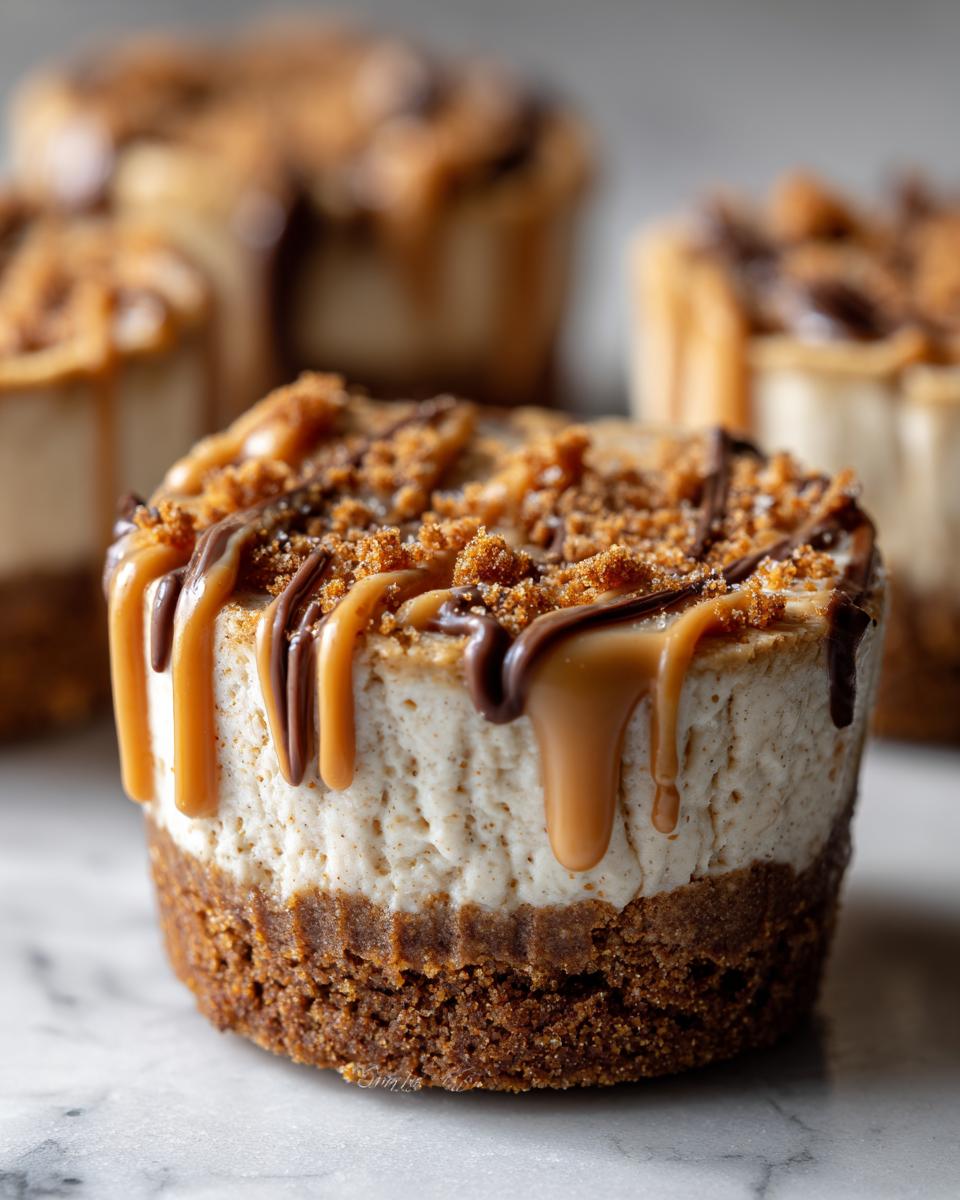
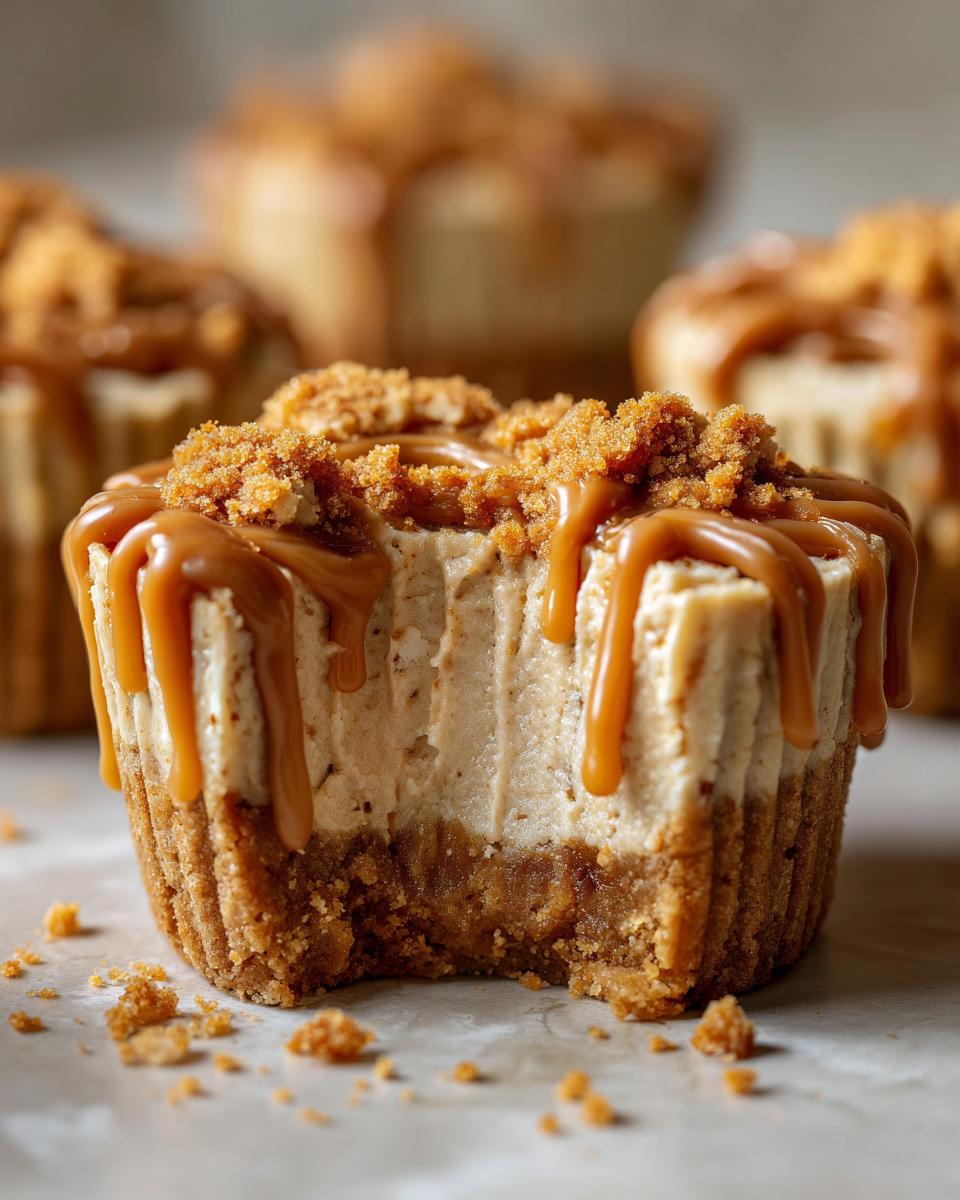
That’s why I am absolutely bursting to share these cookie butter cheesecake cups. Seriously, the warm, spiced notes of cookie butter swirled into a rich, no-bake cheesecake filling? It’s heavenly, especially when served chilled for a decadent texture. They are my go-to for last-minute gatherings because they chill up beautifully and everyone digs right into their own little masterpiece. If you’re looking for the ultimate, easy-yet-impressive dessert, this is it. You’ll definitely want to check out some of my other simple dessert recipes after you try these!
- Why You Will Love These No-Bake Cookie Butter Cheesecake Cups
- Gathering Ingredients for Your Cookie Butter Cheesecake Cups
- Essential Equipment for Making Cookie Butter Cheesecake Cups
- Step-by-Step Instructions for No Bake Cheesecake Cups
- Tips for Perfect Cookie Butter Cheesecake Cups
- Ingredient Notes and Substitutions for Your Cookie Butter Desserts
- Storage and Make Ahead Cheesecakes Instructions
- Frequently Asked Questions About Cookie Butter Cheesecake Cups
- Sharing Your Indulgent Sweet Snacks
Why You Will Love These No-Bake Cookie Butter Cheesecake Cups
Honestly, I think these are going straight to the top of your favorite dessert rotation. They manage to look fancy without any baking drama, which is my favorite kind of win! These cookie butter cheesecake cups check every box if you’re looking for a showstopper that’s simple to pull off.
- No need to even glance at the oven—these are totally no-bake!
- They come in perfect individual portions, making serving a breeze.
- That creamy texture? It’s pure, indulgent satisfaction in every bite.
- They come together in about twenty minutes of active work, seriously!
Gathering Ingredients for Your Cookie Butter Cheesecake Cups
Okay, the beauty of these no-bake cups is that you don’t need a whole pantry overhaul. Most of this stuff, you probably already have! But precision matters here, especially with the cream cheese and the cookie butter itself. Don’t try to sneak in cold ingredients—they’ll end up lumpy, and nobody wants a bumpy bite of cheesecake, right?
For the Cookie Butter Crust Alternative
This is the spicy, buttery base that holds everything together. You need that snap! Grab these items, and remember, you’re aiming for a texture like wet sand when you mix it all up.
- 1 1/2 cups finely crushed cookie butter cookies (Biscoff or Speculoos are perfect)
- 6 tablespoons unsalted butter, melted
Now, if you happen to be out of those specific cookies, don’t panic! We can pivot! If you need a quick Graham Cracker Crust Alternative, I suggest using standard graham crackers mixed with just a gentle pinch of cinnamon and ground ginger to mimic that spiced flavor. It works like a charm in a pinch.
For the Creamy Cheesecake Filling
This is where the dreaminess happens, so make sure your cream cheese is genuinely room temperature—I mean, leave it out on the counter for at least an hour before you start. It should yield easily when pressed lightly.
- 16 ounces cream cheese, softened (like I said, soften it!)
- 1 cup powdered sugar, sifted (sifting stops lumps later, trust me on this one)
- 1 teaspoon vanilla extract
- 1/2 cup cookie butter spread (like Biscoff), we’re going to warm this up slightly!
- 1/4 cup heavy cream
And don’t forget a little something extra for flair! I usually keep a small jar of extra cookie butter spread handy for drizzling right before serving, but that’s totally optional!
Essential Equipment for Making Cookie Butter Cheesecake Cups
Since these are no-bake treats, we aren’t breaking out the stand mixer for hours, which is great news for cleanup! But you do need a few reliable tools to get these individual cheesecake portions looking sharp and tasting perfectly smooth. Think of this as your minimal setup for maximum reward.
When I make these for a big crowd, I grab everything ahead of time so I can move fast. Speed is key when we are dealing with chilling times!
- A standard 12-cup muffin tin. You need a place to hold those lovely little cups!
- Paper liners (or those cute little tulip-style liners). These make popping the finished bites out so much easier.
- An electric hand mixer. While you *could* use a sturdy whisk and some elbow grease, an electric mixer ensures that cream cheese gets that luxurious, lump-free texture we are aiming for.
- A couple of mixing bowls—one larger one for the filling and a small one for crushing your cookies and mixing the melted butter.
- A rubber spatula. You’ll need this for gently folding the whipped cream and warm cookie butter in; we don’t want to deflate all the air we just whipped in!
- Measuring cups and spoons, obviously, to keep things accurate.
Gathering these tools makes the whole assembly process feel like a smooth assembly line instead of a frantic mess. Trust me, having that electric mixer ready means you skip the arm workout and get straight to the good part!
Step-by-Step Instructions for No Bake Cheesecake Cups
Now for the fun part! Even though these are a quick cheesecake recipe that skips the oven, we still need to respect the chilling time. That chill is what transforms our soft mixture into those firm, creamy bites we crave. We’re going to move fast during assembly so the crust stays crisp and doesn’t get soggy while we mix the filling. If you’re looking for other easy treats to make while you wait, you might want to check out my guide for easy cool whip candy recipe!
Building the Cookie Butter Crust Base
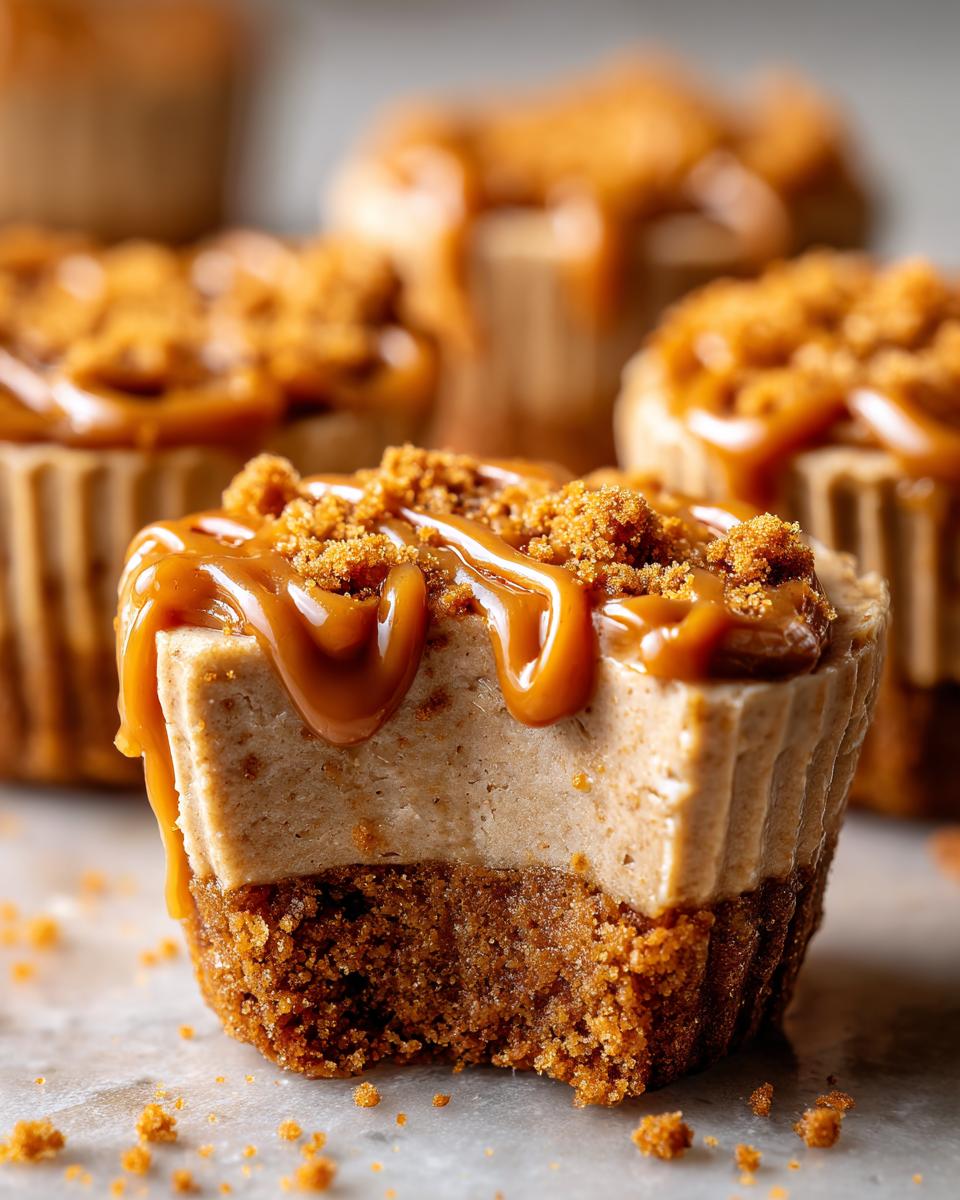
First things first, let’s make the foundation for your gorgeous cookie butter cheesecake cups. Take those 6 tablespoons of melted butter and toss them right into your crushed cookies. You want it all coated beautifully—mix it until there aren’t any dry pockets left. It should feel damp enough to stick together when you squeeze a handful.
Next, get those paper liners ready in your muffin tin. Spoon the crumb mixture evenly into the 12 cups. This is important: press it down HARD! Use the bottom of a small cup or maybe even the back of a measuring spoon to really compact that crust. We want it dense so it doesn’t crumble when we eat it later. Pop that whole tin into the fridge for about 15 minutes while you start the filling. That little chill time firms it up just enough.
Mixing the Rich & Creamy Treats Filling
Time to get that filling silky smooth! Grab your softened cream cheese and beat it with your electric mixer until it is completely smooth and looks cloud-like. Don’t rush this prep part! Once it’s perfect, slowly add the sifted powdered sugar and vanilla until it’s just combined. Scrape down the sides often, please!
In a separate bowl, whip up your heavy cream until it forms soft peaks—it should look fluffy, not stiff. Gently fold that whipped cream into the cream cheese mixture using your spatula. Remember, we are folding, not beating! We want air in here for that light texture.
Finally, take your half-cup of cookie butter spread and warm it up just a hair—maybe 15 to 20 seconds in the microwave. You just want it pourable, not melted soup! Fold that gently into the filling until beautiful, consistent swirls disappear. Stop mixing as soon as it’s uniform across the bowl.
Assembling and Chilling Your Individual Cheesecake Portions
Your crusts should be chilled and set now! Spoon that dreamy filling right over the crusts. I like using a small cookie scoop for even amounts, but you can just use a spoon if that’s all you have handy. Fill them up almost to the top line of the paper liner.
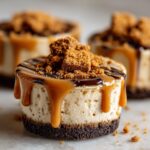
Now comes the hardest part: waiting! You absolutely must chill these individual cheesecake portions for a minimum of 4 hours. If you can leave them overnight—and I highly recommend this for the best flavor transfer—do it! Keeping them covered in the fridge ensures they set up firm. You can use the paper liners or pop them into little clear plastic cups for a super elegant look to serve at your next get-together.
Tips for Perfect Cookie Butter Cheesecake Cups
Even though these are so unbelievably easy, there are a few little tricks I’ve picked up over the years that take these cookie butter cheesecake cups from “good” to “I need the recipe right now!” These aren’t complicated steps, really—they’re just about respecting the ingredients so you get that smooth, luxurious texture every single time.
First and foremost: stop mixing when you think you should stop. Over-mixing dairy and sugar brings in too much air, which sounds good but creates a grainy or sometimes even weeping cheesecake texture once it chills. You want to mix the cream cheese and sugar until just incorporated, and then you *fold* in everything else gently!
That cookie butter swirl is crucial, but straight from the jar, it just clumps up when it hits that cold cream cheese base. That is why warming it slightly—just until it runs easily off a spoon—is non-negotiable for me. It allows the spread to integrate perfectly into the filling without creating thick, unmixed pockets. Trust me on this one; warming it makes all the difference when creating these rich & creamy treats.
When you’re planning for guests, these shine as the ultimate party dessert cups centerpiece. Since they are already portioned, they are so simple to grab and go. If you are making a big batch, consider using decorative ramekins or even small clear glass dishes instead of paper liners for an extra-elegant presentation. They look stunning lined up on a platter!
Also, when you are pressing down that crust, really use some muscle! A firm, compressed base ensures that when someone lifts their cup, the crust stays intact. These are some of the best easy dessert cups you can make, provided you give that base a good pat-down!
Ingredient Notes and Substitutions for Your Cookie Butter Desserts
I always want you to feel successful, even if you’re staring into your pantry realizing you’re missing one thing. Don’t worry about rushing out to the store! We can make smart swaps when creating these amazing cookie butter cheesecake cups, especially with that crust.
If you run out of the actual store-bought cookies for the base, remember that pinch of cinnamon and ginger added to crushed graham crackers works wonders. That spiced quality is what really pairs well with the rich cheesecake layer!
Also, when it comes to the cream cheese, please use full-fat, brick-style cream cheese. The stuff that comes in a tub just has too much water content, and trust me, it will ruin the firmness of your no-bake dessert. Keep it bricked up for the creamiest results possible!
Finally, regarding the topping: while I adore drizzling that melted cookie butter on top, you can absolutely skip it if you’re short on time. A simple dusting of powdered sugar or even just some toasted pecans works great too. Flexibility is key in my kitchen!
Storage and Make Ahead Cheesecakes Instructions
This is probably my favorite part about these cookie butter cheesecake cups: they are champions of the make-ahead game! Seriously, if you are planning a party or just want dessert ready for the week, you can put these together entirely the day before, or even two days out, and they just keep getting better.
Because we aren’t baking them, the flavors actually meld together beautifully overnight. The crust gets perfectly saturated with a little moisture from the filling, but it stays totally distinct. It’s perfect for when you need those make ahead cheesecakes.
To store them, you just need to seal them up tightly. If you’ve used paper liners, make sure you cover the entire muffin tin with plastic wrap—I often use a layer of foil over the plastic wrap just to be sure everything is sealed tight against fridge odors. Keep them in the coldest part of your refrigerator.
I’ve found they stay absolutely pristine for up to three full days. Any longer than that, and while they won’t be unsafe, the crust might start getting softer than I prefer. If you need to hold them longer, freezing is an option, but for the perfect creamy texture, I always aim to eat these within 72 hours of making them!
Frequently Asked Questions About Cookie Butter Cheesecake Cups
I know you might have a couple of lingering thoughts once you look at this recipe! It’s totally normal, especially when dealing with no bake cheesecake cups that look this indulgent. Here are the common questions that pop up when I share this recipe with friends, so we can get you baking (or, well, chilling!) right away.
What kind of cookie butter spread should I use in the filling?
You’ve got options here, but I have my favorite! Most people default to Lotus Biscoff, and it’s wonderful, lending that classic spiced flavor. If you can find Trader Joe’s cookie butter, that works great too. The important thing here is that you want one that’s relatively smooth. If yours is super hard right out of the jar—like, you can barely scoop it—you absolutely must warm it up a bit (15-20 seconds in the microwave) before folding it into the cream cheese. That prevents you from getting hard little chunks in your otherwise creamy cheesecake bites!
Can I use a graham cracker crust instead of cookie butter cookies?
Yes! That’s one reason I love keeping this recipe in my rotation—it’s flexible for those busy times. If you don’t have the specific cookies, you can totally use graham crackers. However, to replicate that signature flavor profile, you need to add flavor back in. I recommend mixing about 1/4 teaspoon of ground cinnamon and a tiny pinch of ground cloves right into the crushed graham crackers and melted butter mixture. It gives you a similar foundation for your cookie butter desserts!
How long do these cookie butter cheesecake cups really need to set?
The minimum chill time is 4 hours. I’m not even kidding; if you try to eat them before that, you’re going to end up with soup! That time is crucial for the cream cheese and the whipped cream to stabilize properly. But honestly? If you’re trying to make these for a party, aim to make the full batch the night before. They become firmer, the flavors deepen beautifully, and it makes your party prep so much easier. They are truly the perfect easy cheesecake cups when you plan ahead.
Can I freeze these individual cheesecake portions?
You absolutely can freeze them if you need to make them *really* far ahead—like for holiday cookie trays! They hold up fairly well, but I need to give you a heads-up: the crust texture might change slightly when thawing. If you freeze them, make sure they are in airtight containers or tightly wrapped plastic wrap. I recommend thawing them in the refrigerator overnight rather than on the counter. Eat them within about a month for the best quality!
Sharing Your Indulgent Sweet Snacks
There you have it! My absolute favorite way to whip up a dessert that always gets rave reviews without having to heat up the kitchen. These cookie butter cheesecake cups are my secret weapon for everything from casual weeknight cravings to big family potlucks.
Now that you’ve made them—or are planning to—I really want to hear about it! Did you stick strictly to the recipe, or did you add a little extra something? Did you drizzle that cookie butter on nice and thick? Don’t be shy!
Leave me a comment down below and let me know how your chilling process went. Rating the recipe helps other bakers know they are in good hands, and honestly, seeing pictures of your finished cups makes my day! If you snap a photo for social media, please tag me! Helping you connect with people through food is exactly why I started Food Dexterity in the first place. If you have any burning questions that I missed—or if you want to share suggestions for other contact me directly—feel free to reach out!
PrintEasy No-Bake Cookie Butter Cheesecake Cups
You can make these creamy, individual cheesecake cups without turning on your oven. They feature a spiced cookie crust and a rich cookie butter filling, making them a simple, impressive dessert for any gathering.
- Prep Time: 20 min
- Cook Time: 0 min
- Total Time: 4 hr 20 min
- Yield: 12 servings 1x
- Category: Dessert
- Method: No-Bake
- Cuisine: American
- Diet: Vegetarian
Ingredients
- 1 1/2 cups finely crushed cookie butter cookies (like Biscoff or Speculoos)
- 6 tablespoons unsalted butter, melted
- 16 ounces cream cheese, softened
- 1 cup powdered sugar, sifted
- 1 teaspoon vanilla extract
- 1/2 cup cookie butter spread (like Biscoff), plus extra for drizzling
- 1/4 cup heavy cream
- Optional: Extra crushed cookies or cookie butter for topping
Instructions
- Prepare the crust: In a small bowl, mix the crushed cookies and melted butter until the crumbs are evenly moistened.
- Divide the crust mixture evenly among 12 standard muffin cups lined with paper liners or placed in a muffin tin. Press the mixture firmly into the bottom of each cup to form the base. Chill in the refrigerator for 15 minutes.
- Prepare the filling: In a large bowl, beat the softened cream cheese with an electric mixer until smooth. Scrape down the sides of the bowl.
- Gradually add the sifted powdered sugar and vanilla extract, mixing until just combined and creamy. Do not overmix.
- In a separate bowl, lightly whip the heavy cream until soft peaks form. Gently fold the whipped cream into the cream cheese mixture.
- Warm the 1/2 cup of cookie butter slightly in the microwave (about 15-20 seconds) so it is easily stirrable, but not runny. Fold the warmed cookie butter into the cheesecake filling until streaks disappear and the mixture is uniform in color.
- Spoon or pipe the cheesecake filling evenly over the chilled crusts in the muffin cups.
- Refrigerate the cups for at least 4 hours, or until the filling is firm. For best results, chill overnight.
- Before serving, remove the paper liners. Drizzle the tops of the cheesecake cups with extra melted cookie butter and sprinkle with crushed cookies, if desired.
Notes
- You can use graham crackers mixed with a pinch of cinnamon and ginger for a similar crust if you do not have cookie butter cookies.
- To make this a make-ahead dessert, assemble the cups completely and keep them covered in the refrigerator for up to 3 days.
- If you are serving these at a party, you can use small clear plastic cups or ramekins instead of paper liners for a more elegant presentation.
Nutrition
- Serving Size: 1 cup
- Calories: 350
- Sugar: 28
- Sodium: 250
- Fat: 22
- Saturated Fat: 13
- Unsaturated Fat: 9
- Trans Fat: 0.5
- Carbohydrates: 34
- Fiber: 1
- Protein: 5
- Cholesterol: 65