
There’s just something truly soul-satisfying about a rustic loaf of bread, right? That crackly crust, the soft, airy inside… it just feels like you’ve achieved something big in the kitchen. When I first started adapting my grandmom’s techniques for my busy life in Austin, I thought artisan bread was completely off-limits—too much fuss, too much waiting! But this cranberry walnut bread changed everything for me. Trust me, this Easy No Knead Cranberry Walnut Loaf is my answer for busy people who still want that incredible, bakery-quality texture without ever touching a kneading board. It’s moist, it’s packed with flavor, and honestly, it feels miles more special than any store-bought loaf you can grab. If you think bread baking is too complicated, stick with me. We’re gonna make something great together. We’ll talk more about making things easy in our guide to soft, chewy garlic naan bread later on, but for now, focus on this loaf!
I learned early on that success in the kitchen sometimes means finding clever shortcuts that don’t sacrifice flavor. That long, overnight rest is my secret weapon here; it builds all the deep flavor you usually get from hours of folding. It’s pure connection to the act of baking, just much quieter and much easier on your schedule. You’ll want to try this when you have a slow moment, maybe the night before a big brunch.
- Why This Cranberry Walnut Bread Recipe Works for You
- Gathering Ingredients for Your Cranberry Walnut Bread Recipe
- Step-by-Step Instructions for Homemade Cranberry Nut Bread
- Expert Tips for the Best Cranberry Walnut Bread
- Serving Suggestions for Your Cranberry Walnut Snack Bread
- Storage and Reheating for Your Cranberry Walnut Bread
- Frequently Asked Questions About This Cranberry Walnut Bread Recipe
- Nutritional Estimates for Your Loaf
- Share Your Homemade Cranberry Nut Bread Creations
Why This Cranberry Walnut Bread Recipe Works for You
I know what you’re thinking: Artisan bread? That means knuckles raw from kneading! Nope! That’s the best part about this recipe—it completely bypasses all that hard work. This becomes your go-to Easy Quick Bread Recipe, even though it uses yeast! It’s the perfect thing to whip up ahead of time, making it an absolute lifesaver when you’re planning a big event. If you’re looking for the ultimate Holiday Breakfast Bread that looks impressive but keeps your hands free, this is it.
Plus, this loaf travels beautifully, making it an amazing gift when wrapped up in some festive twine. I always make an extra to keep on hand for those unexpected visitors. And since we’re talking about easy techniques, exploring soft, chewy garlic naan bread shows you how many ways you can simplify baking! If you need more inspiration for low-fuss meals, check out my tips for easy weeknight dinners—this spirit of simplicity is what Food Dexterity is all about.
The Magic of No Knead Cranberry Bread
The long, slow fermentation is what replaces all that aggressive kneading. When you give the yeast all that time (12 to 18 hours, to be exact!), it develops deep, complex flavors you just can’t rush. It handles the fruit and nuts perfectly, delivering that amazing artisan crust and a wonderfully soft interior. Honestly, if you’re just starting out, this is the best way to feel like a pro at Beginner Bread Baking without any stress.
Achieving a Perfect Moist Cranberry Walnut Loaf
The secret to keeping this dense, flavorful loaf from drying out is actually in the water—it has to be ice cold! Using cold water and mixing minimally means we don’t develop too much gluten structure early on. Gluten is great when you want chewiness, but we aren’t aggressively working it here. When you handle the dough gently later on, you lock in that moisture. That’s how you get that coveted, unbelievably tender crumb that makes this a truly Moist Cranberry Walnut Loaf.
Gathering Ingredients for Your Cranberry Walnut Bread Recipe
Okay, gathering your supplies is almost the fun part, because this list is deceptively simple for such a flavorful bread. Remember, with no-knead baking, the quality of what you put in really shines through, so let’s be precise! We’re aiming for that perfect balance of tart, nutty, and soft in every slice of this Cranberry Walnut Bread Recipe.
The ingredients are straightforward, but pay attention to the preparation notes—that’s where the real dexterity comes in handy, keeping things simple but effective.
Ingredient Clarity and Preparation
You’ll need three main players here: the dry goods, the cold water, and of course, the stars of the show—the cranberries and walnuts. Don’t just toss the nuts in; really treat them right!
- 3 cups all-purpose flour – just your regular stuff!
- 1 teaspoon instant yeast – make sure it’s instant, since we aren’t blooming it first.
- 1 teaspoon salt
- 1 tablespoon granulated sugar
- 1 1/2 cups cold water – yes, *cold* water is key here.
- 1 cup dried cranberries
- 1 cup chopped walnuts – Now, here’s my quick tip: quickly toast those walnuts in a dry pan for about five minutes until they smell amazing. It deepens their flavor so much!
- 1 teaspoon orange zest (optional, but I highly recommend it for that bright lift!)
Step-by-Step Instructions for Homemade Cranberry Nut Bread
Alright, this is the part where we transform simple flour and water into something truly special. Since this is a Homemade Cranberry Nut Bread recipe, we rely on time, not effort, to do the heavy lifting. Set aside about fifteen minutes now, and then we let the dough hang out overnight. It’s the easiest process, but you have to trust the timing!
Mixing the Shaggy Dough and Long Fermentation
First, grab your biggest mixing bowl. Whisk together all your dry stuff: the flour, the instant yeast, the salt, and that tiny bit of sugar. Don’t skip the whisking—we want the yeast to be evenly distributed before the water goes in. Now, pour in that cold water all at once. Use a wooden spoon or a sturdy spatula and mix it until you literally don’t see any more dry streaks of flour. That’s it! The dough will look messy, sticky, and maybe a bit sad—that’s perfect. Cover that bowl really tightly with plastic wrap. Now, stick it somewhere on your counter, away from any draft, and forget about it for 12 to 18 hours. That long, slow rest is where all the flavor magic happens! This is our shortcut to that amazing Artisan Cranberry Bread texture.
Incorporating Fruit and Nuts Gently
When you come back the next day, wow, what a difference! The dough will look much puffier and maybe a little bubbly. Gently flour a clean counter space. Carefully scrape the dough out—try not to deflate it too much! Now, spread out the dough slightly. Sprinkle your chopped walnuts, dried cranberries, and that optional orange zest right over the top. Here’s where we channel that gentle touch needed for that Costco Cranberry Walnut Bread Copycat texture: fold the dough over itself just a couple of times until the mix-ins are mostly tucked in. We aren’t kneading aggressively here; we’re just *folding* them in so we don’t punch out all the air pockets we built up overnight.
Shape it loosely into a ball and pop it into a bowl lined with a floured kitchen towel—this is your proofing basket, keeping its shape nice and rustic. Cover it lightly and let it sit on the counter for about 30 to 45 minutes while your oven gets screaming hot. And I mean *hot*! Preheat your oven to 450 degrees Fahrenheit, and put your Dutch oven (lid on!) inside to heat up with it. That hot pot is non-negotiable for a great crust!
Baking the Artisan Cranberry Bread in a Dutch Oven
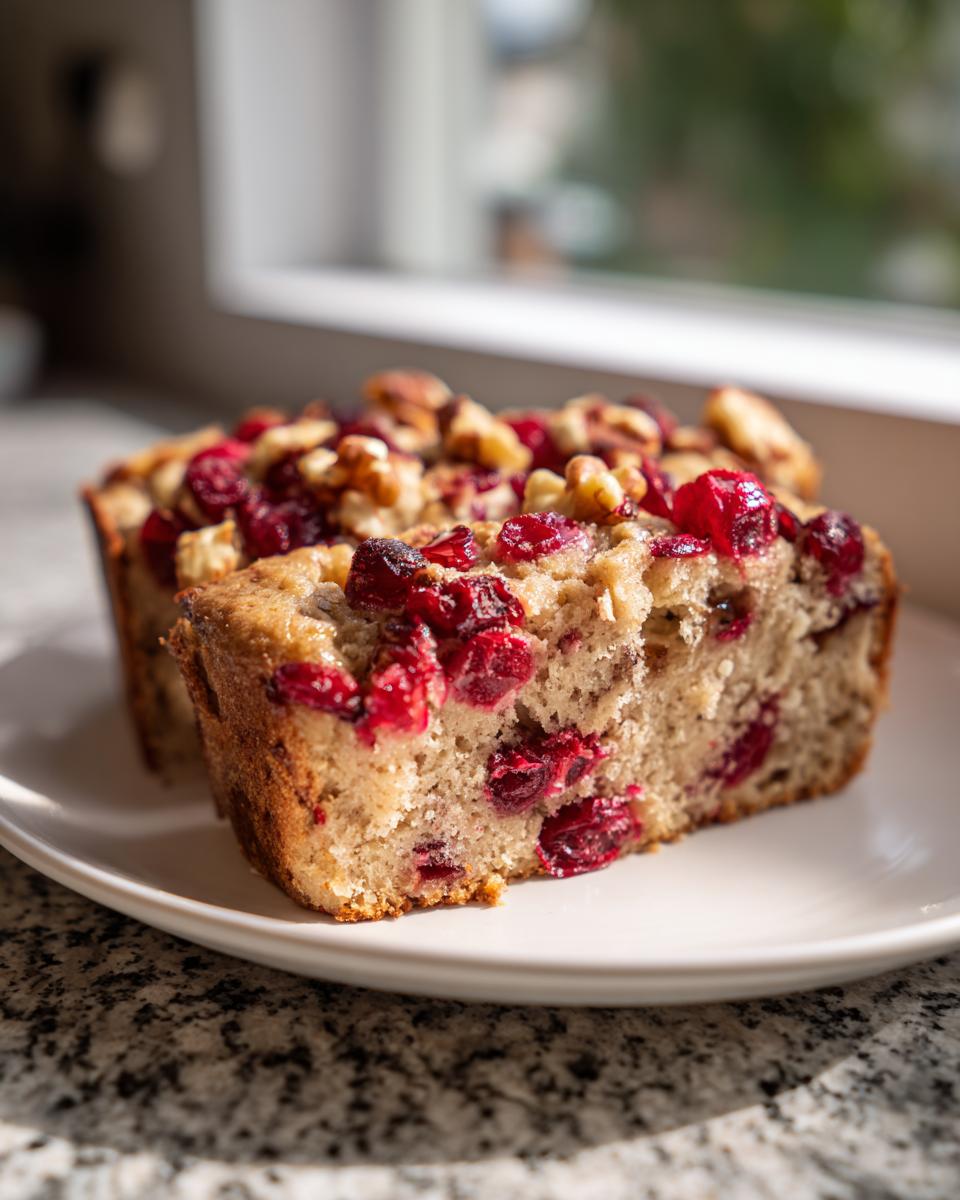
Once everything is preheated, put on some good oven mitts. Carefully take that heavy, hot Dutch oven out of the oven. Gently flip your proofed dough ball right into the middle of the hot pot—it’s going to sizzle a bit, so be quick and safe! If you feel like it, take a sharp little knife and make just one quick slash across the top. This helps the bread expand where you want it to. Put the lid right back on, and pop it back into the oven. Bake it covered for 30 minutes. This traps the steam and gives you that beautiful, crusty exterior. After 30 minutes, carefully take the lid off. Let it keep baking for another 15 to 20 minutes uncovered until the crust is deep golden brown. Seriously, the smell in your kitchen right now is incredible!

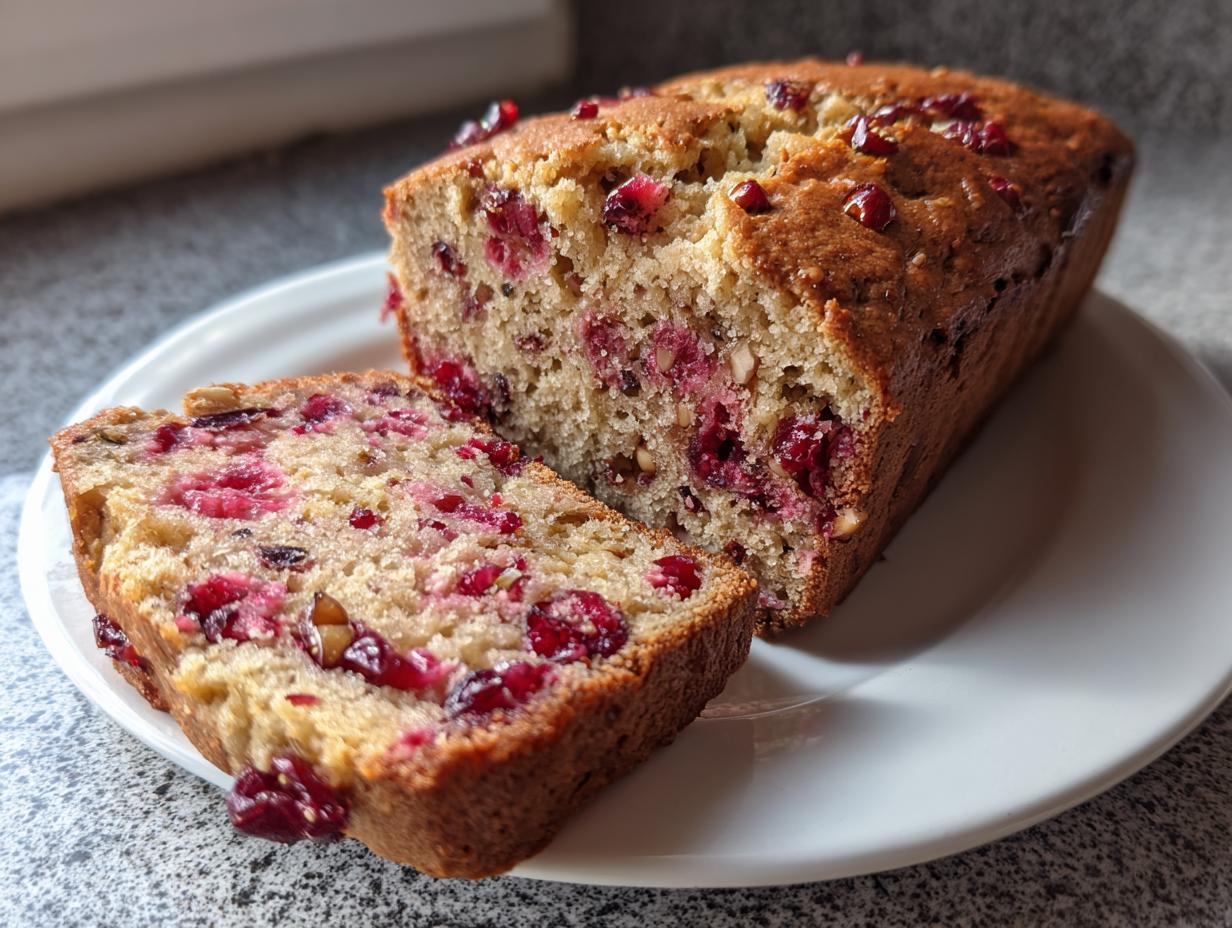
Once it looks done—deeply colored and smelling perfect—carefully pull the loaf out of the pot and place it directly on a wire rack. You have to let this cool down completely before slicing, which is the hardest part, I know! Cutting it warm turns the inside a little gummy, and we worked too hard for that. If you’re making something similar, like the Apricot Cranberry Walnut Bread, you’ll want to let that cool the same way. For other easy baking projects, don’t forget the technique you learned here helps with things like soft, chewy garlic naan bread, too!
Expert Tips for the Best Cranberry Walnut Bread
Now that you have the technique down—the long rest, the gentle fold, the steamy bake—let’s talk about really dialing in that flavor. I always tell people that baking should be responsive; you should feel free to tweak things slightly based on what you love. We want this Cranberry Walnut Bread to taste like *your* perfect loaf, whether that means leaning into the tartness or going for that specific store-bought vibe.
Adjusting Flavor Profiles for Your Cranberry Walnut Bread
If you’re a big fan of the tartness from the dried fruit really singing through, then try leaving out that optional orange zest. That zest adds brightness, sure, but omitting it leaves you with a more straightforward, deeply flavored loaf. In my experience, that leans you right into a wonderful Tart and Nutty Bread profile—very earthy and rich. Also, if you’ve tried that commercial bread you find at the big warehouse stores, you might notice it isn’t overly sweet. To get closer to that copycat flavor, just pull back on the tablespoon of sugar in the dry mix. That little adjustment makes a huge difference in balancing everything out!
Walnut Toasting for Maximum Crunch
I mentioned toasting the walnuts quickly when we looked at the ingredients, but I want to stress this again because it’s such an easy way to boost flavor! You don’t need to heavily roast them; just toss them into a completely dry skillet over medium heat. Stir them constantly for maybe five minutes until you start smelling that toasty, earthy aroma. This simple step wakes up the natural oils and makes them wonderfully crunchy, ensuring they don’t go soft during the long rise. It adds a layer of complexity that makes this whole loaf feel more elevated. If you want more tips on coaxing maximum flavor out of basic ingredients, you might enjoy learning about the techniques in my guide on soft, chewy garlic naan bread, too!
Serving Suggestions for Your Cranberry Walnut Snack Bread
Now that you have this gorgeous, crusty loaf, the hard work is done! How you serve this Cranberry Walnut Snack Bread is all about making it fit your moment. Honestly, it doesn’t need anything at all—a thick slice just pulled from the rack while it’s still slightly warm is pure heaven. That tart and nutty flavor stands up beautifully all on its own. But if you’re serving it for a big brunch spread, you have a few fun options.
For breakfast, a smear of slightly salted butter is always classic, or try a cream cheese spread mixed with a tiny bit of maple syrup. If you’re looking to elevate it for a party, I love setting out a small bowl next to the bread with a fruity dip, like my easy apple dip recipe—the tanginess works surprisingly well with the walnuts. And, as I always say, wrapping a whole, unsliced loaf in tissue paper tied with ribbon makes for truly thoughtful gifting during the holidays!

Storage and Reheating for Your Cranberry Walnut Bread
Look, the most important storage tip I can give you for this Cranberry Walnut Bread—and really, most rustic bread—is to resist cutting into it too soon. I know, I know, the smell is intoxicating, but if you slice it while it’s still steaming, you compress that beautiful, airy crumb we worked so hard to create during the long, slow rest. So please, give it a full hour, preferably two, to cool completely on a wire rack before you even think about grabbing that serrated knife!
Once it’s totally cooled, this bread keeps beautifully on the counter for a couple of days. Just wrap the whole loaf tightly in plastic wrap, and then place that whole package into a Ziploc bag or an airtight container. Keep it at room temperature, not in the fridge! The fridge dries out bread like nothing else, and we want to keep this loaf moist.
If you manage to have leftovers after day three, or if you’re baking this loaf just before a holiday and want to save it, the freezer is your best friend. Slice the cool loaf first—this is crucial for easy reheating later. Wrap the individual slices tightly in plastic wrap, then slip those wrapped slices into a freezer bag. You can keep it frozen solid for up to two months. When you’re ready for a slice, just pop it directly from the freezer onto a toaster setting, or microwave it for about 15 seconds, and it tastes almost freshly baked! That way you always have that amazing Homemade Cranberry Nut Bread ready when you need a quick snack.
Frequently Asked Questions About This Cranberry Walnut Bread Recipe
It’s totally normal to have questions when dealing with a long, slow fermentation process like this one. Baking bread without kneading feels a little like taking a leap of faith, doesn’t it? But don’t worry, this recipe is super forgiving! I’ve gathered a few things folks ask me most often when they tackle this Cranberry Walnut Bread Recipe for the first time.
Can I use active dry yeast instead of instant yeast in this No Knead Cranberry Bread?
You absolutely can, but you have to wake that yeast up first! Instant yeast (which we use here) can go right into the dry ingredients because it’s ready to go. Active dry yeast is a bit sleepier. If you use it, you need to dissolve it in about a half cup of warm (not hot!) water with a pinch of the sugar from the recipe and let it sit for about 10 minutes until it gets foamy. Once it’s foamy, add that foamy mixture to the rest of your cold water, and mix it in. Because you’re warming up that small portion of water, it might slightly jump-start the fermentation process, so your 12-to-18-hour rest might lean closer to the 12-hour mark. Just keep an eye on it!
How do I make this recipe faster, like a traditional Quick Bread Recipe?
That’s a great question, and it shows you’re thinking about using this whenever the mood strikes! However, this specific recipe relies entirely on yeast and that long, slow rest to develop that *artisan* flavor and open crumb structure. If you wanted a faster loaf, you’d actually need to switch techniques entirely to a true Easy Quick Bread Recipe, which uses chemical leaveners like baking powder and baking soda instead of yeast. You would skip the 18-hour rest, mix everything just until combined, and bake it right away, usually at a lower temperature like 350 degrees. It will be delicious, but the crust and chew will be completely different from this rustic, no-knead loaf.
My dough didn’t rise much during the 18-hour rest. Is my Cranberry Walnut Bread ruined?
Absolutely not! This is the biggest surprise for people new to no-knead baking. Unlike traditional yeast breads where you are looking for the dough to double in size by the first rise, flavor development is the main goal here, not massive volume. As long as your dough is still sticky, looks slightly bubbly on the surface, and feels a little looser than when you first mixed it up, you’re good to go. The flavor compounds are developing even if you don’t see a huge visual difference. Seriously, don’t panic! As long as you followed the steps to get that beautiful moist, zesty glaze flavor profile (even without the zest!), you’ll end up with a wonderful loaf.
Nutritional Estimates for Your Loaf
Now, let’s talk numbers, but please take this section with a huge grain of salt—literally and figuratively! Because we are making bread from scratch and using ingredients like walnuts and dried fruit, the exact nutritional panel can change wildly based on the specific brands you grab off the shelf or how close you follow my recommendation for a Costco Cranberry Walnut Bread Copycat (less sugar!).
The estimates below are based on the ingredients divided into 16 generous slices. Keep in mind these are just good ballpark figures to help you plan your day, not strict medical data. These estimates give you a great idea of why this is such a wonderful, hearty slice of Cranberry Walnut Snack Bread!
- Serving Size: 1 slice
- Calories: 280 (This is a substantial slice, perfect for breakfast!)
- Sugar: 12g (Mostly from the dried cranberries, which is why it tastes so festive.)
- Fat: 8g (Thank the walnuts and the minimal fat we use in the dough!)
- Carbohydrates: 47g
- Protein: 7g

Just remember, this is a rustic loaf, not a diet food, and that’s okay! It’s made with simple, honest ingredients. These numbers reflect that hearty, satisfying texture we worked so hard to achieve by skipping the harsh kneading process. Enjoy your slice!
Share Your Homemade Cranberry Nut Bread Creations
Now that you’ve conquered the long rise and pulled that gorgeous, steaming loaf out of the Dutch oven, it’s time for my favorite part: hearing about your success! This is where you build your own cooking confidence, and seeing your results really fuels me up.
When you make this Homemade Cranberry Nut Bread, I genuinely want to know what you thought. Did you go for the bright optional orange zest, or did you lean into that wonderfully tart flavor profile? Don’t be shy—leave a star rating right below this section so others know this recipe is a winner. And definitely drop a comment telling me about your experience!
If you snapped a photo of your beautifully crusted loaf—maybe beside your morning coffee or wrapped up ready for gifting—I would absolutely love to see it! Tag us on social media so I can share your skills with the Food Dexterity community. Seriously, creating something this impressive without kneading is something to be proud of. If you ever have a question about this process or need a little boost of confidence in the kitchen, you can always reach out to me directly through my contact page. Happy baking, friend!
PrintEasy No Knead Cranberry Walnut Loaf

Bake this moist, rustic loaf filled with tart cranberries and crunchy walnuts. This beginner-friendly, no-knead recipe delivers artisan quality bread with minimal effort, perfect for breakfast or gifting.
- Prep Time: 15 min
- Cook Time: 50 min
- Total Time: 13 hours 5 min
- Yield: 1 loaf 1x
- Category: Breakfast
- Method: No Knead Baking
- Cuisine: American
- Diet: Vegetarian
Ingredients
- 3 cups all-purpose flour
- 1 teaspoon instant yeast
- 1 teaspoon salt
- 1 tablespoon granulated sugar
- 1 1/2 cups cold water
- 1 cup dried cranberries
- 1 cup chopped walnuts
- 1 teaspoon orange zest (optional, for brightness)
Instructions
- In a large bowl, whisk together the flour, instant yeast, salt, and sugar.
- Add the cold water to the dry ingredients. Mix with a wooden spoon until just combined. The dough will be shaggy and sticky; do not overmix.
- Cover the bowl tightly with plastic wrap and let it rest at room temperature for 12 to 18 hours. This is the long, slow fermentation that builds flavor without kneading.
- After the long rise, gently fold the dough onto a lightly floured surface. Sprinkle the cranberries, walnuts, and orange zest (if using) over the dough. Gently fold the dough over itself a few times to incorporate the fruit and nuts without deflating the air bubbles.
- Shape the dough into a rough ball. Place the dough, seam-side down, into a proofing basket or a bowl lined with a floured kitchen towel. Cover and let it rest for 30 to 45 minutes while you preheat your oven.
- About 30 minutes before baking, place a Dutch oven (with the lid on) into your oven and preheat to 450 degrees Fahrenheit.
- Carefully remove the hot Dutch oven from the oven. Gently flip the dough into the hot pot. Score the top of the loaf with a sharp knife if desired.
- Cover the Dutch oven and bake for 30 minutes.
- Remove the lid and continue baking for another 15 to 20 minutes, or until the crust is deep golden brown.
- Carefully remove the bread from the Dutch oven and let it cool completely on a wire rack before slicing.
Notes
- To achieve a Costco Cranberry Walnut Bread copycat flavor, use slightly less sugar in the dough mixture.
- Toast the walnuts lightly before adding them to the dough for deeper flavor.
- If you skip the orange zest, you get a more classic, tart and nutty bread profile.
Nutrition
- Serving Size: 1 slice
- Calories: 280
- Sugar: 12
- Sodium: 250
- Fat: 8
- Saturated Fat: 1
- Unsaturated Fat: 7
- Trans Fat: 0
- Carbohydrates: 47
- Fiber: 2
- Protein: 7
- Cholesterol: 0