

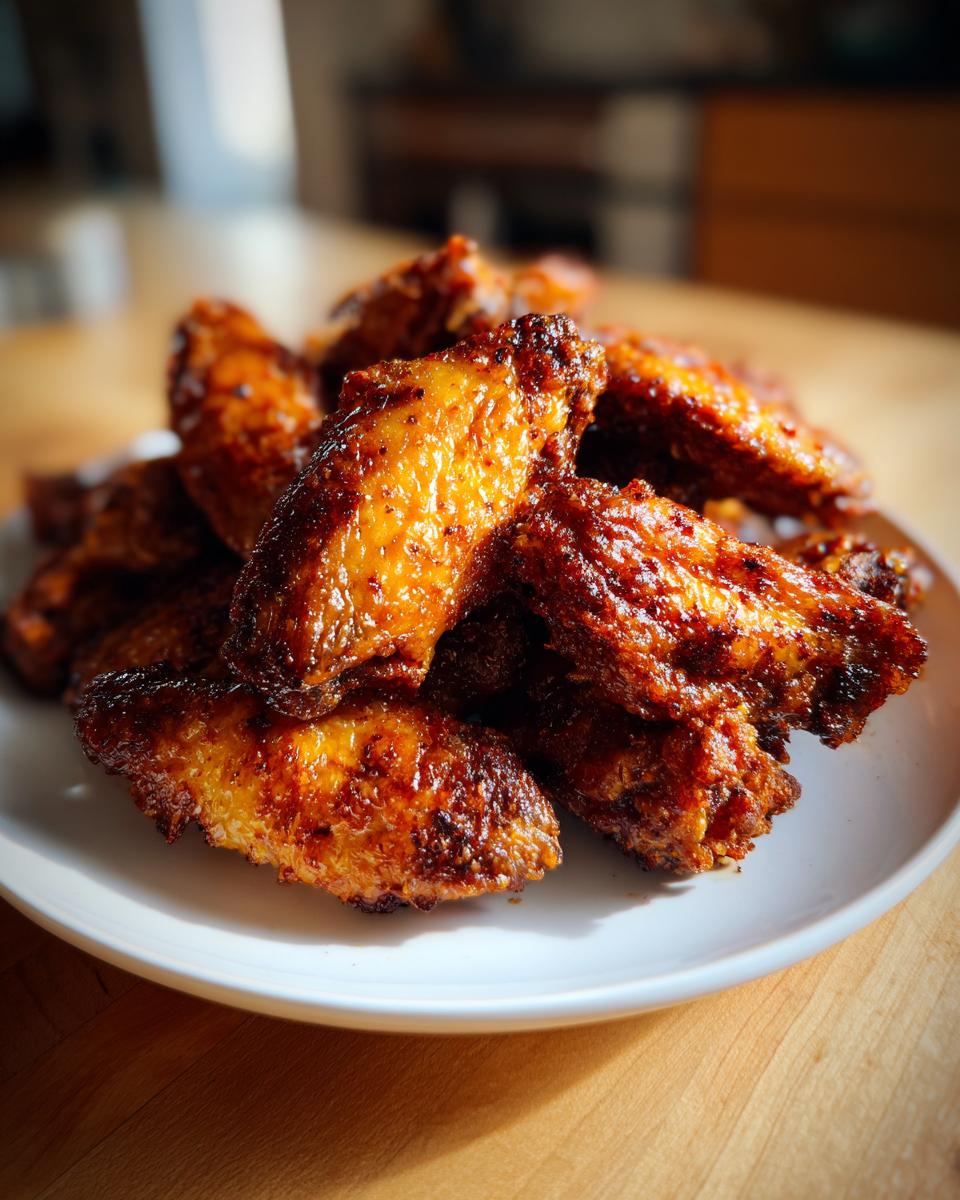
Okay, let’s be honest: trying to get that shatteringly crisp skin on your homemade chicken wings without bringing out the deep fryer feels like chasing a mythical creature, right? I’ve been there! After years of event planning in Austin, my kitchen habits got lazy, and I missed that perfect comfort food feeling. That’s why I dedicated myself to adapting classic styles for our busy, everyday lives. This recipe for Ultra Crispy Baked Chicken Wings is the answer. Forget soggy skin! We’re using a simple little secret with baking powder to achieve restaurant-quality crunch right in your oven. It’s about cooking smarter, not harder, which is exactly what Food Dexterity is all about.
- Why This Baked Chicken Wing Recipe Delivers The Crunch
- Ingredients for Ultra Crispy Baked Chicken Wings
- Step-by-Step Instructions for Perfect Oven Baked Wings
- Flavor Variations: Beyond the Basic Chicken Wing Seasoning
- Tips for Success with Baked Chicken Wings
- Serving Suggestions for Your Game Day Wings
- Storage and Reheating Instructions for Leftover Chicken Wing Pieces
- Frequently Asked Questions About Making Crispy Chicken Wings
- Sharing Your Ultra Crispy Chicken Wing Creation
Why This Baked Chicken Wing Recipe Delivers The Crunch
You’ve probably tried everything—double baking, freezing—and still ended up with skins that sigh instead of snap. I figured out what was missing! To truly get amazing Crispy Chicken Wings without all that messy oil, we need a little chemistry on our side. This method turns ordinary No Fry Chicken Wings into something you’ll swear came from a fryer basket.

The Science Behind Crispy Chicken Wings
When you mix that little bit of baking powder with the salt and spices, you’re actually raising the pH level on the chicken skin. That sounds fancy, but all it really means is that the proteins on the skin relax and let go of moisture faster! When the high heat hits that slightly altered skin, it dries out beautifully. It’s like creating a microscopic little shield that lets all that tasty fat render out, leaving you with pure crunch.
Achieving Juicy Chicken Wings Every Time
The real trick to getting that perfect textural contrast is temperature control. We start hot, right around 425°F! That intense heat works fast to crisp up that baking powder coating we just made. But because we patted the pieces totally dry first, that heat seals in the juices underneath! You get that deeply satisfying crunch on the outside, and inside, you’ve got wonderfully Juicy Chicken Wings that never feel dry. Honestly, it’s the best way to get incredible texture.
Ingredients for Ultra Crispy Baked Chicken Wings
Okay, I love talking technique, but let’s get down to brass tacks—what you actually need in your bowl! Like I always say, simple ingredients are the foundation of real flavor. You don’t need a fancy spice rack for these, just a few staples. Trust me, the magic isn’t in some exotic spice; it’s in how we treat the chicken and that one key white powder!
- 2 lbs chicken wing sections (make sure you get both the flats and drumettes, variety is the spice of life, right?)
- 1 tablespoon baking powder (If you can find aluminum-free, go for it! It tastes cleaner, but regular works too if that’s what you have.)
- 1 teaspoon salt
- 1 teaspoon garlic powder
- 1 teaspoon onion powder
- 1/2 teaspoon black pepper
- 1/4 teaspoon cayenne pepper (Optional, but if you like just a tiny little kick on the back end, toss it in!)
Step-by-Step Instructions for Perfect Oven Baked Wings
Now that we have our powerhouse dry rub ready, it’s time to pay attention to the process. This isn’t a recipe where you can just throw everything in a pan and hope for the best! The success of these wings hinges on a couple of very clear steps regarding dryness and airflow. Don’t worry, it’s super fast, and your first batch of chicken wing pieces will be ready before you even decide what show to put on during the game! If you ever want an alternative flavor starting point, you can check out my marinade guide here: Easy Zesty Chicken Marinade.
Preparation and Coating: The Key to Crispy Chicken Wing Texture
First thing’s first: preheat your oven to a solid 425 degrees Fahrenheit. While that’s heating up, you absolutely must take care of the moisture situation. Grab your paper towels and pat every single wing piece until it feels totally dry. I mean bone-dry! This is the secret spot where most people fail at learning How To Make Crispy Wings at home. Next, mix your seasoning and baking powder in a bowl, then toss those dry wings in until they are fully coated. Make sure you’ve lined a sheet pan with foil and placed a wire cooling rack on top. That rack is crucial, as it lets air circulate underneath so the bottom of your finger food chicken doesn’t steam.
Baking Times and Flipping for Evenly Cooked Chicken Wing
Place those coated wings on that rack in a single layer—no crowding allowed! We are baking them in two stages. Pop them in for 20 minutes exactly, straight into that hot oven. Once that first timer goes off, pull them out, flip every single chicken wing piece over carefully, and put them back. They need another 20 to 25 minutes. You’ll know they are done when the skin looks deep golden brown and feels super firm to the touch. That’s your signal for the Best Chicken Wing Recipe finish!

Flavor Variations: Beyond the Basic Chicken Wing Seasoning
The base dry rub we used is fantastic—it’s bold, savory, and gets that crispy texture—but let’s be real, sometimes you need variety for your party food wings! These wings are fabulous plain, but adding a coating after they come out of the oven is where the real fun begins. This is when you get to trick your guests into thinking you spent hours basting them!
Creating Honey Garlic Wings Glaze
For amazing Honey Garlic Wings that stick perfectly, wait until the wings are fresh out of the oven. While they rest for just a minute, quickly melt a half cup of honey with about two tablespoons of soy sauce and two cloves of minced garlic in a small saucepan on the stove. Whisk it until it’s smooth and bubbly. Then, toss your hot, crispy wings right into that sweet, savory sauce! If you want more depth, check out my other honey glaze recipe here: Honey Garlic Parmesan Chicken. Just use the glaze part!
Zesty Lemon Pepper Wings Finish
If you’re craving that bright, zesty flavor that screams classic wing joint, this finish is for you. After the wings come out of the oven, immediately put them in a large bowl. Take about two tablespoons of melted butter and toss it lightly with your favorite bottled lemon pepper spice blend—don’t measure too much, just enough for a light coating. Toss quickly! The residual heat melts the butter just enough to help the seasoning stick without ever making the skin soggy.
Tips for Success with Baked Chicken Wings
Even with the perfect ingredients, sometimes things go sideways, right? That’s why I always share my little troubleshooting secrets for making the Best Chicken Wing Recipe every single time. If you ran into any issues, chances are it’s one of these easy fixes. My biggest tip, which I can’t stress enough, is the air circulation! If your wings are touching on that baking sheet, they steam, and steaming kills the crunch. They need space to breathe and roast! Always use that wire rack.
Also, if your wings seem a little pale after the full bake time, don’t panic or start frying them! Just turn the broiler on for the final two or three minutes. Keep the oven door slightly ajar and watch them like a hawk—broilers can turn golden to charcoal in about sixty seconds flat! If you’re curious about other fast cooking methods for poultry without frying, you might find my tips on air fryer chicken tenders helpful when you’re looking for quick finger food.
Finally, remember that whole patting-them-dry phase? That’s non-negotiable. If you skip that, no amount of baking powder can save you from a sad, floppy skin situation. Seriously, wipe them down until the paper towel comes away dry!
Serving Suggestions for Your Game Day Wings
Okay, so you’ve got these perfectly crispy, juicy little flavor bombs sitting on the platter – what next? You can’t just serve them naked! Especially when they are the star of your Game Day Wings spread, they deserve the right supporting cast. I love keeping things simple but delicious because usually, I’m trying to manage dips, chips, and maybe a veggie platter all at once, ha!
When the wings are this good—whether they’re spicy or covered in that lovely Honey Garlic glaze—you really only need a couple of reliable, cooling dips. The homemade options are always the best, even when you’re short on time. Trust me, a good dip makes these Appetizer Chicken Wings instantly better.

My absolute favorite partner for any savory wing is a serious, creamy dip. I often whip up a big batch of my homemade onion dip an hour before everyone gets here. That classic cool, savory flavor just cuts right through the spice or richness of the wing coating perfectly. It feels gourmet but takes almost no effort!
For something easier, ranch or blue cheese dressing is a non-negotiable classic pairing. But if you want to keep things lighter? Toss some celery and carrot sticks on the plate, too. They are wonderful for scooping up any leftover sauce drips, and they make me feel slightly less guilty about eating three pounds of crispy chicken! Keep it easy, keep it delicious, and make sure you have plenty of napkins handy.
Storage and Reheating Instructions for Leftover Chicken Wing Pieces
This is the part no one talks about: what to do when you actually have leftovers! It’s rare in my house, but sometimes, miraculously, we have a few leftover chicken wing pieces hanging around. The most important thing you need to remember is that the microwave is the enemy of crispiness. If you put a perfectly baked wing in the microwave, it comes out tasting like a rubber band soaked in sadness. We just can’t allow that to happen!
For storage, keep your remaining wings in an airtight container in the fridge. They should be good for about three to four days max. If you coated them heavily in a sticky sauce, like that Honey Garlic mixture we talked about, they might soften up a bit faster, so try to eat sauced wings sooner.
Now for the magic of reheating! Because we baked them the first time instead of frying, bringing back that crunch is actually much easier. You want to use dry heat again. Set your oven (or even an air fryer, if you have one!) to about 375 degrees Fahrenheit. Lay the wings out on a wire rack set on a baking sheet—yes, the rack again! We need that airflow!
Pop them in for about 8 to 10 minutes. That is enough time to heat the meat through and completely dry out any moisture that seeped in overnight. Sometimes I even spray them lightly with a little cooking spray right before they go back in, just to encourage that browning. When they come out, they’ll be delightfully crisp again. If you’re looking for a different, faster way to cook them next time, you should check out my guide on Air Fryer Chicken Wings for a super quick cleanup!
Frequently Asked Questions About Making Crispy Chicken Wings
I know you might still have some lingering kitchen anxieties, especially after trying to get that perfect crunch. That’s totally normal! Everyone who tries to master the crispy chicken wings game hits a few snags along the way. I put together the questions I get asked most often about this game-changing oven technique. Don’t worry, we’ll conquer any sticking points so you can be the MVP of the next party!
Can I use baking soda instead of baking powder for my chicken wing recipe?
That’s a great question about substitutions! You certainly *could* try using baking soda, but I strongly advise against it for this specific recipe. Baking powder is a balanced leavener—it has both an acid and a base, so it helps crisp nicely without messing up the flavor. Baking soda is pure base; it works even faster to dry out the skin, but if you don’t balance it with enough acid, your oven baked wings can end up with a slightly soapy or metallic aftertaste. Stick to the powder for the cleanest flavor!
Are these Healthy Chicken Wings compared to deep-fried versions?
Absolutely, one hundred percent yes! That’s the main reason I developed this whole process. Deep-fried wings soak up so much oil, which jacks up the fat and calories instantly. Since these are just seasoned and roasted in the oven with tons of air circulation, you eliminate all that excess cooking oil. They’re still rich because of the fat in the chicken skin, but they are definitely a much Healthy Chicken Wings option for your weekly snack rotation. And if you want to skip the oven entirely, check out my Air Fryer Chicken Wings guide for an even faster cleanup!
What about using frozen wings? I’d say wait until they are 100% thawed and then pat them aggressively dry. Trying to bake frozen wings usually results in a sad, steamy interior because the water just can’t escape fast enough.
Sharing Your Ultra Crispy Chicken Wing Creation
Alright, now that your kitchen smells incredible and you’ve got your platter of perfect, crunchy morsels, I want to hear all about it! Seriously, this is my favorite part of sharing recipes—seeing you all put these foundational skills to work!
Did you stick to the basic savory rub, or did you try out that zesty Lemon Pepper finish I mentioned? Maybe you whipped up a killer batch of Honey BBQ sauce to toss them in afterwards? Don’t keep those delicious successes secret! Drop a rating down below—five stars if your kitchen didn’t smoke while trying to achieve that perfect crispiness, ha!
I always love seeing how you adapt things for your own family gatherings or party food wings nights. If you ended up needing a little extra help or have a burning question about timing for a massive batch, feel free to reach out through my contact page, and we can troubleshoot together. I’m always learning, too! You can get in touch right here: contact page.
But most importantly, enjoy these wings! You nailed the technique, and you skipped the fryer. That deserves a round of applause and, definitely, a few happy bites. Let me know what you think!
PrintUltra Crispy Baked Chicken Wings: The Secret Oven Crunch

You can make shatteringly crispy baked chicken wings without frying. This easy recipe uses a simple technique to achieve a crunchy exterior and juicy interior, perfect for game day or appetizers.
- Prep Time: 10 min
- Cook Time: 45 min
- Total Time: 55 min
- Yield: 4 servings 1x
- Category: Appetizer
- Method: Baking
- Cuisine: American
- Diet: Low Fat
Ingredients
- 2 lbs chicken wing sections (flats and drumettes)
- 1 tablespoon baking powder (aluminum-free preferred)
- 1 teaspoon salt
- 1 teaspoon garlic powder
- 1 teaspoon onion powder
- 1/2 teaspoon black pepper
- 1/4 teaspoon cayenne pepper (optional)
Instructions
- Preheat your oven to 425 degrees Fahrenheit. Line a large, rimmed baking sheet with foil for easy cleanup, then place a wire cooling rack on top of the foil.
- Pat the chicken wings completely dry using paper towels. This step is crucial for crispiness.
- In a large bowl, combine the baking powder, salt, garlic powder, onion powder, black pepper, and cayenne pepper.
- Add the dried chicken wings to the bowl. Toss thoroughly until every piece is evenly coated with the dry rub mixture.
- Arrange the coated wings in a single layer on the wire rack set over the baking sheet. Do not let the wings touch each other.
- Bake for 20 minutes.
- Flip each wing over. Return the wings to the oven and bake for another 20 to 25 minutes, or until the skin is deeply golden brown and very crisp.
- Remove the wings from the oven. You can serve them plain, toss them in your favorite sauce, or enjoy them as is.
Notes
- For extra flavor, you can toss the baked wings in a simple sauce like melted butter mixed with hot sauce or a honey garlic glaze after they come out of the oven.
- If you want a thicker coating, use 1.5 tablespoons of baking powder.
- Do not skip drying the wings; moisture prevents crisping.
Nutrition
- Serving Size: 4 wings
- Calories: 250
- Sugar: 0
- Sodium: 350
- Fat: 15
- Saturated Fat: 4
- Unsaturated Fat: 11
- Trans Fat: 0
- Carbohydrates: 1
- Fiber: 0
- Protein: 25
- Cholesterol: 85