
Oh, chicken. It seems so simple, right? Just pop a bird in the oven and boom, dinner! But how many times have you cut into a beautiful, golden-brown chicken only to find the breast meat is dry as dust while the thighs never quite got there? It’s frustrating! My whole mission here at Food Dexterity is to stop those kitchen letdowns. That’s why I’m obsessed with perfecting this recipe: The Ultimate Easy Oven Roasted Chicken with Crispy Skin. This isn’t some complicated gourmet mess; this is real-life cooking, just like Charlie learned when she had to transition from planning big events to needing incredible, fast weeknight meals. We nail the juicy meat and the shatteringly crispy skin every single time. Trust me; once you try this method, you won’t look back!
- Why This is the Best Roasted Chicken Ever: Key Success Factors
- Ingredients for Your Garlic Herb Roasted Chicken
- Step-by-Step Instructions for the Perfect Roasted Chicken
- Tips to Achieve Rotisserie Style Chicken at Home
- Serving Suggestions for Your Whole Roasted Chicken Recipe
- Storing and Reheating Leftover Roasted Chicken
- Frequently Asked Questions About Oven Roasted Poultry
- Estimated Nutritional Data for the Roasted Chicken
- Share Your Simple Chicken Main Dish Experience
- Estimated Nutritional Data for the Roasted Chicken
- Share Your Simple Chicken Main Dish Experience
Why This is the Best Roasted Chicken Ever: Key Success Factors
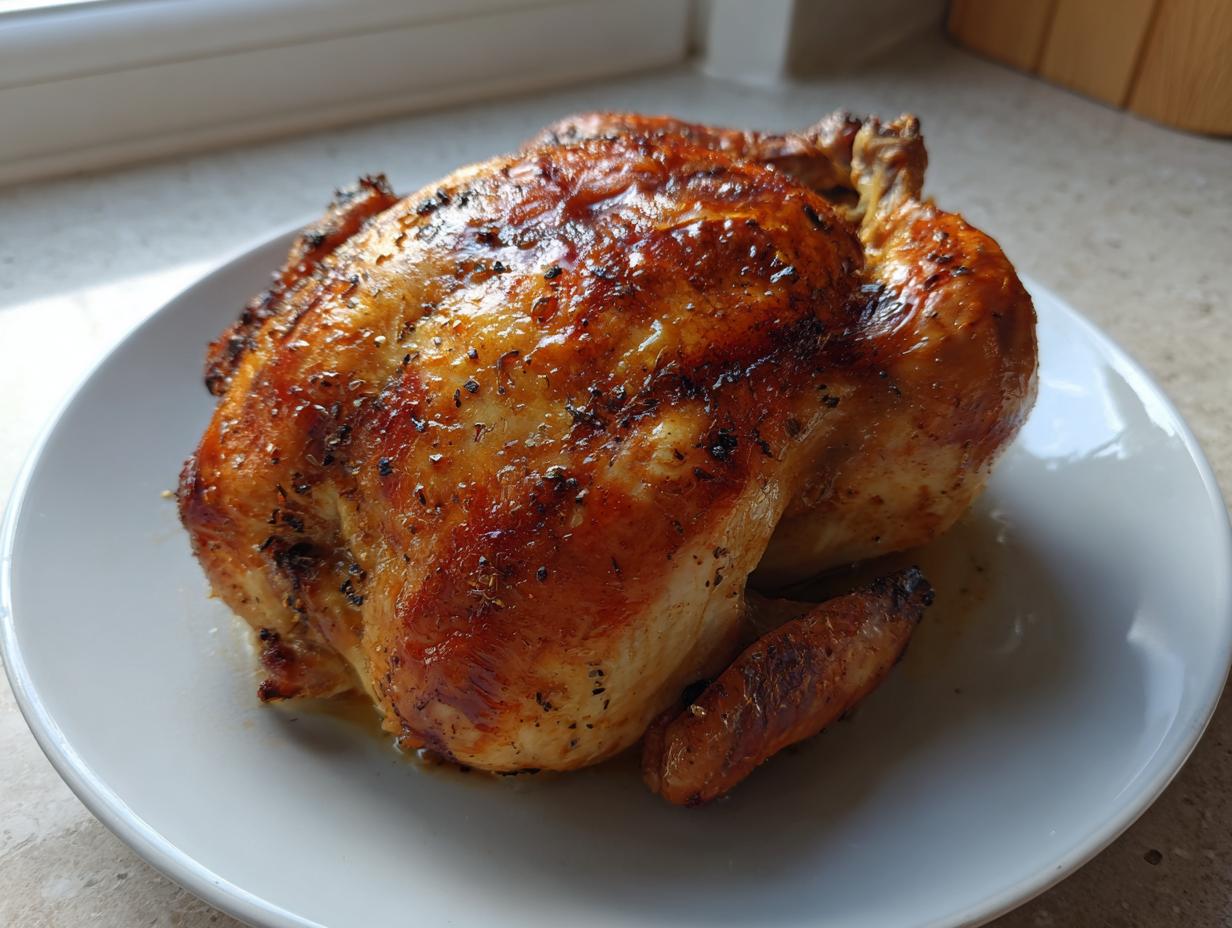
When people ask me what makes my roasted chicken stand out, it always boils down to two things: unbelievably juicy meat and skin you want to snack on all by itself. You don’t need a rotisserie, honestly! This is the Best Roast Chicken Ever because we focus on simple technique, not complicated gear. It’s all about setting the stage properly before it even hits the oven.

Achieving Crispy Skin Chicken Every Time
Listen up, because this is non-negotiable for crispy skin chicken: you have to dry that bird! I mean bone-dry. I use paper towels (so many paper towels!) inside and out. Moisture is the enemy of crispiness. After the drying ritual, we start hot—a quick blast at 425°F helps kick-start that glorious browning before the second phase. That high heat sets the skin right away.
The Secret to Juicy Roast Chicken: Herb Butter Under the Skin
If you only put butter on the outside, you’re missing the party! For truly juicy roast chicken, you need to gently lift the skin over the breasts and thighs. Rub about half of that beautiful garlic-herb butter directly onto the meat itself. This bastes the muscle from the inside out while the outside gets crisp. It’s protective flavor armor, and honestly, it’s the easiest way to guarantee tenderness.
Ingredients for Your Garlic Herb Roasted Chicken
Okay, gathering up your arsenal for this incredible Garlic Herb Roasted Chicken is part of the fun! I’ve kept the ingredient list super tight because when you use quality items, you don’t need a huge spice cabinet. Remember, we are aiming for simple flavor mastery here. Everything you need should be easy to find at any decent American grocery store, just like we do here at Food Dexterity. Don’t sweat the measurements too much once you’re comfortable, but for the first time, stick to these specifics!
- 1 whole chicken (about 4-5 lbs)
- 4 tablespoons unsalted butter, making sure it’s nice and softened—not melted, just pliable!
- 4 cloves garlic, completely minced—we want that potent flavor!
- 1 tablespoon fresh rosemary, finely chopped
- 1 tablespoon fresh thyme leaves
- 1 teaspoon salt (kosher or sea salt works best)
- 1/2 teaspoon black pepper
- 1 lemon, which you’ll cut halved for stuffing
- 1 small onion, quartered
Ingredient Notes and Substitutions
I know sometimes we look in the spice rack and realize we’re out of that one fresh thing. Don’t panic! The beauty of this recipe is its flexibility, even though I swore by fresh everything when I first started cooking. If you have to substitute, here are my rules.
First, the butter: Use real butter, please! It melts better and tastes richer than anything else. That fat content is essential for the crust.
Second, the herbs: If you’re out of fresh rosemary or thyme, you can absolutely use dried. But here’s the trick I picked up: use only about one-third of the amount. Fresh is potent; dried needs less space to release its flavor. So, instead of a tablespoon each of fresh, use about a teaspoon of dried rosemary and thyme. If you only have that mixed Italian seasoning on hand, that totally works too, just skip the rosemary and thyme and use a tablespoon of Italian seasoning in place of all of them.
Third, the aromatics: The lemon and onion stuffing does a lot of heavy lifting for internal moisture and aroma. If you absolutely can’t spare a lemon, use an orange half, or even just a few thick onion wedges. We just need something wonderful stuffed inside to steam the meat gently!
Step-by-Step Instructions for the Perfect Roasted Chicken
Alright, let’s get this bird into the oven! Following these steps sequentially is how we go from a plain chicken to that show-stopping, roasted chicken centerpiece. I break everything down because timing is everything when you’re juggling multiple temperatures. Grab your roasting pan or, if you have one, your cast-iron skillet—that always seems to give a better sear on the bottom, too!
Preparation: Drying and Butter Application for Easy Oven Chicken
First things first: Preheat your oven to a screaming hot 425 degrees Fahrenheit (that’s 220 Celsius). While that’s heating up, you need to prep your bird. Take that chicken out of its wrapper and pull out any little bags of giblets stuffed inside the cavity—toss those or save them for stock, but they absolutely do not go in the oven. Now for the crucial step for easy oven chicken that gets crispy skin: grab every paper towel you own and pat the entire thing dry. I mean it! Get the back, the front, and inside the cavity until you can’t absorb any more moisture.
Next, make that herb butter paste we mixed earlier. The application part is where the magic happens. Take your fingers—yes, use your hands, you get a better feel for it—and gently separate that skin from the breast meat and thigh meat. You aren’t ripping it off, just making pockets. Push about half of that glorious garlic-herb butter mixture right onto the meat under the skin. Then, take the rest of the butter and just coat the outside skin like it’s getting ready for a spa day. Finally, stuff your lemon halves and onion quarters right into the body cavity. Pop the whole thing into your hot pan.
Roasting Temperatures and Timing for Perfectly Cooked Chicken
We start hot to create a crust! Roast that chicken for exactly 15 minutes at 425°F. This shock treatment is what sets that beautiful skin.
Once those 15 minutes are up, you must immediately turn the oven down to 375°F (that’s 190 Celsius). Don’t open the door longer than necessary! Continue roasting for another 50 to 70 minutes. This second phase cooks the inside gently. How do you know when it’s done? You need a meat thermometer. Stick it deep into the thickest part of the thigh without touching the bone. When it reads 165°F (74°C), your perfectly cooked chicken is ready to come out!

The Essential Rest Period for a Better Roasted Chicken
You will be tempted to carve it right away. Don’t! This might be the hardest step, but it’s vital for a truly juicy roast chicken. Take the bird out of the oven, move it to a clean cutting board, and tent it loosely with foil. Let it hang out there for a minimum of 15 minutes. Seriously, 20 is even better if you can wait. What happens during this rest is that all those internal juices that were rushing around while cooking redistribute back into the meat fibers. If you cut it too early, all that beautiful moisture just pours out onto the board. Trust me on this resting time; it’s what separates good chicken from the best roast chicken ever.
When that rest is done, carve it up and serve it immediately! If you made any drippings, you can quickly whisk them with a little flour and broth right in the roasting pan for a super fast, super savory gravy—check out how I do that when I make garlic butter potatoes!
Tips to Achieve Rotisserie Style Chicken at Home
So, you want chicken that tastes like it spun over an open flame, but you live in an apartment with just an oven? I get it! Getting that rotisserie style chicken at home is totally achievable. We rely on technique rather than specialized equipment, which is very much the Food Dexterity way. It’s all about airflow and maximizing that crunchy skin all the way around, not just the top where the oven heat hits hardest.
If you really want to nail that evenly cooked, deeply browned look, you need to stop just plopping the chicken right into the bottom of a pan. Even if you are just looking for a simple chicken main dish, a little elevation goes a long way!

Trussing for Shape and Evenness
My notes said to mention trussing, and I always recommend it if you have some kitchen twine lying around. Trussing is just tucking the wings tight against the body and tying the legs together with twine. Why do we bother? Well, it pulls the whole bird into a nice, compact shape. This means the breast meat cooks more evenly with the thighs, stopping those gorgeous legs and wings from scorching while waiting for the massive breast to finish. It really helps mimic that tight, professional look of a whole roasted chicken recipe.
Using a Roasting Rack or Elevated Surface
Airflow is your secret weapon here! If you have a wire rack that fits inside your roasting pan, use it! Lifting the chicken off the bottom means hot air can circulate underneath, which guarantees a crispy bottom crust instead of a soggy one. If you don’t have a rack—and honestly, who uses theirs daily?—a cast-iron skillet is my favorite alternative for this recipe. The heavy metal distributes heat beautifully and gives you that lovely sear, though you’ll need to be careful when you get it out.
If you can’t tell, I’m obsessed with using drippings later for sauces, which is why I love repurposing flavors. For instance, I often use leftover chicken bits to make amazing rotisserie chicken tostadas later in the week! If you are looking for inspiration on how others achieve that perfect spin, even Ina Garten’s classic methods often rely on simple elevation, like checking out this advice on achieving that signature look.
Serving Suggestions for Your Whole Roasted Chicken Recipe
Now that you’ve got the absolute best roast chicken ever resting perfectly on your counter, you need companions for that glorious bird! A whole roasted chicken recipe this comforting deserves sides that are equally satisfying but don’t require you to use three extra pots and pans—we’re keeping it manageable around here!
Since we used tons of garlic and herbs in the butter, we want sides that can soak up those remaining savory juices left in the roasting pan. And speaking of drippings, don’t you dare throw them away! Just skim off the surface fat, then whisk in a little flour over the heat, slowly adding chicken broth until you have a quick, silky gravy. That’s the sauce you want drizzled right over the sliced meat.

When planning the mains to go with this for a great simple dinner idea, I always lean toward pairings that share that rustic, savory profile. Potatoes are almost required, right? Mashed potatoes are my ultimate suggestion because they are practically begging for that pan gravy. If you haven’t tried my garlic parmesan mash, now is the time!
If you need something green to cut through that richness, don’t grab frozen spinach—that’s too fussy. Roasted root vegetables or simple steamed green beans tossed with butter and a squeeze of lemon zest are perfect. They cook right alongside the resting chicken. This makes the whole meal feel super intentional for a special occasion, yet it’s entirely doable on a Tuesday night, making it the definition of comfort food chicken!
Storing and Reheating Leftover Roasted Chicken
Listen, if you miraculously have any leftovers from this amazing bird—and trust me, it reheats better than almost any other poultry—you need to treat it right. We worked so hard to get that meat juicy, and we aren’t going to ruin it with a quick zap in the microwave! Handling leftovers properly is part of being dexterous in the kitchen, making sure that comfort food chicken tastes great the next day, too.
When it comes to storing your whole roasted chicken recipe leftovers, the key is speed and airtight sealing. As soon as the chicken has cooled down after the initial rest (you don’t want to store it hot—that causes condensation and mushy skin!), carve it up. It’s much easier to reheat slices than to reheat the whole carcass, and slicing quickly gets the meat into the fridge.
Get that sliced meat into an airtight container. If you just leave it uncovered in a dish, it dries out fast. A good container will keep your meat fresh and moist in the refrigerator for about three to four days. That gives you plenty of time for a fantastic weeknight chicken meal later in the week!
Reheating for Juicy Roast Chicken Results
Nobody wants rubbery chicken! To maintain that glorious moisture, you have to reintroduce some steam when reheating. Forget just putting a slice of breast meat on a plate and microwaving it until it’s bouncy. No way!
My favorite hack for a truly juicy roast chicken the second time around is to reheat slices in a little liquid. Just put the carved meat into an oven-safe dish, pour a tablespoon or two of chicken broth or even water just around the edges (not over the meat!), cover the whole dish tightly with foil, and warm it gently in a 300°F or 325°F oven for about 10 to 15 minutes. The steam trapped by the foil rehydrates the meat perfectly!
If you are just reheating a couple of dark meat pieces, the microwave is fine, but keep the time short—maybe 60 seconds—and try covering the plate with a damp paper towel. The dark meat holds moisture better anyway, so it’s a bit more forgiving, but I still prefer that gentle oven reheating if I have the time for my easy oven chicken leftovers!
Frequently Asked Questions About Oven Roasted Poultry
I always get so many questions after people try this recipe because once you nail the basics of getting that crispy skin chicken, you start thinking about variations! Cooking an entire bird, or oven roasted poultry as some folks call it, can feel intimidating, but once you have a reliable guide, it’s just like any other simple dinner idea. Here are the things I hear most often!
Can I roast a smaller or larger chicken using this roasted chicken recipe?
Absolutely, you can shift the size of the bird, but you must adjust the time! The recipe is gauged for a 4 to 5-pound chicken. If you go bigger—say, a 6 or 7-pound bird—you need to give it more time during that lower temperature roasting phase at 375°F. I always estimate an extra 15 to 20 minutes of cooking time for every extra pound of weight you add, but listen, the thermometer is your best friend. Never trust the clock completely; rely on that 165°F reading in the thigh!
What temperature should the chicken reach to be safe?
This is the most important question for any poultry project! You absolutely must hit 165°F (that’s 74°C) in the darkest, thickest part of the thigh, making sure that probe isn’t touching any bone. If you take the chicken out exactly at 165°F, don’t panic when you rest it. Carryover cooking is real—the internal temperature keeps climbing for several minutes after it leaves the heat. It might climb another 3 to 5 degrees while resting, which is perfectly safe and means your meat will be tender, not tough or overcooked!
Can I make this a one-pan meal for a Weeknight Chicken Meal?
Yes, you totally can turn this into the ultimate weeknight chicken meal with almost zero extra effort! Since the chicken takes that high-heat blast first, you need veggies that can handle that heat or vegetables that you can toss in during the second, lower-temperature phase. About 20 minutes into the entire cook time (right after you drop the oven temp down to 375°F), toss diced potatoes, carrots, or even some hard squash around the base of the pan. They’ll roast beautifully in the rendered fat and juices while the chicken finishes. Minimal cleanup for maximum flavor!
Estimated Nutritional Data for the Roasted Chicken
If you’re tracking your macros or just curious about what you’re eating, here is the approximate nutritional breakdown for this roasted chicken recipe. Remember, this is based on the ingredient list provided and assumes you are serving a standard 6-ounce portion of cooked meat, mostly breast meat, and that you’re using the juices for moisture but not necessarily creating a super thick gravy laden with flour.
- Serving Size: 6 oz cooked meat
- Calories: 450
- Sugar: 0
- Sodium: 350
- Fat: 25
- Saturated Fat: 10
- Unsaturated Fat: 15
- Trans Fat: 0
- Carbohydrates: 0
- Fiber: 0
- Protein: 50
- Cholesterol: 150
Because we rely on natural fats from the butter and chicken skin for flavor, you’ll notice the fat content is higher here than on a skinless breast, but that’s where the flavor for your simple chicken main dish comes in! That fat is what keeps the meat from drying out as we work toward that perfect cook time.
Share Your Simple Chicken Main Dish Experience
Seriously, I want to know how this went for you! Did you manage to get that shatteringly crisp skin? Did your family agree this was the best roast chicken ever? Cooking is all about learning and sharing, and when you leave feedback, it helps me, and it helps the next person who is nervous about tackling a whole bird—that’s how we build confidence in the kitchen!
If you made this Simple Chicken Main Dish and loved it, please hit those stars and leave a review! Tell me what sides you served it with. I always love getting new ideas for easy pairings. If you have questions, drop them in the comments below or reach out directly via my contact page. Happy roasting, and I can’t wait to hear about your crispy results!
PrintThe Ultimate Easy Oven Roasted Chicken with Crispy Skin

Make a whole roasted chicken that is juicy inside and has perfectly crispy skin using simple garlic and herb butter. This recipe is ideal for a weeknight dinner or a special occasion.
- Prep Time: 15 min
- Cook Time: 1 hour 15 min
- Total Time: 1 hour 30 min
- Yield: 4 servings 1x
- Category: Dinner
- Method: Roasting
- Cuisine: American
- Diet: Low Fat
Ingredients
- 1 whole chicken (about 4–5 lbs)
- 4 tablespoons unsalted butter, softened
- 4 cloves garlic, minced
- 1 tablespoon fresh rosemary, chopped
- 1 tablespoon fresh thyme leaves
- 1 teaspoon salt
- 1/2 teaspoon black pepper
- 1 lemon, halved
- 1 small onion, quartered
Instructions
- Preheat your oven to 425 degrees Fahrenheit (220 degrees Celsius). Remove the chicken from its packaging and remove any giblets from the cavity. Pat the entire chicken dry, inside and out, with paper towels. This step is key for crispy skin.
- In a small bowl, mix the softened butter, minced garlic, chopped rosemary, thyme, salt, and pepper until combined into a paste.
- Gently loosen the skin over the chicken breasts and thighs. Rub about half of the herb butter mixture directly onto the meat under the skin. Rub the remaining butter mixture all over the outside of the chicken skin.
- Place the lemon halves and onion quarters inside the chicken cavity.
- Place the chicken in a roasting pan or a large cast-iron skillet.
- Roast the chicken for 15 minutes at 425 degrees Fahrenheit.
- Reduce the oven temperature to 375 degrees Fahrenheit (190 degrees Celsius). Continue roasting for 50 to 70 minutes more, or until a meat thermometer inserted into the thickest part of the thigh registers 165 degrees Fahrenheit (74 degrees Celsius).
- Remove the chicken from the oven. Let it rest on a cutting board, tented loosely with foil, for at least 15 minutes before carving. This allows the juices to redistribute, resulting in a juicier roast chicken.
- Carve and serve immediately.
Notes
- For extra crispy skin, you can lightly brush the chicken with olive oil before roasting.
- If you want a rotisserie style chicken at home, you can truss the legs together with kitchen twine before roasting.
- Use the pan drippings to make a simple gravy or sauce for serving.
Nutrition
- Serving Size: 6 oz cooked meat
- Calories: 450
- Sugar: 0
- Sodium: 350
- Fat: 25
- Saturated Fat: 10
- Unsaturated Fat: 15
- Trans Fat: 0
- Carbohydrates: 0
- Fiber: 0
- Protein: 50
- Cholesterol: 150