

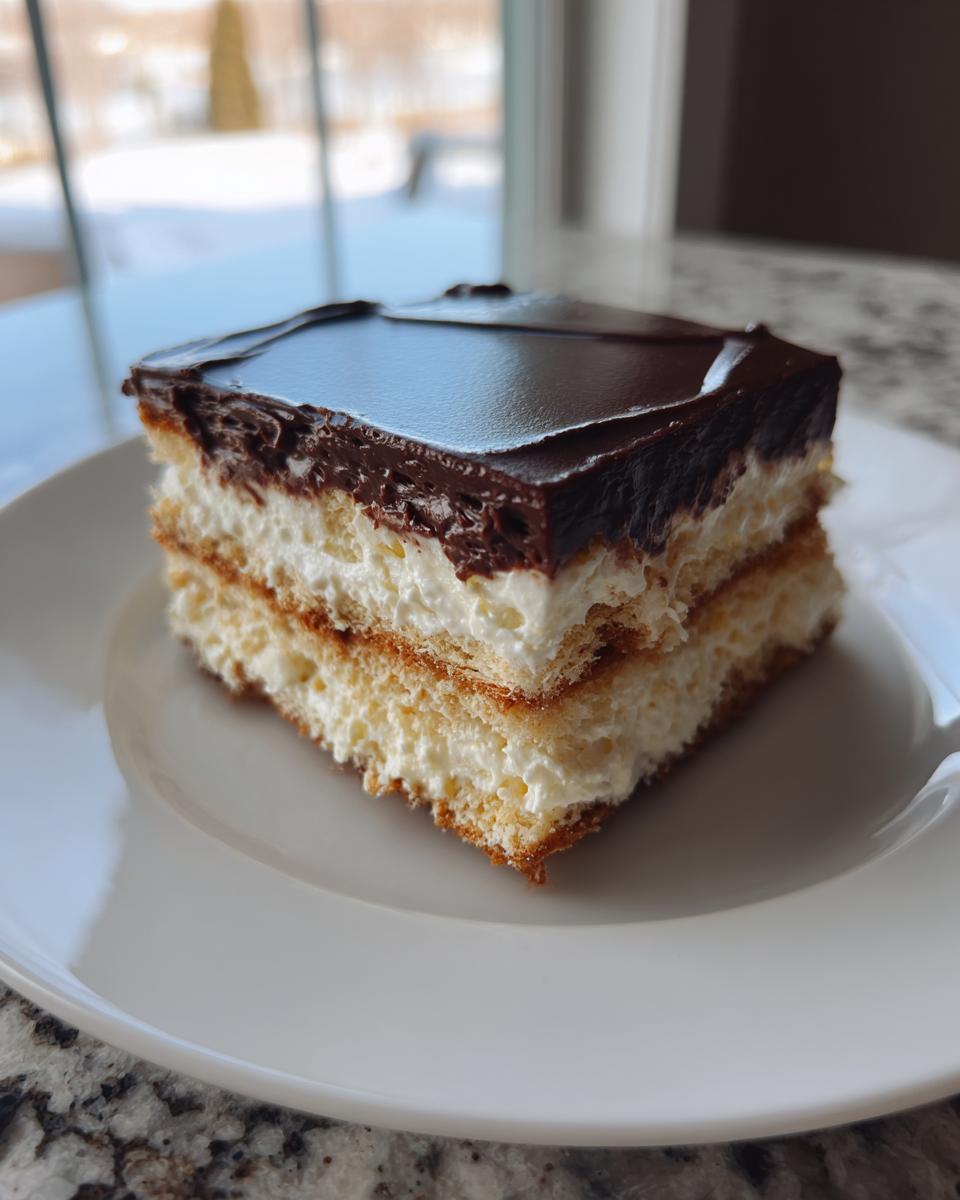
You know those days when you absolutely crave that perfect, creamy, chocolate-topped flavor of a classic French eclair, but the thought of making delicate pastry dough? No, thank you, not today! I totally get it. Back when I was running around planning big events, I learned fast that great flavor shouldn’t take an entire day. That sparked my whole philosophy here at Food Dexterity—making the comforting classics achievable, even when life is moving at lightning speed. That’s exactly why I’m sharing this recipe today. Forget the oven; this is the ultimate No-Bake Chocolate eclair cake, guaranteed to deliver that nostalgic hit with minimal effort on your part.
- Why This No-Bake Chocolate Eclair Cake is Your New Favorite Simple Summer Dessert
- Gathering Ingredients for Your Layered Eclair Cake
- Step-by-Step Instructions for the Eclair Cake Assembly
- Tips for Success with Your Make Ahead Chocolate Dessert
- Storage & Reheating Instructions for Your Chilled Pudding Cake
- Troubleshooting Common Issues with the Eclair Cake
- Frequently Asked Questions About the Easy Chocolate Eclair Dessert
- Estimated Nutritional Data for One Slice of Eclair Cake
- Share Your Experience Making This Decadent No Bake Treat
Why This No-Bake Chocolate Eclair Cake is Your New Favorite Simple Summer Dessert
Honestly, this dessert is my secret weapon for summer potlucks. When everyone else is sweating over their ovens, I just whip this up and let the fridge do the heavy lifting. It’s everything you love about that rich, creamy eclair flavor but simplified into a wonderful, layered format.
It has earned its spot as my go-to because it truly ticks every box:
- Zero Heat Required: Absolutely no oven use needed! This is a lifesaver when it’s blazing hot outside.
- Assembly is a Breeze: We’re talking about 20 minutes of active time, tops. You barely need a recipe card once you see the simple layering involved.
- Instant Crowd Pleaser: Trust me, this is one of those Quick Crowd Pleaser Desserts. Everyone goes wild for the combination of pudding, chocolate, and soft crackers.
- Make-Ahead Magic: It gets better overnight, so you can fully prepare it the day before your event. Instant peace of mind!
If you are looking for a truly Simple Summer Dessert that brings massive satisfaction with zero fuss, you’ve found it right here.
Gathering Ingredients for Your Layered Eclair Cake
Okay, let’s talk supplies! The beauty of this eclair cake is that you don’t have to run to any fancy specialty stores. Everything here is stuff you can grab easily on just one quick grocery run. I always keep vanilla pudding mix and graham crackers tucked away so I can whip this up if unexpected company shows up. This whole thing feeds about 12 people comfortably, and you’ll have about 20 active minutes of work before it hits the fridge for its long, quiet chill.
Just make sure you pay attention to the details here. “Instant” pudding is key, and all refrigerated/frozen elements must be properly thawed or cold, depending on what you’re mixing. This isn’t the time for guesswork; precision in preparation leads to that famous creamy result in this Graham Cracker Layer Cake.
Ingredients for the Creamy Vanilla Pudding Cake Filling
This filling is what gives us that wonderful melt-in-your-mouth texture that mimics the classic eclair pastry cream, only we’re using simple pudding and topping to get it there fast. You’ll need:
- One (14.4 ounce) package of instant vanilla pudding mix. Don’t grab the cook-and-serve kind—it won’t set up right!
- 3 cups of very cold milk. Seriously, make sure it’s cold so it whips up correctly.
- One (8 ounce) container of frozen whipped topping (like Cool Whip), fully thawed. Leave that out on the counter for a bit before assembling.
Ingredients for the Graham Cracker Layer Cake Structure
This is the structural workhorse, replacing all that fussy choux pastry!
- Two full packages (that’s 14.4 ounces *each*) of graham crackers. You need enough to make three solid layers, so don’t skimp!
Ingredients for the Simple Chocolate Topping Dessert Glaze
The crowning glory! This chocolate layer sets up beautifully over the cold filling. Remember, the frosting needs to be thawed but still thick, not runny.
- One (12 ounce) container of frozen chocolate frosting, completely thawed.
- One (14 ounce) can of sweetened condensed milk. Yep, the whole thing!
Step-by-Step Instructions for the Eclair Cake Assembly
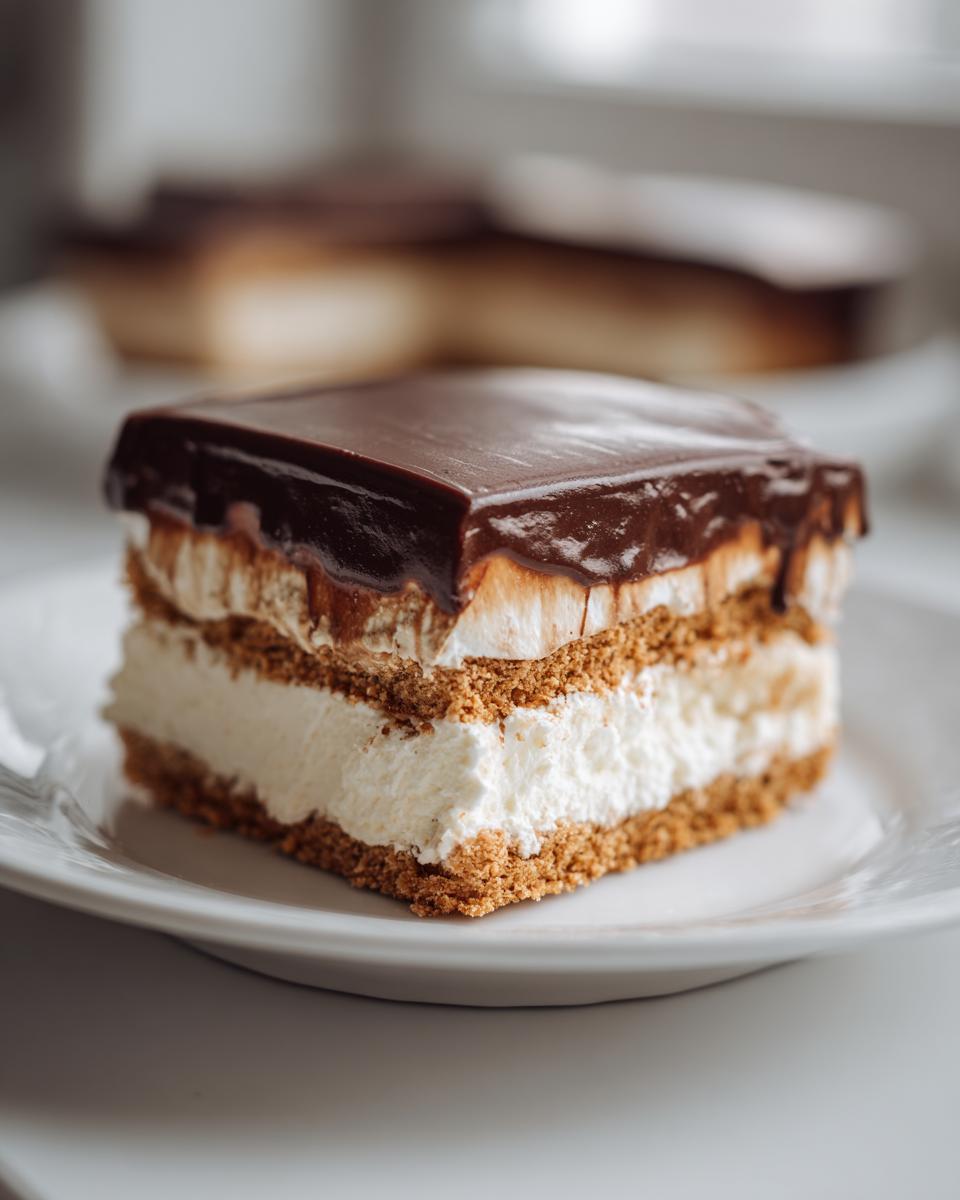
Alright, this is where the magic happens, and believe me, it goes together shockingly fast. If you have about 20 minutes before you need to walk away and let it set up, you’re golden. Don’t worry about turning on your stove; this entire No Bake Eclair Cake Recipe is assembly only! We are building this dessert in layers in a standard 9×13 inch dish, which makes serving up perfect slices super easy later on. We want this dessert to be as satisfying visually as it is to eat, just like the amazing recipes you can find popping up everywhere, like this fantastic one over at Make This Rich No Bake Eclair Cake Easily.
Creating the Creamy Vanilla Filling for the Eclair Cake
First things first, we need that luscious vanilla middle layer. Grab a big bowl—you’ll need room! Whisk your instant vanilla pudding mix right into the 3 cups of cold milk. You gotta be vigorous here; whisk it like you mean it for a solid two minutes until you see the mixture start to thicken up on its own. That instant stuff works fast! Once it’s thick, gently—and I mean gently—fold in your thawed whipped topping. I always use a spatula for this part so I don’t deflate all that lovely air we just whipped in. Once it’s barely marbled, set that bowl aside; it needs a little rest while we whip up the chocolate part.
Preparing the Chocolate Layer for the Eclair Cake
This step hardly takes any time at all, which is fantastic. Grab a separate bowl—we aren’t mixing this with the vanilla stuff. You’re just combining that can of sweetened condensed milk with your thawed chocolate frosting. Use a whisk or a sturdy spoon and stir until everything is completely smooth and glossy. If your frosting was a little stiff when you thawed it, you might need to scratch it a bit against the side of the bowl to help it blend, but honestly, just keep stirring until it looks decadent and uniform. This is going right on top, so we want it looking perfect!
Assembling the Graham Cracker Layer Cake
Now we build! Think of this like an icebox lasagna. Start by laying down one full layer of graham crackers right across the bottom of your 9×13 dish. Don’t leave big gaps; try to make them meet edge-to-edge. Next, take exactly half of that vanilla pudding mixture and spread it out smooth over those crackers. Trust me on the layering—it helps the crackers soften properly. Then, another layer of graham crackers goes on top. Then, spread the rest of the vanilla pudding over that second cracker layer. Finally, top it with the last layer of graham crackers. Go ahead and spread that beautiful, smooth chocolate frosting right over the very top layer. Cover it up tightly with plastic wrap. You can jump over to read up on some quick weeknight dinner ideas while this chills, but seriously, the next step is the hardest one—waiting!

Tips for Success with Your Make Ahead Chocolate Dessert
Listen, this chilled pudding cake looks simple—and it is!—but there are a couple of little things I learned early on that make the difference between an okay dessert and one that actually tastes like you spent hours fussing over it. Since this is an amazing make ahead chocolate dessert, getting the texture right during assembly is everything.
The absolute biggest secret to success is patience during the chilling phase. This isn’t like a no-bake cheesecake where you just want it firm. For this eclair cake to truly mimic that classic pastry experience, those graham crackers need time to absorb the moisture from the pudding. If you slice it immediately after 3 hours in the fridge, you get crunchy crackers. If you let it sit overnight, wow, what a difference! I promise you, leaving it covered in the fridge for at least 6 hours, but preferably until the next day, softens those crackers just perfectly so they melt in your mouth. It’s worth the wait, I swear!

Another key element for building that deeply creamy texture is the dairy you choose for the vanilla filling. The recipe calls for milk, but if you want the absolute creamiest, richest filling possible, use whole milk for mixing the pudding. Skim milk just doesn’t have the fat content needed to make that vanilla layer as luxurious as it should be. If you’re prepping ahead for a busy morning, you can always check out my ideas for quick lunch recipes to keep your weeknights stress-free while this cake chills!
If you’ve ever wondered about shortcuts or seen other versions out there, you might want to check out how The Absolute Foodie approaches their No Bake Eclair Cake as well! But honestly, sticking to the chilling instructions is the best advice I can give you for achieving that divine, melt-in-your-mouth texture everyone raves about.
Storage & Reheating Instructions for Your Chilled Pudding Cake
Okay, so you made it through the hardest part—the waiting! Now that your eclair cake is perfectly set, we need to make sure it stays that way until serving time. Since this is a very moist, chilled pudding cake, storage is all about keeping that wonderful texture and locking in the moisture so those graham crackers stay perfectly soft.
The key here is covering it up tight. Don’t even think about leaving this uncovered in the fridge, or you’ll end up with dry edges and a possibly cracked chocolate top. Use plastic wrap, making sure it touches the surface of the chocolate frosting as little as possible to prevent sticking. You can use tenting if you’re worried about the wrap sticking, but covering it well is essential.
When it comes to how long it lasts, this cake is surprisingly robust because of that high sugar content in the frosting and condensed milk. I find it tastes best within the first two days, but you can safely keep this covered tightly in the refrigerator for up to four days. If you’ve got leftovers, just serve them straight from the fridge. I never bother trying to “reheat” this, of course—it’s meant to be cold and refreshing!
This dessert is actually fantastic for making ahead of time. If you’re hosting a large group, making it the day before and letting those layers meld overnight is honestly the best move. It just makes the whole process stress-free on the day of your gathering! For more make-ahead baking tips, you might want to check out some of my thoughts on moist fruit cake recipes sometime, because planning ahead makes life so much calmer.
Troubleshooting Common Issues with the Eclair Cake
If you’re reading this, it probably means you got excited and dove in too early, or maybe your dairy ingredients weren’t feeling cooperative! Don’t panic. This eclair cake is super forgiving, but sometimes things don’t go exactly to plan, especially when you don’t use an oven to force things along.
Problem: My Vanilla Pudding Filling Isn’t Setting Up!
This is usually a temperature issue. If your pudding seems soupy even after whisking, your milk probably wasn’t cold enough when you started whisking, or you didn’t whisk long enough. Remember I said whisk for two minutes? Do it! If it still won’t cooperate, try popping the bowl into the freezer for about ten minutes—seriously, just long enough for the edges to start looking frosty. Keep folding gently after that. If you’re really desperate, sometimes adding just a tiny bit more dry pudding mix (like a tablespoon!) can help it grab that moisture, but go easy on that, or you’ll get a grainy texture.
Problem: The Graham Crackers Are Still Too Hard After Chilling
Ah, the dreaded crunchy layer! This almost always comes down to chilling time. If you didn’t let it sit overnight like I begged you to, you might have a hard layer. If you can’t wait, the absolute best fix is to use a little bit of steam from the spout of a just-boiled kettle (be super careful!) and hold the steam near the top of the cake for just a minute or two, then re-cover and chill for another hour. You’re trying to introduce a tiny bit of moisture vapor to help soften those crackers before you slice. Never try to microwave this, though; the pudding will explode!
Problem: My Chocolate Frosting Topping Is Stiff or Cracking
This usually happens for two reasons: either your frosting wasn’t thawed enough before you mixed in the sweetened condensed milk, or the cake got way too cold, maybe sitting near a vent in the fridge. If the frosting cracks when you spread it, don’t worry! Just gently warm a knife by dipping it in hot water and wiping it dry, and use that warm knife to smooth out the top layer again. If the whole topping feels rock hard, let the whole dish sit on the counter for 15 to 20 minutes before slicing; that little bit of warmth really loosens up the chocolate and condensed milk mixture perfectly.
Frequently Asked Questions About the Easy Chocolate Eclair Dessert
I get so many questions once people see how good this dessert looks! It sparks a lot of curiosity about changing things up, and honestly, that’s what cooking is all about—taking a great base and making it your own. But remember, we’re working with instant ingredients here, so sometimes too much change throws the texture off. Here are the most common things folks ask me about making this easy chocolate eclair dessert.
Can I use chocolate pudding instead of vanilla in this eclair cake?
You absolutely can, and it turns this into something closer to a chocolate cream pie situation, which is yummy! If you swap to chocolate pudding, I highly recommend you stick with vanilla or plain whipped topping for the fluffy part. If you use chocolate pudding *and* chocolate whipped topping, the whole thing might taste a little too heavy or monotonous. Mixing the chocolate pudding with the vanilla whipped topping keeps that signature contrast that makes the original so great. It’s a fun variation worth trying, though!
What happens if I skip the long chilling time for this No Bake Eclair Cake Recipe?
Oh, honey, don’t skip the chill time! That is the make-or-break step for this No Bake Eclair Cake Recipe. Remember that the graham crackers need hours to magically absorb the moisture from the pudding layers. If you cut into it too early—say, after just an hour or two—you’ll find yourself eating pudding layered with hard, crunchy crackers. That texture is jarring! We want that soft, tender mouthfeel that makes you think you’re eating real pastry. If you absolutely must cheat the clock, at least give it 4 hours, but overnight is truly where this layered eclair cake shines.
Are there any good substitutions for graham crackers in this Layered Eclair Cake?
Graham crackers are the traditional choice for a reason; they soak things up beautifully and offer that slightly grainy sweetness that works. However, if you’re in a pinch and need a different cracker layer cake base, vanilla wafers (like Nilla Wafers) work surprisingly well. They tend to stay a touch firmer than graham crackers, so you might need that extra overnight chill time to soften them up. Another option that people rave about is using thin shortbread cookies! They add a lovely buttery flavor, but again, they are dense, so give them extra time to absorb the filling. You can find some really neat ideas on quick healthy snack recipes if you’re looking for other quick ingredient swaps in general!
If you are ever in a real rush and need a fast dessert idea, definitely check out what the folks at Make Eclair Cake Without Ever Turning On Oven suggest for speeding things up, though patience is always my preferred ingredient for this specific dessert!
Estimated Nutritional Data for One Slice of Eclair Cake
Now, I always like to put this information out there because being transparent about what we’re eating is part of being a good home cook, right? But listen closely: these numbers are definitely estimates. I use standard grocery store ingredients, so your brands of condensed milk, frosting, or whipped topping might make these numbers shift just a little bit. This is just a general nutritional snapshot for one slice of this glorious chilled pudding cake.
Keep in mind that since this cake is meant to be a rich, satisfying treat, it does contain a decent amount of sugar and fat—but hey, that’s what makes it taste like a dreamy eclair!
- Serving Size: 1 slice (Trust me, you’ll want to cut reasonable slices, this stuff is decadent!)
- Calories: Around 450 per serving.
- Total Fat: About 22g, with 10g of that being saturated fat.
- Carbohydrates: Roughly 60g total, including about 45g of sugar.
- Protein: Around 5g.
- Cholesterol: Approximately 35mg.
We’re keeping the fiber pretty low here (only about 1g), as we aren’t exactly loading this up with fruit or whole grains, even if we are using graham crackers! It’s a dessert, folks, meant for enjoying special moments, not for everyday fuel. When you make this no bake chocolate eclair dessert, just enjoy it for what it is: a creamy, simple, absolutely delicious indulgence!
Share Your Experience Making This Decadent No Bake Treat
Now that you have the secrets for the perfect layered eclair cake, I truly hope you make it soon! This is the kind of dessert that deserves to be shared, and honestly, seeing your results is what keeps me excited about sharing these easy family-friendly recipes.
When you pull that tray out of the fridge after it’s chilled all night—oh, the smell of that chocolate settling over the creamy filling is just heavenly. Once you slice into it, please don’t be shy! I really want to hear how the crackers turned out for you. Did they soften just like the pastry in a classic eclair? Did your family even wait 6 hours before digging in?
I always ask everyone who tries a recipe here at Food Dexterity to leave a quick rating. Just tap those stars right below the recipe card! A five-star rating lets me know I delivered on that promise of an easy chocolate eclair dessert, and your comments give me great ideas for future recipes. If you post a picture on social media—and you totally should, because this cake looks amazing—tag me! I love seeing how you bring these simple meals and treats to life in your own kitchens. Your feedback here is how our little cooking community grows stronger and more trustworthy.
If you have any last-minute questions or ideas while you attempt this decadent no bake treat, don’t hesitate to pop over to the contact page to send me a message. If you’re looking for more inspiration on simple potlucks, check out what other folks are saying about their favorite versions, including this one mentioned by Easy No-Bake Eclair Cake. Go whip up some joy!
PrintEasy No-Bake Chocolate Eclair Cake

Make a rich, creamy dessert that tastes like a classic eclair without turning on your oven. This layered cake uses graham crackers, vanilla pudding, and chocolate frosting for a simple, crowd-pleasing treat.
- Prep Time: 20 min
- Cook Time: 0 min
- Total Time: 6 hr 20 min
- Yield: 12 servings 1x
- Category: Dessert
- Method: No-Bake/Chilling
- Cuisine: American
- Diet: Vegetarian
Ingredients
- 1 (14.4 ounce) package instant vanilla pudding mix
- 3 cups cold milk
- 1 (8 ounce) container frozen whipped topping, thawed
- 1 (14 ounce) can sweetened condensed milk
- 1 (12 ounce) container frozen chocolate frosting, thawed
- 2 packages (14.4 ounces each) graham crackers
Instructions
- Prepare the vanilla filling: In a large bowl, whisk the instant vanilla pudding mix and cold milk together until the mixture thickens, about 2 minutes.
- Gently fold the thawed whipped topping into the pudding mixture until just combined. Set aside.
- Prepare the chocolate layer: In a separate bowl, stir the sweetened condensed milk and the thawed chocolate frosting together until smooth.
- Assemble the cake: Line the bottom of a 9×13 inch baking dish with a single layer of graham crackers.
- Spread half of the vanilla pudding mixture evenly over the graham crackers.
- Place a second layer of graham crackers on top of the pudding.
- Spread the remaining half of the vanilla pudding mixture over the second layer of crackers.
- Place a third layer of graham crackers on top of the pudding.
- Spread the entire chocolate frosting mixture evenly over the top layer of graham crackers.
- Cover the dish tightly with plastic wrap.
- Chill the cake in the refrigerator for at least 6 hours, or preferably overnight, before slicing and serving.
Notes
- Chilling overnight allows the graham crackers to soften completely, giving the cake a texture similar to the pastry in a real eclair.
- If you need to speed up the chilling process, you can freeze the cake for 2 hours, but the texture will be firmer.
- Use whole milk for the creamiest vanilla filling.
Nutrition
- Serving Size: 1 slice
- Calories: 450
- Sugar: 45
- Sodium: 350
- Fat: 22
- Saturated Fat: 10
- Unsaturated Fat: 12
- Trans Fat: 0.5
- Carbohydrates: 60
- Fiber: 1
- Protein: 5
- Cholesterol: 35