

You know those moments when you just need something crunchy? Something tangy? Something that totally screams ‘Game Day’ or ‘I deserve a snack right now’? For me, that craving always hits hard for perfectly seasoned, crispy, salty, *sour* goodness. That’s why I had to nail down the ultimate recipe for **Fried Pickles**—and I mean *nail it*!
When I first started shifting to cooking for a busy life, ditching the takeout meant I had to figure out how to bring those irresistible restaurant favorites home without spending hours in the kitchen. This recipe is the culmination of that effort. We’re making unbelievably crispy fried pickles today, and the bonus? We’ve got instructions whether you want that classic, indulgent deep-fried crunch or a lighter, speedier version made right in your air fryer. Trust me, the coating stays perfectly intact either way!
Plus, because everyone loves bringing a piece of the restaurant experience home, we’re also diving into a killer Texas Roadhouse copycat dipping sauce. Get ready, because these zesty pickle bites are about to become your absolute new favorite appetizer.
- Why This Crispy Fried Pickles Recipe Works Every Time
- Gathering Ingredients for Perfect Fried Pickles
- How to Make Homemade Fried Pickles: Step-by-Step Instructions
- The Best Fried Pickle Dip: Texas Roadhouse Fried Pickles Copycat Sauce
- Tips for Perfect Fried Pickles Every Time
- Serving Suggestions for Your Crispy Fried Pickles
- Storage and Reheating Instructions for Fried Pickles
- Frequently Asked Questions About Making Fried Pickles
- Estimated Nutritional Data for Fried Pickles
- Estimated Nutritional Data for Fried Pickles
Why This Crispy Fried Pickles Recipe Works Every Time
I’ve tried so many versions of fried pickles over the years, and I’m telling you, this crispy fried pickles recipe is different. The secret isn’t just the seasoning—though that zesty blend is divine—it’s all about managing moisture. That’s why we emphasize draining those pickles until they practically beg for mercy!
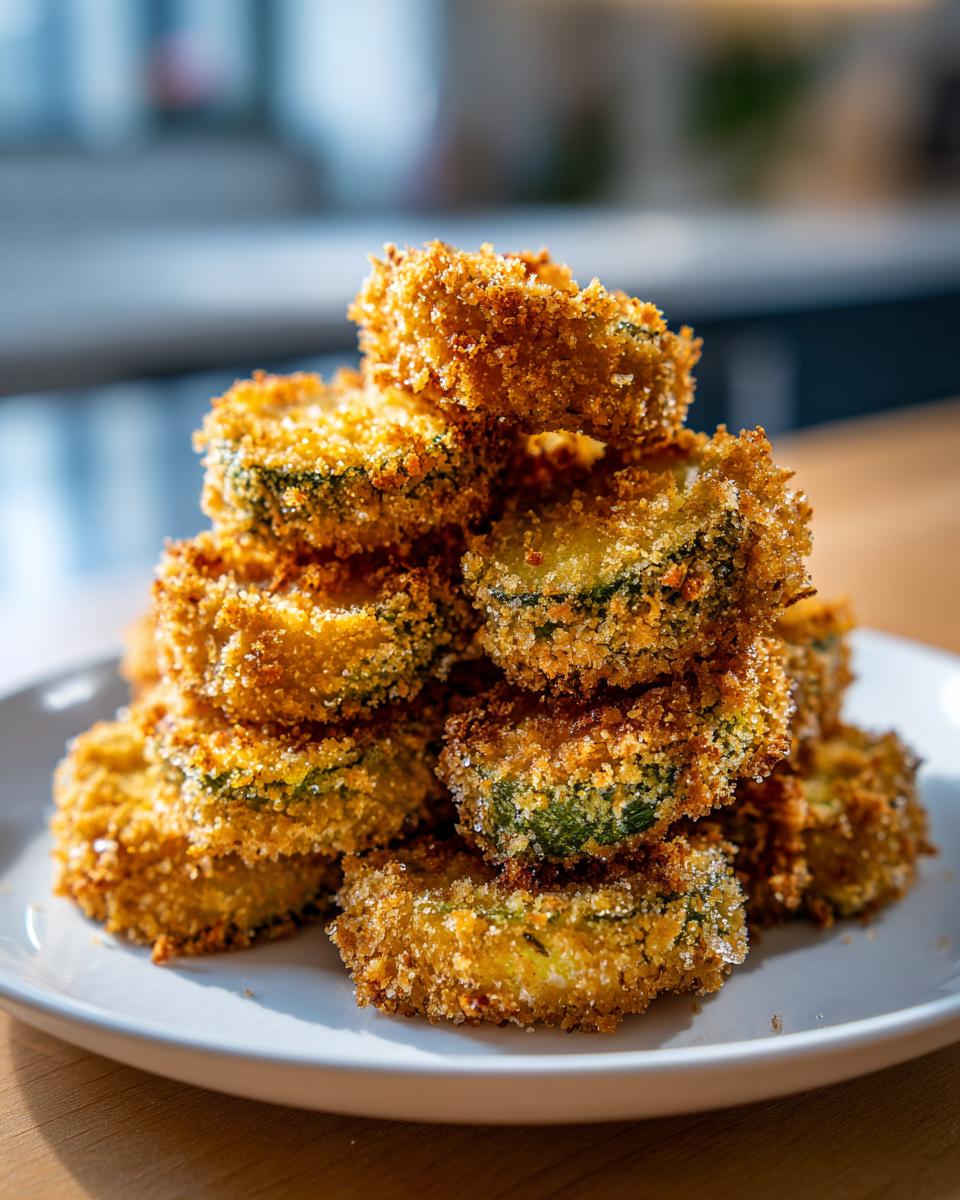
We get that spectacular crunch because we rely on Panko breadcrumbs; they create these beautiful shards of texture that just melt in your mouth. Whether you use your deep fryer or you’re going for the healthier fried snacks route in your air fryer, this coating holds up beautifully. And here’s a pro tip I learned the hard way: chill the breaded pickles for 15 minutes before cooking. It locks that coating in place, guaranteeing the best tangy crispy treats you’ve ever had. For more quick, reliable recipes like this, check out my guide on easy weeknight dinners for busy days.

The Secret to Truly Crunchy Pickle Chips
You absolutely cannot skip the drying step if you want crunchy pickle chips. Seriously, wrap those sliced dills paper towels and press down hard. Water is the enemy of crispiness, you know? Once they’re dry as a bone, we move straight into the dredging station. By using that coarse Panko instead of regular breadcrumbs, we increase the surface area available to crisp up in the hot oil or spray. It’s kitchen science, but trust me, it delivers that audible crunch we are all after!
Gathering Ingredients for Perfect Fried Pickles
Okay, getting our setup ready is half the battle. When I shop for this, I make sure I grab everything at once so I can fly through the dredging station later. Getting those perfect fried pickles is all about having the right roster of ingredients ready to go.
Remember what I keep saying—you have to start with the driest pickles possible! We’re using standard dill pickle chips today because they cook fast and give you that great surface area for coating, but you can absolutely experiment later. Here is exactly what you need for the pickles and the coating:
- 1 jar (16 ounces) dill pickle chips, drained and patted very dry
- 1 cup all-purpose flour
- 1 teaspoon salt
- 1 teaspoon black pepper
- 1 teaspoon garlic powder
- 1 teaspoon onion powder
- 1/2 teaspoon paprika
- 1/4 teaspoon cayenne pepper (optional, if you like some kick!)
- 2 large eggs
- 1/2 cup milk
- 1 cup panko breadcrumbs (Don’t skip the Panko! This is your crunch insurance.)
- Vegetable oil, for deep frying (I usually pour in about 3 cups, depending on my pot.)
- Cooking spray (If you’re going the air fryer route, you’ll need this.)
That seasoning blend is so flavorful, too. It’s simple stuff that makes a huge difference. We’re mixing those dried seasonings right into the flour so every single pickle bite gets coated in flavor before it even hits the heat. It feels very Southern and rustic, just how I like my southern fried pickles!
How to Make Homemade Fried Pickles: Step-by-Step Instructions
Now for the fun part! Learning exactly how to make fried pickles that come out golden and crisp, not sad and soggy, is all about setting up a proper dredging station. We need three bowls, right in a row, to move those poor pickles along their journey to deliciousness. If you’re already thinking about other crispy snacks, I have my air fryer crispy potato chip guide that uses almost the same setup!
First bowl: the seasoned flour mixture we made up earlier. Second bowl: the egg and milk wash. Third bowl: this is where the magic happens—our Panko breadcrumbs. Take a few of those super-dry pickle chips and give them a good toss in the flour first. Make sure they are totally coated and shake off any clumps clinging on for dear life.
Next, they jump into the egg wash—just a quick dunk is all they need so the crumbs have something to stick to. Then, press them firmly into the Panko. Really get those breadcrumbs stuck on there! Once they are fully coated, set them on a clean wire rack. Remember that chilling tip I mentioned? This is when you pop that rack into the fridge for about 15 minutes. It makes a huge difference in preventing fallout during cooking, especially if you’re making larger batches like I sometimes do for get-togethers.

Method 1: Deep Fried Fried Pickles for Maximum Flavor
If you want that decadent, authentic crunch that only hot oil can deliver, this is your method for stellar deep fried snacks. Get your vegetable oil heating up in a heavy pot—you need about 2-3 inches depth—until it hits exactly 375°F (190°C). Temperature is critical here!
Safety check first: Always use tongs or a spider strainer to gently lower the coated pickles into the hot oil. Do not overcrowd the pot; this drops the oil temperature fast and you end up with greasy, pale pickles instead of golden ones. Fry them quickly, aim for just 1 to 2 minutes until they look perfectly golden brown. Pull them out right away and let them drain on paper towels. Amazing!
Method 2: Air Fryer Fried Pickles for Healthier Fried Snacks
For those days where I want that crunch without having a pot of oil going, the air fryer is my best friend. Preheat your machine to 390°F (199°C). You still need to treat the coating nicely, so arrange your breaded bites in a single layer in the basket—no overlapping allowed, or they steam instead of fry! For beautiful golden brown fried pickles, give the tops a good, light spray of cooking spray right before they go in.
Cook these air fryer fried pickles for about 8 to 10 minutes total. The key here is to flip them halfway through so both sides get that satisfying crispness. A little spray on the second side doesn’t hurt either! This method is fantastic for making these crunchy pickle chips fast. If you want to see how I use the air fryer for things like potato croquettes, check out that post!
The Best Fried Pickle Dip: Texas Roadhouse Fried Pickles Copycat Sauce
Okay, let’s be real. You can have the crunchiest, most perfectly seasoned fried pickles in the world, but they’re only half the battle. What makes them truly legendary? The dip! This is where we pull out the big guns and make a sauce that rivals any fancy restaurant appetizer spread. People search everywhere for the Texas Roadhouse fried pickles copycat experience, and the sauce is usually the missing link.
While you might think of it as fried pickles with ranch, this version is slightly different—it’s zingier, tangier, and has this amazing horseradish depth that cuts right through the rich, fried coating. It’s honestly my favorite part of the whole snack! If you end up with extra sauce (which is unlikely, trust me), you can use it on other things, like my recipe for easy homemade nacho cheese—it adds a nice spice!
Here’s how quick this is. You seriously just mix everything together. No cooking, no heating, just pure mixing mastery. If you’re looking for other amazing dip recipes for your next party, check out the whipped hot honey dip, but for now, focus on this dynamite sauce.
To get that unforgettable flavor profile that so many people hunt down, you need:
- 1 cup mayonnaise (Use good quality mayo, it matters!)
- 1/4 cup ketchup
- 1 tablespoon prepared horseradish (This is the secret weapon for that kick!)
- 1 teaspoon Worcestershire sauce
- 1/2 teaspoon smoked paprika
- 1/4 teaspoon black pepper
Just throw all those glorious components into a bowl. Whisk them until they are perfectly smooth and combined. Now, this is important: You must chill this sauce for at least 30 minutes before serving. Why? It lets those zesty flavors—especially the horseradish and Worcestershire—really meld together. It stops it from tasting like separate ingredients and turns it into *the* dip. If you want to see where this copycat sauce idea originated, I found a great reference here: Texas Roadhouse Fried Pickles Copycat.

When you serve up these golden fried bites alongside this sauce, you’ll get huge applause. It just takes your crispy, tangy treat to a whole new level of satisfaction. Don’t skip the chill time, that’s non-negotiable for the best results!
Tips for Perfect Fried Pickles Every Time
Okay, you’ve made it this far, and you’re ready to fry, but I want to share a few little secrets I rely on when I’m whipping up a batch of southern fried pickles. Everyone strives for that perfectly crisp coating, but sometimes things just don’t go as planned. Don’t toss them out! Usually, it’s a super simple fix that we can troubleshoot right now.
A lot of people think fried food is inherently difficult, but honestly, it’s just about temperature control and prep work. If you’re making any kind of coated snack, like my famous fried chicken wings, the same rules about dryness and heat apply here.
Troubleshooting Common Fried Pickles Issues
The number one issue I hear about is a soggy coating. If your beautiful breaded pickles come out looking pale and greasy instead of golden brown fried pickles, I have two guesses for you. Nine times out of ten, it means your heating medium—whether it’s oil or the air fryer—wasn’t hot enough when you dropped them in. Cool oil soaks into the coating instead of instantly sealing it, so you get sogginess.
If you’re deep frying and the oil temperature dropped low, pull the current batch out, let the oil recover its heat, and then drop in smaller batches next time. Don’t overcrowd the pot!
The other issue? Seasoning that won’t stick. If you find the flour or Panko flakes just falling off in the oil, go back to step one: those pickles weren’t dry enough! Even if you patted them down once, run them through a second round of paper towels. Also, make sure you are really pressing that Panko firmly onto the egg-washed pickle. You want the coating to feel fully bonded before they go anywhere near high heat.
Finally, what about flavor? If your seasoning seems flavorless, it means your flour step wasn’t thorough enough. Make sure you whisk that flour mixture really well so the salt, pepper, and spices aren’t clumped. Every single pickle needs to travel naked through that seasoned flour layer! That’s how you ensure flavor in every single one of these tangy crispy treats.
Serving Suggestions for Your Crispy Fried Pickles
Once these beauties come out of the oil or the air fryer, they are ready to serve immediately. Seriously, hot and crispy is the only way to go! While my copycat ranch-style dip is fantastic, don’t let that stop you from getting creative. These fried pickles are such a versatile snack, they belong everywhere delicious happens.
For game days, they are definitely king. I always put out a huge bowl of these when we have friends over, maybe alongside some cheesy dips or wings. They disappear faster than anything else! They are truly one of those crowd pleasing appetizers that gets everyone chatting about how amazing they taste.
But I love using them for more than just dipping! Think about how great the tangy crunch is on top of other things. Have you ever tried crushing a few up and sprinkling them over a hearty salad instead of croutons? It’s wild! Or, if you’re making burgers, skip the boring pickle slices on the side and pile a few of these on top instead. The crunch and savoriness elevate a simple burger instantly. Check out my recipe for the ultimate juicy burger—I promise, topping it with these fried pickles is a game-changer for your next backyard cookout. These are spectacular game day snacks because they are just so addicting!
If you aren’t serving them hot right away, make sure you’ve got a good surface for them to rest on. Don’t let them stack up in a mound; they’ll steam themselves! A big wire rack is your friend here, even if you just transferred them out of the deep fryer for a minute before they hit the serving platter.
Storage and Reheating Instructions for Fried Pickles
Listen to me closely: Fried Pickles are truly at their peak performance the second they come out of the hot oil or the air fryer basket. I mean it! They are meant to be eaten piping hot, right then and there, while the coating is aggressively crispy and the pickle inside is warm. That’s the magic window, and if you can manage it, serve them immediately!
Now, life happens, right? Sometimes you make a huge batch for a party, and you end up with extras. Here’s the hard truth: these don’t keep well in the fridge. Storing them in an airtight container overnight means the coating is going to absorb moisture and turn soft. It happens to the best of us, but you have to manage expectations if you’re saving leftovers.
If you absolutely have to save them for later, spread them out on a plate (don’t pile them up!) and cover them loosely with a paper towel before chilling. They won’t be crispy anymore, but at least they won’t get gummy on top of each other. If you need ideas for making an amazing meal for later, check out how I simplify slow cooker recipes with my easy crockpot steak bites!
But here’s the good news: we can bring back that satisfying crunch! The only way I recommend reheating these is using your air fryer. Forget the microwave entirely; that just steams them into sad little sponges. Set your air fryer to about 375°F (190°C).
Lay the leftover fried pickles in a single layer in the basket—again, no overcrowding! Spray them lightly with oil if you can. Pop them in for 4 to 6 minutes. Keep an eye on them, because they heat up fast. When they come out, that beautiful, crunchy coating should be totally revived. We’re looking for that signature crispiness again. It takes a little effort, but it’s so much better than tossing them out, don’t you think?
Frequently Asked Questions About Making Fried Pickles
It is completely normal to have questions when you are trying to perfect something new in the kitchen, even something as fun as fried pickles! I get asked the same things all the time, especially when folks are trying to move beyond just making standard appetizers and aiming for that truly crunchy perfection.
I’ve tried to cover all the main hurdles in the recipe above, but let’s tackle a few more FAQs here so you feel totally ready to get that coating golden brown and sticking perfectly. If you’re interested in other ways to use dill pickles—maybe not fried—you might like my dill pickle chicken salad recipe for a fresh twist!
Can I use pickle spears instead of chips for these Fried Pickles?
Yes, absolutely you can! Spears are often even nicer for dipping, if you think about it. The one thing you have to remember is that spears are much thicker than those quick-cooking chips. If you switch to spears, you must increase your cooking time slightly, whether you’re deep frying or air frying. You need that extra minute or two to make sure the center of the pickle heats up all the way through, otherwise you’re left with a cold center inside a perfectly cooked crust. Just watch them closely so the coating doesn’t get too dark before the heat penetrates!
What is the best way to get extra zesty flavor in my Fried Pickles?
Oh, I love this question because it gets right to dialing up the zing factor! If you feel like the pickle itself isn’t bringing enough punch, you can easily boost the flavor in the breading itself. My favorite trick is to add a small pinch of dried dill or maybe some Italian seasoning right into that flour mixture along with the salt and pepper. It really amps up that classic herby, tangy flavor profile we associate with great dill pickle recipes.
Here’s a bolder move, though: Instead of using plain milk in your egg wash, use the actual pickle juice you drained off earlier! It adds an extra layer of pickle tang right to the coating, which helps those zesty flavors come through in every bite. You won’t regret this little tweak when you bite into one of these tangy crispy treats!
Can I make the breaded coating ahead of time?
You can, but it needs a solid chill! As I mentioned in the main instructions, coating them beautifully is only step one. If you want to prep for a party or just get ahead of things, bread the pickles entirely, place them on a rack, and pop them in the fridge for about 30 minutes. This helps the flour and Panko really adhere to the pickle surface. If you try to cook them straight away without that chill time, you risk having your beautiful coating fall off when it hits the hot oil. If you chill them longer than an hour, though, say overnight, you risk moisture creeping back in—so aim for that short chill if you can!
What is the best oil to use for deep frying?
When you are doing any sort of deep frying, you want something with a high smoke point so it doesn’t burn up before your food is cooked. For these homemade fried pickles, I almost always reach for standard vegetable oil because it’s economical and works beautifully at the required 375°F. Canola oil is also a fantastic choice for the same reasons! Just make sure you’re using enough oil—at least 2-3 inches deep—so that the pickles are fully submerged and fry evenly. Using too little oil means they rest on the bottom and get way too greasy, and we definitely want crispy, not greasy!
Can I use sweet pickles instead of dill?
You certainly *can*, but you’re definitely moving away from the classic fried pickles profile everyone craves! Sweet pickles bring a lot of sugar into the mix. When you heat them, the sugar caramelizes very fast, meaning you might burn the coating while waiting for the thicker pickle inside to heat through. If you try it, definitely go the air fryer route on a slightly lower temperature (maybe 375°F) and watch them like a hawk. If you love that sweet and salty thing, you might even decide you prefer the dipping sauce on these over my copycat recipe!
We’ve covered the deep fry, the air fryer, the rockstar sauce, and all the troubleshooting advice you could ever need to make these your go-to easy appetizer recipes. Making something this addictively crunchy at home just proves you don’t need to rely on takeout for your favorite fun snacks.
These crispy bites, whether you call them zesty pickle bites or just the best snack ever, are all about that initial crunch contrasted with the tart dill inside. Remember that chilling step, dry everything out perfectly, and you will be set. I hope these quick snack ideas make your next gathering a wild success!
Estimated Nutritional Data for Fried Pickles
Now, I like to be totally transparent about what we’re eating, and that includes giving you some numbers. Keep in mind that these estimates are based on using the deep-frying method, since that tends to soak up the most fat. If you used the air fryer method, your fat and calorie counts will be significantly lower! These numbers are just a starting point so you know what you are working with when you make these amazing crowd pleasing appetizers.
This data should give you a good idea of the profile for one serving (which is 1/4 of the recipe, *not* including that amazing dipping sauce we made!):
- Serving Size: 1/4 of recipe (without sauce)
- Calories: 350
- Fat: 22g
- Saturated Fat: 4g
- Unsaturated Fat: 18g
- Trans Fat: 0g
- Cholesterol: 75mg
- Sodium: 850mg
- Carbohydrates: 30g
- Fiber: 2g
- Sugar: 3g
- Protein: 8g
As you can see, the fat content jumps up with deep frying, but these are treats, right? If you are planning on using these as air fryer appetizer ideas, know that those healthier fats are substantially reduced because you aren’t submerging them in oil. Either way you choose—deep fry or light air fry—you end up with a winner. Enjoy every crunchy, savory bite!
PrintThe Ultimate Crispy Fried Pickles: Deep Fried vs. Air Fryer (Plus Texas Roadhouse Copycat Dipping Sauce)

Make perfectly crispy, seasoned fried pickles at home using either a deep fryer or an air fryer. This recipe includes instructions for the crunchy pickle chips and a zesty ranch dipping sauce inspired by Texas Roadhouse.
- Prep Time: 20 min
- Cook Time: 10 min
- Total Time: 30 min
- Yield: 4 servings 1x
- Category: Appetizer
- Method: Deep Frying or Air Frying
- Cuisine: American
- Diet: Vegetarian
Ingredients
- 1 jar (16 ounces) dill pickle chips, drained and patted very dry
- 1 cup all-purpose flour
- 1 teaspoon salt
- 1 teaspoon black pepper
- 1 teaspoon garlic powder
- 1 teaspoon onion powder
- 1/2 teaspoon paprika
- 1/4 teaspoon cayenne pepper (optional)
- 2 large eggs
- 1/2 cup milk
- 1 cup panko breadcrumbs (for extra crispiness)
- Vegetable oil, for deep frying (about 3 cups)
- Cooking spray (for air frying)
Instructions
- Prepare the pickles: Drain the pickle chips thoroughly. Place them between several layers of paper towels and press firmly to remove as much moisture as possible. Dry pickles are key to crispiness.
- Set up the dredging station: In one shallow bowl, whisk together the flour, salt, pepper, garlic powder, onion powder, paprika, and cayenne pepper.
- In a second shallow bowl, whisk the eggs and milk together until combined.
- In a third shallow bowl, place the panko breadcrumbs.
- Dredge the pickles: Take a handful of dried pickle chips and dredge them first in the flour mixture, shaking off excess. Dip them into the egg mixture, letting excess drip off. Finally, press them firmly into the panko breadcrumbs, ensuring they are fully coated. Place coated pickles on a wire rack.
- For Deep Frying: Heat 2-3 inches of vegetable oil in a heavy-bottomed pot or deep fryer to 375°F (190°C). Carefully drop the pickles into the hot oil in small batches, avoiding overcrowding. Fry for 1 to 2 minutes, or until golden brown and crispy. Remove with a slotted spoon and drain on a paper towel-lined plate.
- For Air Frying: Preheat your air fryer to 390°F (199°C). Lightly spray the air fryer basket with cooking spray. Arrange the breaded pickles in a single layer in the basket (work in batches). Lightly spray the tops of the pickles with cooking spray. Air fry for 8 to 10 minutes, flipping halfway through, until golden brown and crunchy.
- Serve immediately with the Copycat Dipping Sauce.
Notes
- For the best results, chill the breaded pickles on the wire rack for 15 minutes before frying or air frying. This helps the coating adhere better.
- If making the Texas Roadhouse Copycat Dipping Sauce, mix 1 cup mayonnaise, 1/4 cup ketchup, 1 tablespoon prepared horseradish, 1 teaspoon Worcestershire sauce, 1/2 teaspoon smoked paprika, and 1/4 teaspoon black pepper. Mix well and chill for at least 30 minutes before serving.
- Use dill pickle chips for the classic flavor profile.
Nutrition
- Serving Size: 1/4 of recipe (without sauce)
- Calories: 350
- Sugar: 3
- Sodium: 850
- Fat: 22
- Saturated Fat: 4
- Unsaturated Fat: 18
- Trans Fat: 0
- Carbohydrates: 30
- Fiber: 2
- Protein: 8
- Cholesterol: 75