

Ugh, Tuesdays. You know those nights? You stare into the fridge, the clock is ticking, and the thought of washing three pots and two pans feels like climbing Mount Everest? I totally get it. That pressure to get something delicious, flavorful, and reasonably healthy on the table fast used to keep me up at night. But listen, that’s where true food dexterity comes in! I developed this incredibly simple Hawaiian Chicken Sheet Pan recipe specifically to fight that weeknight chaos. It brings a big, bold tropical punch—all the sweet, tangy goodness—but the cleanup is almost zero. That’s my whole deal here at Food Dexterity: making real-life, exciting food achievable, not intimidating. Trust me, this is about to become your go-to solution!
- Why This Hawaiian Chicken Sheet Pan is Your New Weeknight Hero
- Gathering Ingredients for Your Hawaiian Chicken Sheet Pan
- Step-by-Step Instructions for the Hawaiian Chicken Sheet Pan
- Tips for the Perfect Juicy Chicken Sheet Pan
- Serving Suggestions for Your Hawaiian Chicken Dinner
- Storage and Reheating Instructions for Leftover Hawaiian Chicken Sheet Pan
- Frequently Asked Questions About This Pineapple Chicken Recipe
- Nutritional Estimates for Your Hawaiian Chicken Sheet Pan
- Share Your Fast Family Dinner Idea
Why This Hawaiian Chicken Sheet Pan is Your New Weeknight Hero
When I say this dish is a hero, I mean it. It truly solves the biggest dinner dilemma: how do you get amazing flavor without spending an hour cooking and another hour scrubbing? This recipe means you spend maybe fifteen minutes prepping, and then you let the oven do all the messy work. It’s the definition of an Easy Sheet Pan Meals success story.
Speed and Minimal Cleanup Dinner
Forget soaking pans overnight! Because you’re just loading everything onto one rimmed baking sheet lined with parchment, cleanup is genuinely a breeze. We’re talking about having a full, delicious dinner on the table, start to finish, quick enough for even the most chaotic evening. It really shines as a Minimal Cleanup Dinner solution when you are tired.
The Flavor Profile: Sweet and Savory Chicken Bake
But ease isn’t everything; it has to taste fantastic, right? This is where the tropics come alive! The sauce—a perfect blend of tangy pineapple juice, brown sugar, and savory soy—caramelizes beautifully in the oven. Every bite is that perfect balance we crave. It truly is a fantastic Sweet and Savory Chicken Bake that tastes like you spent way more time on it than you actually did!

Gathering Ingredients for Your Hawaiian Chicken Sheet Pan
Okay, this is the fun part—getting everything ready so we can throw it all in the oven! For this recipe to work its amazing flavor magic, ingredient prep is key. We need the chicken and veggies cut correctly so they cook evenly, and we absolutely need to reserve some of that pineapple juice for our glaze. Don’t skip treating the pineapple right; that juice is liquid gold here!
Chicken and Produce for the Sheet Pan Dinner with Pineapple
When you grab your chicken, just aim for uniform size so they get that juicy roast. Same goes for the veggies—we want them tender-crisp, not mushy. Having everything prepped and ready to go makes the assembly part so stress-free. Here is what you need for the main bake:
- 1.5 lbs boneless, skinless chicken thighs or breasts, cut into 1-inch pieces
- 1 cup pineapple chunks, drained (make sure you save that juice!)
- 1 red bell pepper, cut into 1-inch pieces
- 1 green bell pepper, cut into 1-inch pieces
- 1 small red onion, cut into wedges
- 1 tablespoon vegetable oil
Creating the Simple Teriyaki Glaze Chicken Sauce
This is what gives us that deep, sweet and savory island flavor. We make a base sauce that coats everything first, and then we thicken the second half later to create that perfect sticky glaze. Pay close attention to reserving that pineapple juice; you’ll use it right along with the soy sauce and the rice vinegar, which gives us that essential tang for our Simple Teriyaki Glaze Chicken.
- 1/4 cup low-sodium soy sauce
- 1/4 cup reserved pineapple juice
- 2 tablespoons brown sugar
- 1 tablespoon rice vinegar
- 1 teaspoon garlic powder
- 1/2 teaspoon ground ginger
- For the Slurry: 1 tablespoon cornstarch mixed with 1 tablespoon water
Step-by-Step Instructions for the Hawaiian Chicken Sheet Pan
Alright, time to put the plan into action! Since we are using the sheet pan method, timing is everything to prevent chicken from drying out while the veggies get tender. The goal here is to get the chicken roasting first, thicken the sauce while it’s in the oven, and then bring it all back together for a final, sticky coating. This two-stage approach is how we guarantee that juicy roast we talked about. It really shows off good process expertise, if you ask me!
Prepping the Pan and Tossing Ingredients
First things first: crank that oven up to 400°F (200°C). Use parchment paper on your sheet pan—this is non-negotiable for a fast cleanup! Toss your cut chicken, pineapple, peppers, and onion directly onto the pan. Drizzle it with that tablespoon of oil, and then pour about half of your prepared sauce base over everything. Mix it really well right there on the pan until everything looks coated. Make sure you spread it out so it’s in a nice, even layer—no piling up allowed! This is a simple base, much like when I make my easy garlic butter chicken bites recipe; easy prep makes a huge difference.
Making the Thicker Glaze While Baking
While the chicken is roasting away for those first 15 minutes, grab the second half of your sauce base that you kept separate. Pour that into a little saucepan and bring it to a simmer on the stove. While it’s simmering, whisk your cornstarch and water slurry together until it’s totally smooth. Whisk that slurry right into the simmering sauce. Cook it, stirring non-stop, for about a minute until it thickens up beautifully—it should coat the back of a spoon nicely. Once it’s thick, pull it straight off the heat.
Glazing and Finishing the One Pan Tropical Chicken
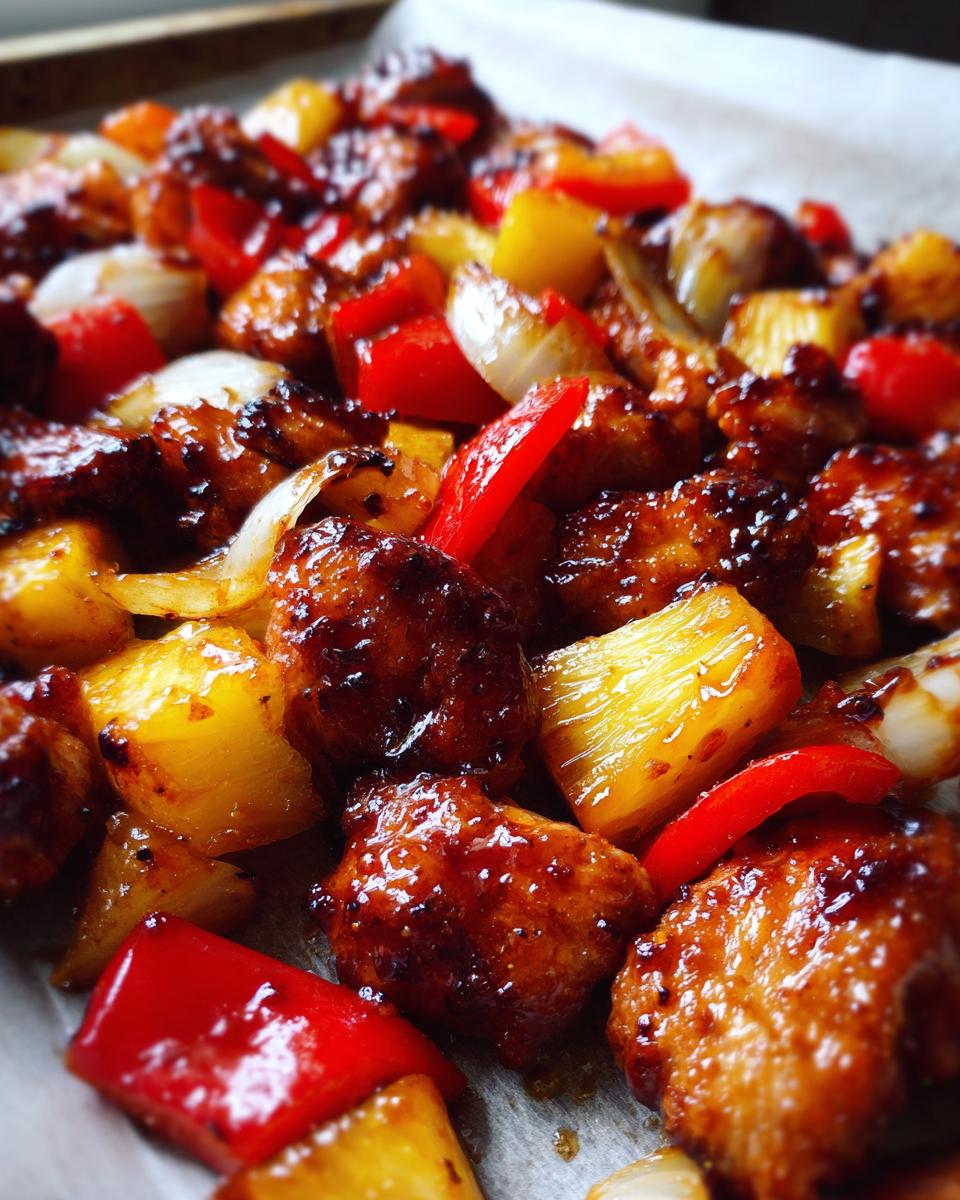
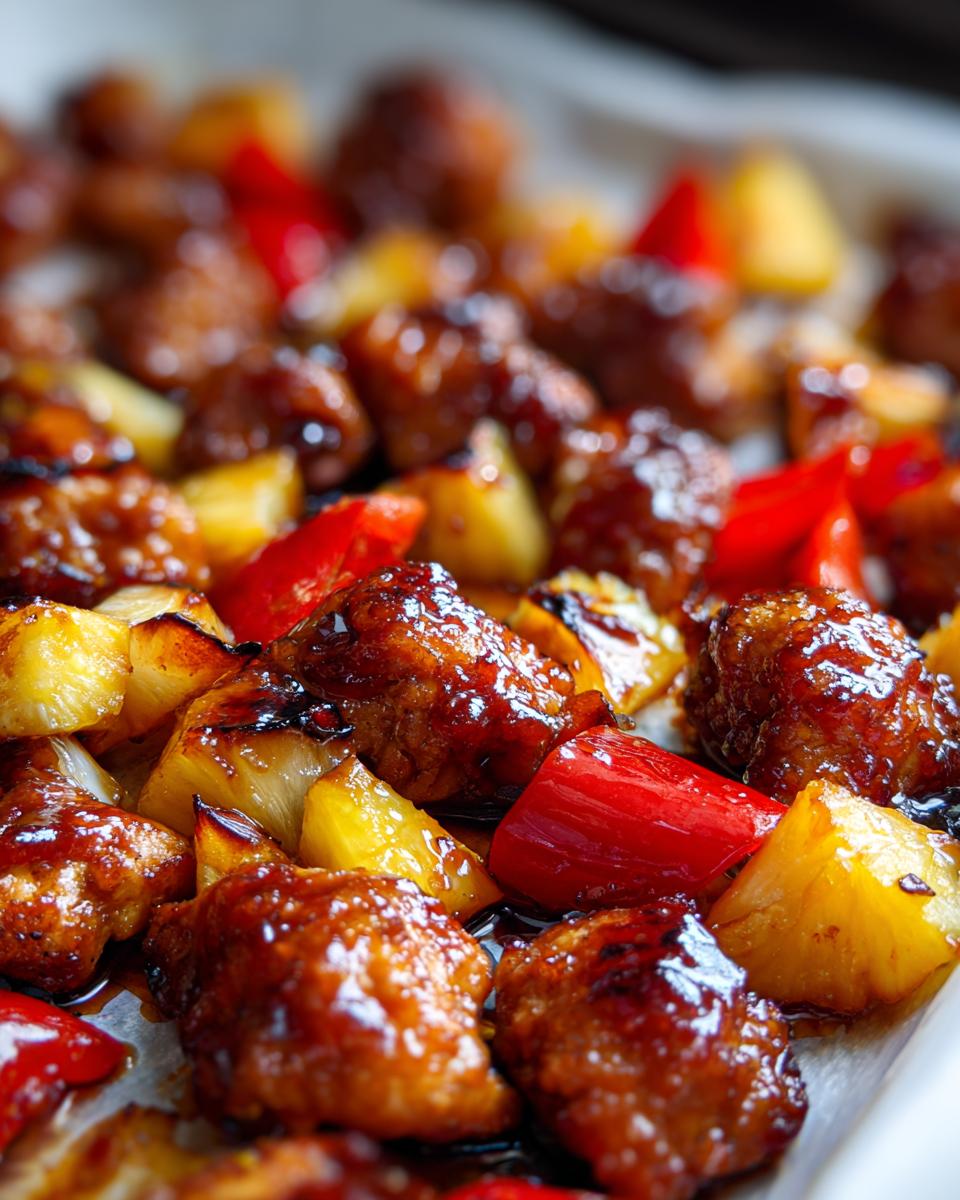
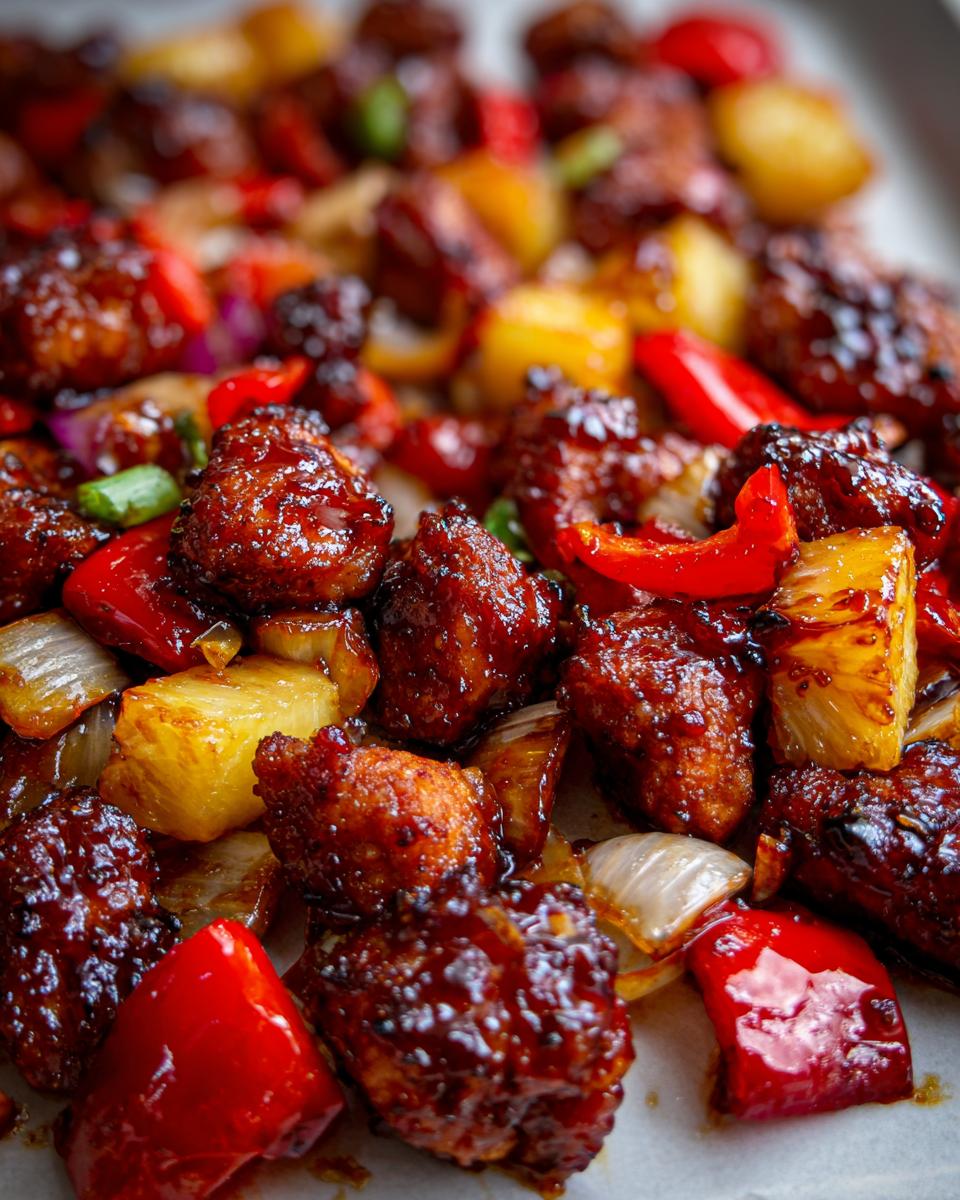
When those first 15 minutes are up, pull that sheet pan out fast! Drizzle that amazing, thickened glaze you just made evenly over all the chicken and veggies. Pop it back into the 400°F oven for another 10 to 15 minutes. You want the chicken to hit that safe 165°F internal temp and for your veggies to be perfectly tender-crisp. Trust me, it smells incredible at this point! Once it’s done, sprinkle on some sliced green onions and sesame seeds if you’re feeling fancy. Serve it right off the pan for that ultimate One Pan Tropical Chicken experience!
Tips for the Perfect Juicy Chicken Sheet Pan
We all want that juicy outcome, right? Especially when we are roasting chicken pieces on a high-heat pan. It’s easy for them to dry out if you aren’t careful, but I have learned a few tricks over the years that keep the meat tender while the veggies caramelize perfectly. It’s all about maximizing flavor impact with minimum effort—that’s what cooking should be!
Marinating the Chicken for Extra Flavor
Listen to me on this one: If your weeknight isn’t *that* rushed, take the extra twenty minutes to marinate the chicken first. Remember that sauce base we made? If you take half of it—the non-thickened portion—and let your chicken chunks soak in it for maybe 30 minutes before they even see the sheet pan, WOW. It punches up the savory notes so much! It makes a huge difference in the final product, just like when I do my baked chicken breast juicy 425f recipe; a little soak goes a long way.
Chicken Cut Choice: Thighs vs. Breasts
This is a major decision point! If you are worried about dryness (and I get it, nobody likes dry chicken!), always go for thighs. Thighs have a little more natural fat, and they just stay more forgiving in the oven, ensuring you get that supremely Juicy Chicken Sheet Pan experience every time. If you stick with breasts, make sure you cut them slightly smaller than the pineapple chunks so they cook through at the same rate as the fruit and peppers.
Serving Suggestions for Your Hawaiian Chicken Dinner
So, the pan comes out of the oven looking like a tropical dream—all caramelized chicken, sweet pineapple, and those bright, roasted peppers. Now, what do we serve this incredible Island Flavored Chicken with? Since everything on the pan is big, bold, and sticky, I always lean toward something simple and neutral underneath to soak up all that extra sauce. You want that balance, you know?
My absolute favorite way to serve this is over perfectly cooked white rice. It just captures all those sticky bits of glaze and onion juice beautifully. If you are looking for something a little lighter, cauliflower rice works wonderfully to cut through the sweetness. It helps keep the focus on the chicken and the vibrant veggies, making it feel like a truly substantial and Colorful Vegetable Chicken Bake without weighing you down.
If you want to add another texture, try a light sprinkle of toasted macadamia nuts over the top right before serving. It gives the whole dish an unexpected crunch that feels very island-inspired! You can even serve it alongside a simple, crisp cucumber salad dressed lightly with rice vinegar if you want something cool and fresh to contrast the sweet heat.
Storage and Reheating Instructions for Leftover Hawaiian Chicken Sheet Pan
Listen, this chicken is so good you’ll definitely have leftovers, and let’s be honest—leftover sheet pan meals sometimes get sad in the fridge, but not this one! When you’re done eating, make sure everything cools down completely before you pack it. Pop the chicken, pineapple, and veggies into a truly airtight container. It stays great like this for three to four days, which is perfect for meal prepping a few lunches. The key to reheating is avoiding the soggy zone.
Don’t even think about the microwave if you can help it! That steams the nice roasted edges right off. Instead, spread the leftovers back out on a clean sheet pan or an oven-safe skillet. Pop it back into a 350°F oven for about 8 to 10 minutes. This gets the glaze sticky again and crisps up those veggies just enough. It tastes almost exactly like it did fresh from the oven when you give it that little refresh!
Frequently Asked Questions About This Pineapple Chicken Recipe
I know when I try a new recipe, I always have a few questions floating around in my head before I pull the trigger, especially about making sure it fits my regular eating plan. Sheet pan meals are supposed to be easy, and I want to make sure you feel totally confident before you start chopping! Here are some things folks ask me all the time about this Hawaiian Chicken Sheet Pan.
Can I make this a Healthy Sheet Pan Dinners version?
Absolutely! This recipe is already surprisingly light, but if you are watching sugar closely, you can easily dial it back. When you are mixing up that sauce, try cutting the brown sugar down by a third, or swap it out entirely for a granular sugar substitute of your choice. I also highly recommend leaning into chicken breasts here, since they are leaner, though remember what I said about thighs staying juicier! It keeps this firmly in the realm of Healthy Sheet Pan Dinners.
What vegetables work best in this Hawaiian Chicken Sheet Pan?
The peppers and onions are classics because they hold up beautifully to the high heat, but I love experimenting! If you want to add a little more green or a different texture, zucchini or broccoli florets are fantastic additions. Just a word of warning: softer veggies cook faster than peppers. If you throw them on right at the beginning, they might turn to mush. I usually toss those softer items on halfway through the initial 15-minute bake, or just right before I drizzle on that thick glaze at the end. This keeps your final $\text{Sheet Pan Dinner with Pineapple}$ looking vibrant!
How do I prevent the pineapple from burning?
Pineapple has a lot of natural sugar, so it loves to caramelize quickly—sometimes too quickly! If you are using super ripe pineapple, or if your oven runs hot, you have two easy options. My favorite trick is waiting until the chicken has roasted for maybe 10 minutes before you scatter the pineapple chunks onto the pan. Alternatively, make absolutely sure every single piece of pineapple is well-coated in some of that oil or sauce before it goes in. If it’s coated, it roasts instead of burning! It’s a good tip to remember, kind of like checking temperatures when making my easy Caesar chicken recipe, you just need to be smart about the timing.
Nutritional Estimates for Your Hawaiian Chicken Sheet Pan
Now, here is the scoop on the numbers side of things, because while flavor is number one, it’s helpful to know what’s fueling you up! I always tell people to take these estimates with a grain of salt, though, because the exact nutritional breakdown changes based on if you use thighs or breasts, how much oil you use when tossing, and what brand of soy sauce you’ve got in the cabinet. These figures are just a general guideline based on the recipe details provided, aiming for four standard servings.
We’re shooting for great macros here—lots of protein to keep you full and not too heavy on the fat, especially since we only use a little oil on the pan itself. It’s a winner for a pretty balanced meal!
- Serving Size: 1 serving
- Calories: 380
- Protein: 45g
- Fat: 10g (with 2g saturated fat)
- Carbohydrates: 25g
- Sugar: 18g (That’s the pineapple and brown sugar working their magic!)
- Sodium: 650mg
- Fiber: 3g
- Cholesterol: 130mg
Just remember, this is based on using the exact measurements in the recipe. If you decide to serve it over a huge mound of rice, or if you double up on that sweet glaze on the side, those numbers are obviously going up. But as a standalone Hawaiian Chicken Dinner on the pan? Not bad at all for something that tastes this wonderfully tropical!
Share Your Fast Family Dinner Idea
Seriously, I want to know what you think! That’s the best part of sharing these everyday recipes—hearing how they fit into your real, chaotic kitchen life. Did this **Hawaiian Chicken Sheet Pan** save your Tuesday night? Was the glaze sticky enough? Did the pineapple get perfectly caramelized?
Don’t be shy! Head down to the comments, give this recipe a rating based on how easy it was to pull off for your crew, and tell me what you thought of that sweet and savory flavor combination. We are all about building confidence here, so every comment helps another cook feel inspired to try it!
If you made this incredible tropical bake, please snap a picture! I absolutely love seeing your kitchen creations. Tag me on social media—seeing your success with this **Hawaiian Chicken Sheet Pan** seriously makes my week. Let’s keep sharing these wins and turning simple ingredients into something special!
If you have any questions while you’re cooking—or if the glaze didn’t turn out exactly how you expected—you can always reach out to me directly through the contact page. Happy cooking, friends!
PrintEasy Hawaiian Chicken Sheet Pan Dinner
Make this sweet and savory Hawaiian chicken sheet pan dinner quickly. It combines juicy chicken, pineapple, and colorful vegetables on one pan for minimal cleanup.
- Prep Time: 15 min
- Cook Time: 30 min
- Total Time: 45 min
- Yield: 4 servings 1x
- Category: Dinner
- Method: Baking
- Cuisine: American
- Diet: Low Fat
Ingredients
- 1.5 lbs boneless, skinless chicken thighs or breasts, cut into 1-inch pieces
- 1 cup pineapple chunks, drained (reserve juice)
- 1 red bell pepper, cut into 1-inch pieces
- 1 green bell pepper, cut into 1-inch pieces
- 1 small red onion, cut into wedges
- 1/4 cup low-sodium soy sauce
- 1/4 cup reserved pineapple juice
- 2 tablespoons brown sugar
- 1 tablespoon rice vinegar
- 1 teaspoon garlic powder
- 1/2 teaspoon ground ginger
- 1 tablespoon cornstarch
- 1 tablespoon water
- 1 tablespoon vegetable oil
- Optional: Sesame seeds and sliced green onions for garnish
Instructions
- Preheat your oven to 400°F (200°C). Line a large rimmed baking sheet with parchment paper for easy cleanup.
- In a small bowl, whisk together the soy sauce, reserved pineapple juice, brown sugar, rice vinegar, garlic powder, and ground ginger. This is your sauce base.
- In a separate small bowl, whisk the cornstarch and 1 tablespoon of water until smooth to create a slurry. Set aside.
- Place the cut chicken, pineapple chunks, bell peppers, and red onion onto the prepared sheet pan. Drizzle with vegetable oil and toss lightly to coat.
- Pour half of the sauce base over the chicken and vegetables on the pan. Toss everything directly on the sheet pan until evenly coated. Spread the ingredients into a single layer.
- Bake for 15 minutes.
- While baking, pour the remaining half of the sauce base into a small saucepan. Bring to a simmer over medium heat. Whisk in the cornstarch slurry and cook, stirring constantly, until the sauce thickens slightly, about 1 minute. Remove from heat.
- After 15 minutes of baking, remove the sheet pan from the oven. Drizzle the thickened glaze evenly over the chicken and vegetables.
- Return the sheet pan to the oven and bake for another 10 to 15 minutes, or until the chicken is cooked through (internal temperature reaches 165°F or 74°C) and the vegetables are tender-crisp.
- Remove from the oven. Garnish with sesame seeds and sliced green onions, if desired. Serve immediately.
Notes
- For extra flavor, marinate the chicken in half the sauce base for 30 minutes before adding it to the sheet pan.
- You can substitute chicken thighs for breasts if you prefer juicier meat.
- Serve this dish over white rice or cauliflower rice for a complete meal.
Nutrition
- Serving Size: 1 serving
- Calories: 380
- Sugar: 18
- Sodium: 650
- Fat: 10
- Saturated Fat: 2
- Unsaturated Fat: 8
- Trans Fat: 0
- Carbohydrates: 25
- Fiber: 3
- Protein: 45
- Cholesterol: 130