

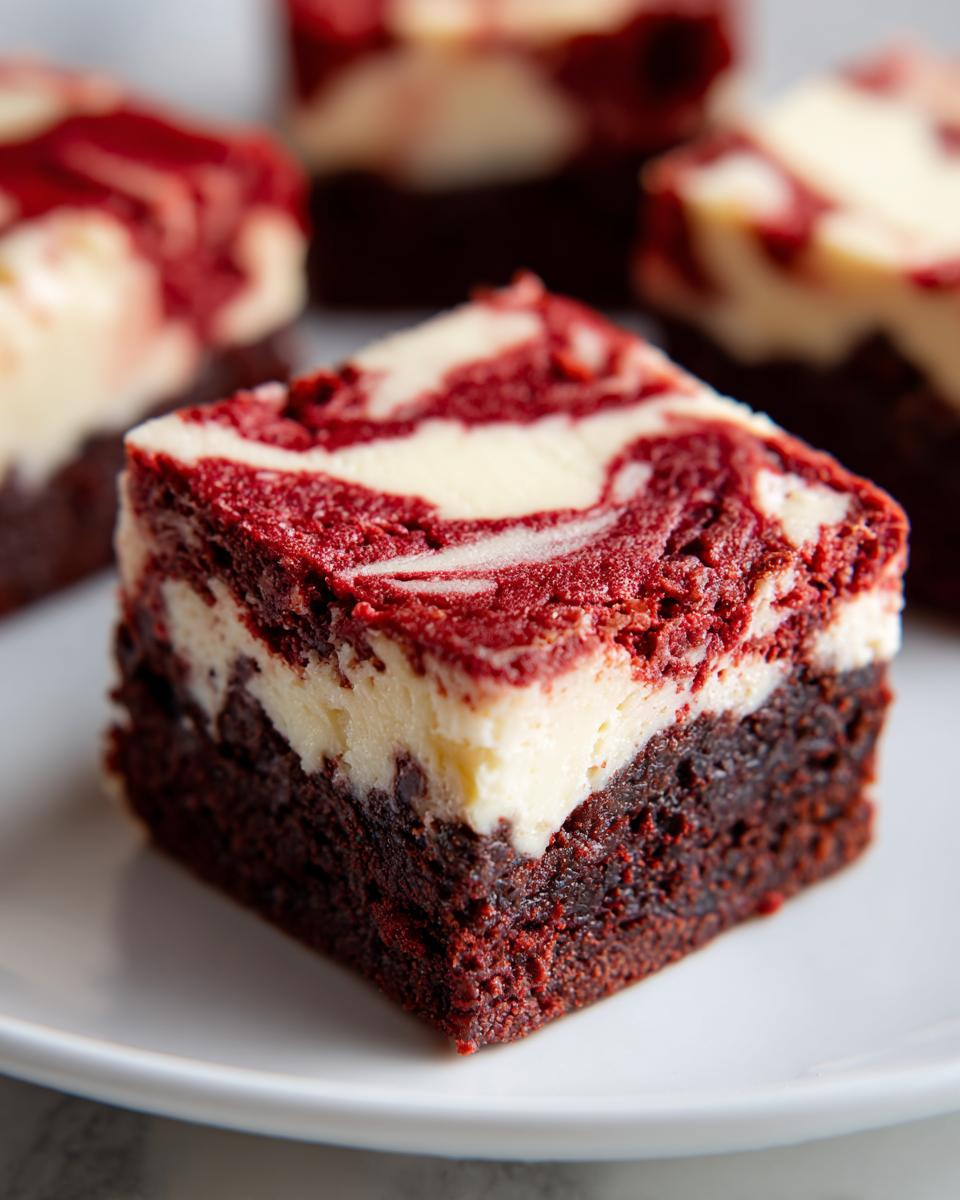
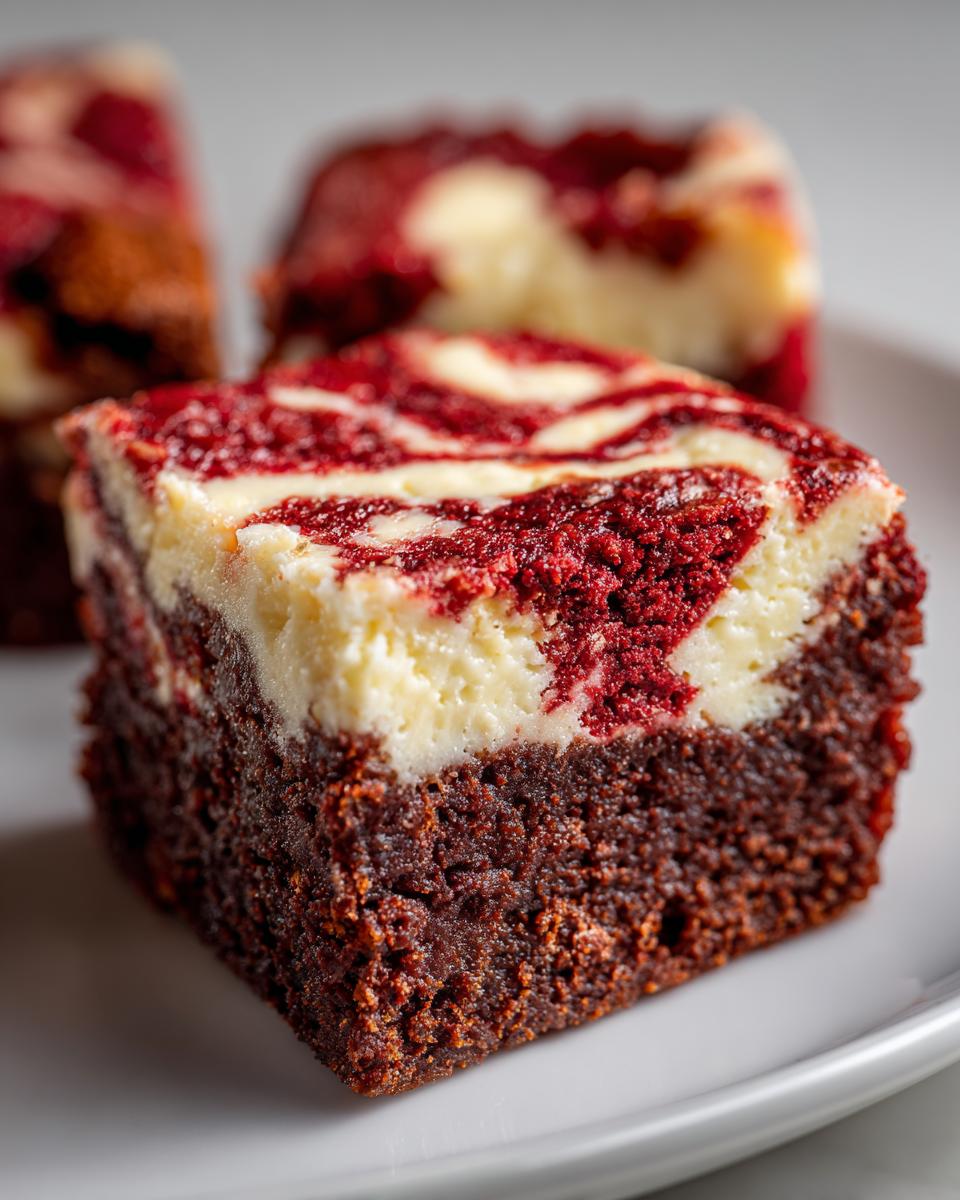
Sometimes, you just need a dessert that screams indulgence, doesn’t it? I get it. Life can be busy, but that doesn’t mean we have to skip the showstoppers. That’s why I’m sharing my absolute favorite way to make red velvet cheesecake brownies. Forget dry cakes; this recipe is all about achieving that incredibly fudgy brownie base paired with a ribbon of creamy, tangy cheesecake. It looks complicated, I know, but I promise that the dexterity I learned in my own busy kitchen makes achieving these beautiful marbled squares totally doable. We’re blending rich chocolate with that classic red velvet pop, making an ultimate indulgent treat that’s genuinely simple to pull off!
- Why You Will Love These Ultimate Fudgy Red Velvet Cheesecake Brownies
- Gathering Ingredients for Perfect Red Velvet Cheesecake Brownies
- Step-by-Step Instructions for Amazing Red Velvet Cheesecake Brownies
- Tips for Achieving the Best Red Velvet Cheesecake Brownies
- Ingredient Notes and Substitutions for Your Red Velvet Brownie Recipe
- Storage and Reheating Instructions for Marbled Brownie Bars
- Frequently Asked Questions About Red Velvet Cheesecake Brownies
- Serving Suggestions for Your Decadent Dessert Bars
- Estimated Nutritional Data for Red Velvet Cheesecake Brownies
Why You Will Love These Ultimate Fudgy Red Velvet Cheesecake Brownies
When I developed this recipe, I was focused on hitting that sweet spot where flavor meets ease. And wow, did we nail it! You won’t just love these bars; you’ll rely on them when you need a real showstopper.
- The Texture is Everything: We achieve that deep, fudgy chew in the brownie that just melts in your mouth, contrasted perfectly by the smooth, cool cheesecake layer.
- Visually Stunning: When you take that knife through the top, the beautiful marbled square that emerges just screams homemade quality.
- Effortlessly Elegant: These look like they belonged on a fancy bakery shelf, but trust me, the technique is straightforward—no special skills required here!
- Crowd-Pleaser Status: These bars are sturdy enough to transport and easy to cut, making them one of the best brownie recipes for parties and big gatherings. If you like layered bars, you absolutely have to check out my recipe for Buckeye Brownies next!
Gathering Ingredients for Perfect Red Velvet Cheesecake Brownies
Getting the right foundation is everything when you’re making something this decadent. For these red velvet cheesecake brownies, we have two sections of ingredients to gather, and I need you to pay close attention to the temperature notes for the swirl mixture. Trust me, room-temperature cream cheese and eggs are what keep that cheesecake layer gloriously smooth and swirl-ready. If you’ve ever made my Peanut Butter Swirl Brownies, you already know this trick is non-negotiable for a perfect marble!
For the Red Velvet Brownie Batter
Keep these simple items handy for the fudgy base:
- 1/2 cup unsalted butter, melted
- 1 cup granulated sugar
- 2 large eggs, room temperature
- 1 1/2 teaspoons red food coloring
- 2 teaspoons vanilla extract
- 1/2 teaspoon salt
- 3/4 cup all-purpose flour
- 3 Tablespoons Dutch process cocoa powder
For the Cream Cheese Swirl
This part needs to be silky smooth so it glides right into the batter. Make sure these items are truly soft before you start!
- 8 ounces cream cheese, room temperature
- 1 large egg, room temperature (for swirl)
- 1/3 cup granulated sugar (for swirl)
Step-by-Step Instructions for Amazing Red Velvet Cheesecake Brownies
Okay, deep breath! You have the ingredients ready, so let’s get these gorgeous red velvet cheesecake brownies into the oven. The process is just a few straightforward steps, but precision matters, especially when we get to that swirling part. I want you to focus on keeping things gentle so we don’t lose that beautiful contrast between the red velvet and the cream cheese.
Preparing the Pan and Brownie Base
First things first, get that oven preheated to 350°F (175°C). Now, the pan setup is crucial for an easy cleanup later. Grab a 9×9 inch pan and line it with parchment paper, making sure you leave some overhang on two sides—this acts as built-in handles for lifting the finished bars out later. That parchment overhang is a lifesaver, trust me!
In a bowl, whisk your melted butter and the 1 cup of sugar together. Beat in those two room-temperature eggs one at a time until they’re incorporated. Then, mix in your vanilla and that vibrant red food coloring until it’s a beautiful, uniform color. In a separate dish, gently whisk together the flour, salt, and cocoa powder. Now for the Dexterity Tip: Gradually add the dry mixture to the wet ingredients, mixing just until everything barely comes together. Seriously, stop mixing as soon as you see the last streak of flour disappear. Overmixing beans these up, and we want fudgy!
Creating the Cream Cheese Swirl
While the base is resting, mix up that tangy cheesecake topping. Beat your room-temperature cream cheese, the 1/3 cup of sugar for the swirl, and that final room temperature egg until it’s completely smooth, lick-the-spoon smooth. No lumps allowed!
Time to layer! Spread exactly half of your red velvet batter into the prepared pan. Then, take spoonfuls of the cream cheese mixture and drop them evenly over that first layer of batter. Finally, gently spread the remaining red velvet batter right over the top of those cream cheese dollops. It’s fine if you mash up the dollops a bit—we are going to swirl them next!
Marbling and Baking the Red Velvet Cheesecake Brownies
This is the fun part. Take a knife or even a thin wooden skewer and gently drag it through the layers to create that gorgeous marbled effect. Don’t overdo it! A few figure-eights and S-shapes are plenty. We want distinct layers, not muddy brown batter.
Pop the pan into the preheated oven and bake for 30 to 35 minutes. This is where you need to be vigilant! We are aiming for moist crumbs, not a dry cake crumb, when you test it with a toothpick near the center. If the toothpick looks wet, give it 2 more minutes. Once it’s done, you absolutely must let these cool completely in the pan before you even think about cutting them. Patience here guarantees clean cuts!
If you’re looking for other bars that are just as fun to make, you might love my recipe for easy Cream Cheese Brownies!
Tips for Achieving the Best Red Velvet Cheesecake Brownies
Making these red velvet cheesecake brownies look like they came from a professional bakery is all about honoring a few little rules. Remember, technique beats talent nearly every time in my kitchen!
First, let’s talk temperature. The cream cheese and the two eggs designated for the swirl mixture absolutely need to be at room temperature. If they’re cold, you’ll get little lumps in your cheesecake layer, and it won’t swirl nicely into the batter on top. Take them out about an hour before you plan to bake; it’s worth the wait!
Second, do not walk away from the oven after 30 minutes. These are meant to be fudgy! Overbaking is the number one way to dry out any bar cookie, and we need that moist center. You are looking for moist crumbs clinging to the toothpick, not shiny, wet batter, but certainly not a clean, dry one either. Also, if you can find it, definitely spring for the Dutch process cocoa powder for the brownie batter—it gives you that deeper, smoother chocolate background note.
If you’re looking for another cheesecake pairing in bar form, you have to try my Chocolate Chip Cheesecake Recipe; the principles for that creamy filling stay the same!

Ingredient Notes and Substitutions for Your Red Velvet Brownie Recipe
I know when you look at a recipe card, sometimes the ingredient list can look intimidating, especially when it calls for very specific things like red dye or a certain type of cocoa. Don’t let it stress you out! Developing these red velvet brownie recipe elements was all about finding that perfect flavor balance, but I want you to feel capable of making swaps if needed. Remember, we’re building cooking Dexterity here, not following ancient laws!
The biggest hang-up I hear about is the red food coloring. Are you using the liquid stuff from the little plastic bottle, or the concentrated gel? I always recommend gel coloring because a little dab goes a long way, giving you that intense, vibrant red without thinning out your brownie batter. If all you have is liquid, just add it half a teaspoon at a time until you get the color you want. It might take three times as much liquid, but it’ll still turn out delicious!
Next up, the cocoa powder. You see I specifically call for Dutch process cocoa in the instructions. This is important because it mixes better with the baking soda/powder ratios and gives a deeper, less acidic chocolate flavor that pairs beautifully with the tang of the cream cheese. You *can* use natural cocoa powder—it’ll just result in a slightly lighter color and a tangier chocolate note, which is fine for a home bake. If you’re curious about blending these classic flavors, my recipe for the Chocolate Red Velvet Fusion goes into that depth!
And finally, vanilla—it’s in almost everything I bake! If you happen to be totally out of vanilla extract, don’t panic and skip it. A tiny splash of almond extract (think 1/4 teaspoon maximum) works wonders as a substitute in things like this, adding a lovely, unexpected floral background note to these decadent dessert bars.
Storage and Reheating Instructions for Marbled Brownie Bars
Okay, cutting and serving are done, which means we have leftover marbled brownie bars—the best kind of problem to have! Since these beauties feature that creamy cheesecake layer, keeping them properly stored is really important. You must store your beautiful red velvet cheesecake brownies in an airtight container.
Because of the cream cheese, I highly recommend keeping them in the fridge if you aren’t planning to eat them all within a day or two. They’ll firm up nicely in there. When you’re ready for a treat, just let them sit on the counter for about 15 to 20 minutes before serving. That slight warming brings back the perfect, fudgy texture. If you want a little extra treat, though, a quick zap in the microwave for about 10 seconds lets you enjoy them slightly chilled, which some folks actually prefer! If you ever need a brighter bar, check out my recipe for Lemon Brownies!
Frequently Asked Questions About Red Velvet Cheesecake Brownies
When you are whipping up something this layered and beautiful, I sometimes get similar questions popping up repeatedly. It’s totally normal! Figuring out how to get that perfect texture and color takes a little trial and error, but honestly, you’ve got this. Here are the things I hear most often about these decadent dessert bars.
Why did my cheesecake swirl sink into the brownie base?
Oh, the dreaded sunken swirl! This usually happens for two big reasons related to temperature. Either your cream cheese layer didn’t have its egg mixed in properly, or—and this is most common—the bottom layer of red velvet batter was too thin or too hot when you dolloped the cream cheese on top. For the best results, make sure that brownie batter is spread evenly before you add the cheese mixture! If you want another great bar with a swirl, you absolutely must check out my Sopapilla Cheesecake Bars recipe.
Can I skip the red food coloring and still call them red velvet?
That’s a great question! Technically, red velvet originally got its color from a reaction between natural cocoa and acidic ingredients, leading to a reddish-brown hue. However, for the vibrant look everyone expects today, you really need the dye. If you skip it, you’ll end up with a lovely, fudgy chocolate cheesecake brownie, but you’ll miss that signature color contrast we love in these cheesecake swirl brownies.
Can I use a different pan size for this recipe?
You sure can, but you have to adjust your expectations! The 9×9 inch pan is perfect for that thick, fudgy bake time of about 35 minutes. If you use a larger 9×13 inch pan, your layers will be much thinner, and you’ll end up with more like a cookie bar than a thick brownie, and they’ll bake way faster—check them around 20 minutes. If you use a smaller 8×8 pan, they will be super thick, meaning the baking time could easily stretch past 45 minutes, and you risk the middle not setting right.
Are these brownies okay to make ahead of time for a party?
Yes! In fact, I think they taste better the next day. Since these qualify as one of the best brownie recipes for parties, I often bake them the day before. Just make sure they are completely cooled, then cover them tightly and keep them in the fridge because of that delicious cream cheese component. Let them come to room temperature for about 30 minutes before you cut and serve!
Serving Suggestions for Your Decadent Dessert Bars
Now that you’ve mastered the swirl, how do you serve these gorgeous decadent dessert bars? Honestly, they are perfect all on their own, but if you’re looking to elevate them for a party spread, a little garnish goes a long way without hiding all your beautiful marbling!
A simple dusting of powdered sugar is my go-to when I’m running low on time but want them to feel finished. If you’re serving these as a plated dessert, definitely add a small dollop of freshly whipped cream next to each square; the light texture is amazing against that fudgy base. A few tart raspberries or sliced strawberries on the side cut through the richness perfectly. These are definitely some of the best brownie recipes for parties because they look so high-end with minimal effort. For another appetizer that impresses people easily, take a peek at my Easy Cranberry Brie Bites!

Estimated Nutritional Data for Red Velvet Cheesecake Brownies
Alright, let’s talk numbers for these rich red velvet cheesecake brownies. I always want to give you a ballpark idea of what you’re serving up, but please remember that this is just an estimate! The exact nutritional breakdown depends heavily on the brand of cream cheese you use and exactly how precise you are with measuring fats and sugars. Since these bars are pure indulgence, they lean toward the richer side, but seeing the numbers helps manage expectations!
Based on 16 servings using the ingredients listed in the recipe, here is the general breakdown:
- Calories: Around 280 per square
- Fat: Approximately 16 grams (a good portion of that is saturated fat from the cheese and butter, as expected in a decadent treat!)
- Carbohydrates: About 30 grams
- Protein: Roughly 4 grams
If you are planning these for a big crowd, just factor in that they are a rich dessert. Compared to some of my lighter bakes, these are definitely in the ‘ultimate indulgent treats’ category! Enjoy them, because the fudge factor is worth every single calorie!
PrintThe Ultimate Fudgy Red Velvet Cheesecake Brownies with Perfect Cream Cheese Swirl
Make these rich, fudgy red velvet cheesecake brownies that feature a creamy, tangy cream cheese swirl. This recipe delivers a visually stunning and decadent dessert bar perfect for parties or satisfying a sweet craving.
- Prep Time: 15 min
- Cook Time: 35 min
- Total Time: 50 min
- Yield: 16 servings 1x
- Category: Dessert
- Method: Baking
- Cuisine: American
- Diet: Vegetarian
Ingredients
- 1/2 cup unsalted butter, melted
- 1 cup granulated sugar
- 2 large eggs, room temperature
- 1 1/2 teaspoons red food coloring
- 2 teaspoons vanilla extract
- 1/2 teaspoon salt
- 3/4 cup all-purpose flour
- 3 Tablespoons Dutch process cocoa powder
- 8 ounces cream cheese, room temperature
- 1 large egg, room temperature (for swirl)
- 1/3 cup granulated sugar (for swirl)
Instructions
- Preheat your oven to 350°F (175°C). Line a 9×9 inch baking pan with parchment paper, leaving an overhang for easy removal.
- Prepare the brownie batter: In a medium bowl, whisk together the melted butter and 1 cup of sugar until combined.
- Beat in the 2 room temperature eggs one at a time. Mix in the red food coloring and vanilla extract until the color is uniform.
- In a separate small bowl, whisk together the flour, salt, and cocoa powder. Gradually add the dry ingredients to the wet ingredients, mixing just until combined. Do not overmix.
- Prepare the cream cheese swirl: In another bowl, beat the cream cheese, 1/3 cup sugar, and the remaining egg until the mixture is smooth and creamy.
- Spread half of the red velvet brownie batter into the prepared pan.
- Dollop spoonfuls of the cream cheese mixture evenly over the brownie layer.
- Gently spread the remaining red velvet batter over the cream cheese layer.
- Use a knife or skewer to gently swirl the cream cheese mixture into the brownie batter to create a marbled effect.
- Bake for 30 to 35 minutes, or until a toothpick inserted near the center comes out with moist crumbs attached, but not wet batter.
- Let the brownies cool completely in the pan on a wire rack before lifting them out using the parchment overhang.
- Cut into 16 squares before serving.
Notes
- For the best swirl, ensure your cream cheese and egg for the swirl mixture are fully at room temperature.
- Do not overbake; these brownies should remain fudgy. Check them starting at 30 minutes.
- Use high-quality Dutch process cocoa powder for a deeper chocolate flavor in the red velvet base.
Nutrition
- Serving Size: 1 square
- Calories: 280
- Sugar: 25g
- Sodium: 150mg
- Fat: 16g
- Saturated Fat: 9g
- Unsaturated Fat: 7g
- Trans Fat: 0.5g
- Carbohydrates: 30g
- Fiber: 1g
- Protein: 4g
- Cholesterol: 65mg