

Isn’t it amazing that you can literally create bread out of thin air? I mean, it’s pure magic, that natural yeast stirring to life just using flour and water. I know you’ve been wanting to jump into the world of wild yeast bread making, and I promise you, it’s not as intimidating as it sounds! Forget all those complicated steps you’ve seen online. Here at Food Dexterity, we strip things down to the basics because cooking should be joyful, not stressful. This is hands-down the easiest, step-by-step guide to create your very own active sourdough starter from scratch. By the end of this week, you’ll have the foundation ready to bake that incredible artisan loaf you’ve been dreaming about. Trust me, creating your sourdough starter is the most rewarding part!
- Why You Need an Easy Sourdough Starter Recipe (Sourdough Basics)
- Gathering Supplies for Your Sourdough Starter Recipe
- How to Make Sourdough Starter From Scratch: The Day-by-Day Guide
- Tips for Success: Cultivating a Bubbly Sourdough Starter
- Sourdough Starter Maintenance and Storage
- Sourdough Starter Troubleshooting for Beginners
- Frequently Asked Questions About Your Natural Yeast Starter
- Next Steps: Baking with Your Active Sourdough Starter
- Estimated Nutritional Information for the Starter Culture
Why You Need an Easy Sourdough Starter Recipe (Sourdough Basics)
Look, there are a million ways to bake bread, but nothing, and I mean nothing, beats the flavor of true sourdough. When you make your own sourdough starter, you’re tapping into something ancient. It’s about that deep, complex tang and the incredible satisfaction that comes from knowing you nourished this little culture yourself. Plus, for many folks, the slow fermentation process makes the bread so much easier on the tummy! This process gives you the real bread flavor that you just can’t get from a packet of commercial yeast. I want you to feel that power in your own kitchen. If you need to know more about my philosophy on finding joy in cooking, check out my About Page!
The Foundation: What is a Sourdough Starter?
People get scared by the name, but honestly, it’s just flour and water hanging out together long enough to wake up the tiny wild yeast and helpful bacteria floating around in the air. That’s it! It’s a living thing you’re nurturing, like a pet, but one that tastes amazing. This is the key to all sourdough basics; once you have this happy, bubbly culture, you’ve got the foundation for any loaf you dream up.
Gathering Supplies for Your Sourdough Starter Recipe
Okay, before we get into the daily ritual of making your sourdough starter, let’s make sure you have your little toolkit ready. You don’t need fancy gadgets, honestly! My goal is always to keep things achievable, so raid your cupboards first. You need a clean glass jar—nothing too small, maybe a pint or a quart size—and something to stir with, like a spoon or a flexible spatula. Having these simple things ready means you won’t panic on Day 1 when you realize you need to whip up that very first batch of natural yeast culture.
Ingredient Clarity for Your Homemade Sourdough Culture
The ingredients list looks simple, but the details matter here, trust me! For the launch—Days 1 through 3—we need the heavy hitters: whole wheat or rye flour. That extra nutrition helps kickstart the wild yeast population quick. After that, switch completely to unbleached all-purpose flour for feeding. And the water? Please, use filtered or unchlorinated water if you can swing it. Chlorine can actually hurt those delicate little microbes we’re trying to encourage in your homemade sourdough culture. It’s this attention to simple quality that makes the difference!
How to Make Sourdough Starter From Scratch: The Day-by-Day Guide
Alright, this is where the real fun begins! We’re going to take that flour and water mixture and turn it into something powerful over the next week or so. Don’t worry if nothing happens on Day 2; that’s normal! We are cultivating life here, and life takes patience. This step-by-step process is how you turn basic pantry items into your incredible sourdough starter recipe. If you’re ready for some easy weeknight cooking once this is ready, you can check out some ideas right here, but for now, eyes on the jar!
Days 1-3: Initial Activation of Your Sourdough Starter
On Day 1, it’s just a simple marriage: 50 grams of that rye or whole wheat flour mixed with 50 grams of warm water in your clean jar. Stir it until it looks like thick paste—no dry spots allowed! Cover that lid loosely; you want air exchange. By Day 2, you might see a few tiny bubbles, or maybe nothing at all. That’s okay! On Day 2 and Day 3, we start the discard ritual. You toss out about half (that’s tough, I know, but necessary!), then feed the remainder with 50g of unbleached flour and 50g of water. Seriously, watch people who are pros, like over at Earth, Food, and Fire, to see what I mean about starting strong!
Days 4-7: Developing an Active Sourdough Starter
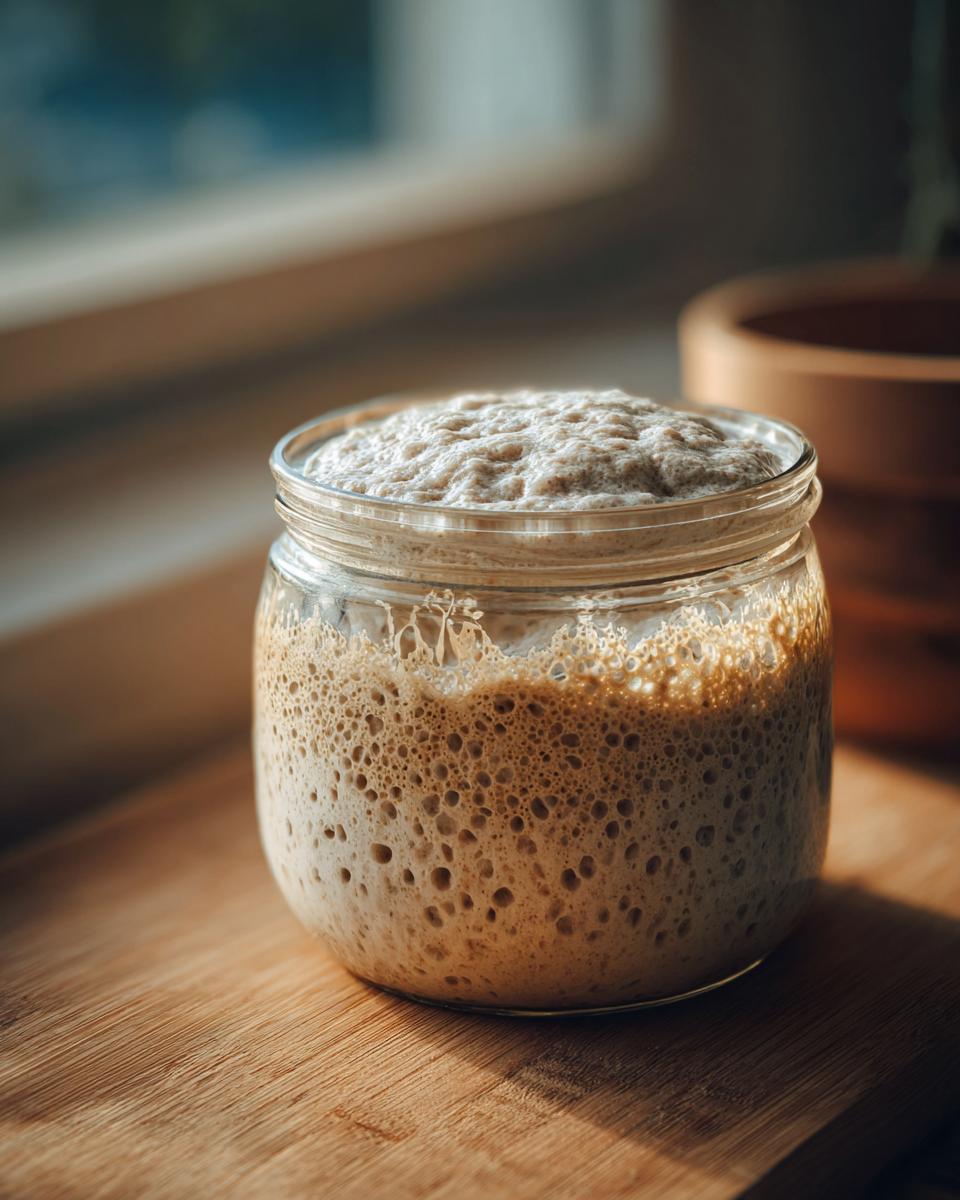
From Day 4 onward, we stick to a rhythm every 24 hours until that magic happens. Remember the pattern: Discard down to about 50 grams, then feed it 50g of flour and 50g of water. Keep watching. Around Day 5 or 6 is when things should really start exploding. You’re looking for signs that your sourdough starter is thriving. I’m talking about it visibly doubling its size between feedings, maybe within four to eight hours. You want a nice, smooth, slightly rounded dome on top, and the sides should look like they are filled with a million tiny bubbles. Once you see that consistent doubling, you’ve got a strong, bubbly sourdough starter ready to go!

Tips for Success: Cultivating a Bubbly Sourdough Starter
Creating a lively, bubbly sourdough starter takes a little common sense more than a fancy degree, but there are a few little secrets I’ve picked up to keep the stress out of it. The biggest one is consistency—once you start that daily feeding routine, stick to it! If you see that dark, watery layer sitting on top of your culture, that’s what bakers call ‘hooch.’ Don’t panic! It just means your sourdough starter is really hungry. You can either stir it right back in for a tangier flavor or carefully pour it off, and then make sure you feed it right away. We’re building confidence here, not aiming for perfection!

Water Quality and Temperature Control
If you’re using water straight from the tap, you might be slowing down your progress because the chlorine can actually harm the developing wild yeast. Try to switch to filtered or bottled water, especially for those first few feedings! Also, think about where you’re keeping your jar. Those wild microbes are happiest hanging out around 70 to 75 degrees Fahrenheit. If your kitchen is cooler, like it gets in the winter, just expect things to move slower—maybe it takes 12 hours instead of 6 for that rise. For more great beginner pointers, check out this excellent guide!
If you’re looking for some easy things to bake once this starter is ready, maybe try starting with something simple like my breakfast recipes!
Sourdough Starter Maintenance and Storage
Phew! Congratulations, you’ve got an active sourdough starter! Now we have to figure out how to keep it happy without feeding it every single twelve hours, right? It’s super flexible, which I love. If you plan on baking daily, keep it on the counter and feed it once a day. But for most of us with busy lives, the fridge is your best friend. Put it in there, and you only need to pull it out and give it a good feeding once a week—that’s easy sourdough starter maintenance!
How to Feed Sourdough Starter Before Baking
So, you decide to bake on a Saturday morning—the starter is chilling in the fridge. First step: wake it up! Take it out, discard almost everything, and leave just a small amount (about 50 grams). Then, feed it with 100 grams of flour and 100 grams of water. This is essentially a 1:2:2 feeding ratio, which gets it nice and active again. You must let it sit on the counter until it reliably doubles in size and is beautifully bubbly before you even think about measuring it for your dough. Otherwise, your bread won’t rise!
We’ve got lots of quick meal ideas for when you’re waiting for that starter to peak, so check out my lunch section!
Sourdough Starter Troubleshooting for Beginners
Don’t sweat it if your first attempt at a sourdough starter doesn’t look like the pictures right away. This is where we put our beginner sourdough guide knowledge to the test! The first week is messy, and that’s totally fine. If you see zero activity by Day 4, don’t give up! It might just be too chilly in your kitchen. Try moving the jar to a warmer spot, maybe near the oven after it’s turned off. If it starts smelling like stinky socks or even slightly like acetone, that’s just your natural yeast making funky things happen. It means your sourdough starter is hungry!

When it smells funky, just pour off any dark liquid if it has it, and give it a really good feed—maybe even feed it twice in one day. Keep that feeding schedule going, and those bad smells usually disappear, leaving you with a healthy culture. Keep reading for more great sourdough starter tips or take a peek at this great resource on sourdough 101.
If you need a little sweet distraction while you wait for that starter to behave, I have some super simple recipes tucked away in my dessert section!
Frequently Asked Questions About Your Natural Yeast Starter
I know you’re going to have questions once you start this journey. It’s totally normal! Creating your own sourdough starter feels a bit like chemistry, but I promise, once you get the routine down, it’s just part of your day. These are the things I get asked most often when folks are first starting out with their natural yeast starter. If you’re making healthy snacks while you wait for your culture to mature, you should check out my ideas!
Can I use any flour to make a sourdough starter?
You certainly can! But here’s my little nudge: use whole grain like rye or whole wheat for the very first few days. That’s where the most wild microbes hang out, giving you a faster start. Once it looks happy and bubbly, you can absolutely switch over to that regular unbleached all-purpose flour for maintenance. It’s all about what works easiest for you.
How long does it take to get an active sourdough starter?
Ah, the million-dollar question! I always tell people to plan for seven days minimum, but realistically, it might take up to 14 days, especially if your kitchen is a bit cooler. The absolute key isn’t the clock, though; it’s the consistency in your feeding schedule. Watch the jar, not the calendar!
What is ‘hooch’ and what does it mean for my starter?
Hooch is that layer of dark, watery liquid that sometimes forms on top of your mixture. If you see it, don’t freak out! It’s a sign that your sourdough starter is starving and throwing a little tantrum. You can just stir it right back in for extra tang, or if you don’t want that intense flavor, skim it off. Either way, it’s your cue to feed it right away!
Next Steps: Baking with Your Active Sourdough Starter
Can you feel it? Now that you’ve successfully nurtured your own sourdough starter, you’re officially ready for the absolute best part! This vibrant, bubbly culture is the true sourdough bread foundation you need. Don’t worry about a full recipe right now; just know that all the flavor and lift come from this little jar. Go ahead and try that first loaf—you’ve done the hardest work already! If you want to get in touch with me after your first bake, feel free to drop me a line on my Contact Page!
Estimated Nutritional Information for the Starter Culture
Now, before you run off to bake that first loaf, I need to give you the numbers, but keep this in mind: this is just an estimate! Since we’re working with a living culture that we are constantly feeding and discarding, the actual nutritional value shifts daily. This breakdown is based on that 50-gram serving size right after a typical feeding where the starter peaks. It’s made from just flour and water, so obviously, it’s not meant to be a snack on its own, but it’s the heart of your bread!
- Serving Size: 50g culture (estimated)
- Calories: 150
- Sugar: 0.1g
- Sodium: 1mg
- Fat: 0.5g (Mostly unsaturated!)
- Carbohydrates: 30g
- Protein: 5g
See? It’s mostly carbs from the flour, which is what feeds the yeast! Don’t stress too much about these numbers right now. Focus on getting that beautiful, reliable rise. The true magic is in the digestibility and flavor, not the nutritional label!
PrintEasy Sourdough Starter Guide: Make Your Natural Yeast Culture From Scratch
Follow this simple, step-by-step guide to create your own active sourdough starter from scratch. This beginner sourdough guide explains how to feed your natural yeast starter and maintain it for delicious homemade sourdough bread.
- Prep Time: 5 min daily
- Cook Time: 0 min
- Total Time: 7 days (for activation)
- Yield: Approximately 200g active sourdough starter 1x
- Category: Baking Foundation
- Method: Fermentation
- Cuisine: American
- Diet: Vegetarian
Ingredients
- 100g Whole Wheat Flour or Rye Flour (for initial activation)
- 100g Unbleached All-Purpose Flour (for maintenance)
- 100g Unchlorinated Water (room temperature)
Instructions
- Day 1: Mix 50g of whole wheat or rye flour with 50g of room temperature water in a clean glass jar. Stir well until no dry flour remains. Cover loosely and let it sit at room temperature (ideally 70-75°F or 21-24°C) for 24 hours.
- Day 2: You may see small bubbles or no change. Discard half of the mixture (about 50g). Feed the remaining starter with 50g of unbleached all-purpose flour and 50g of water. Mix thoroughly, cover loosely, and wait 24 hours.
- Day 3: You should see some activity, perhaps small bubbles. Discard half of the starter. Feed with 50g of unbleached all-purpose flour and 50g of water.
- Day 4 through Day 7 (or until active): Repeat the discard and feed process every 24 hours. Discard half, then feed with 50g flour and 50g water. Look for consistent doubling in volume within 4-8 hours after feeding, a dome shape at the top, and many bubbles. This indicates an active sourdough starter.
- Maintenance: Once your sourdough starter is consistently doubling, you can switch to feeding once every 12 hours if keeping it at room temperature, or move it to the refrigerator for weekly feeding.
- To Feed Before Baking: Take the starter from the fridge (if applicable). Discard all but 50g. Feed with 100g flour and 100g water. Let it sit at room temperature until it doubles reliably (usually 4-8 hours). This is your active sourdough starter, ready for wild yeast bread making.
Notes
- Use filtered or unchlorinated water; chlorine can inhibit the growth of wild yeast.
- A consistent temperature helps build a strong culture. Cooler kitchens slow fermentation, requiring longer wait times between feedings.
- If you see dark liquid (hooch) on top, stir it in or pour it off, then feed your sourdough starter immediately. This means it is hungry.
- For the best results when baking, use your starter when it is at its peak—doubled in size and very bubbly.
Nutrition
- Serving Size: 50g culture
- Calories: 150
- Sugar: 0.1
- Sodium: 1
- Fat: 0.5
- Saturated Fat: 0.1
- Unsaturated Fat: 0.4
- Trans Fat: 0
- Carbohydrates: 30
- Fiber: 2
- Protein: 5
- Cholesterol: 0