
Okay, let’s talk bread! You know that feeling? You crave that warm, crusty, homemade sourdough loaf, the kind that smells absolutely divine and tastes even better, but the thought of all the overnight waiting and complicated steps just makes you sigh? I totally get it. I used to think sourdough was this mystical art only reserved for folks with endless free time. But then, I discovered the magic of this sourdough unloaf bread recipe! It’s a game-changer for anyone dipping their toes into the sourdough world. We’re talking about getting that gorgeous, rustic, bakery-style bread *the same day*, using up that precious discard, and with hardly any fuss. Seriously, it’s all about approachable steps and joyful results, just like we believe here at Food Dexterity!

- Why You'll Love This Sourdough Unloaf Bread
- Gather Your Ingredients for Sourdough Discard Bread
- Step-by-Step Guide to Your Easy Sourdough Method
- Tips for Sourdough Unloaf Bread Success
- Serving and Storing Your Simple Sourdough Recipe
- Frequently Asked Questions about Sourdough Unloaf Bread
- Estimated Nutritional Information
Why You’ll Love This Sourdough Unloaf Bread
Honestly, why wouldn’t you love this sourdough unloaf bread? It’s like the perfect catch-up date with your sourdough starter! Here’s the lowdown on why it’s become my go-to:
- It’s a Same-Day Sourdough Miracle: Forget waiting 24-48 hours. You can bake this beautiful loaf all in one go. Perfect for when a craving hits!
- Super Beginner-Friendly: If you’re new to sourdough, this is your bread. No fancy techniques, no complicated shaping. Easy peasy!
- Uses Up That Precious Discard: Don’t throw away your starter discard! This recipe makes it the star, adding that wonderful sourdough tang.
- Minimal Fuss, Maximum Flavor: It’s practically a no-knead situation, and the shaping is super rustic and forgiving. You get that amazing, chewy, bakery-style texture without breaking a sweat.
Gather Your Ingredients for Sourdough Discard Bread
Alright, let’s get our hands on the goodies! For this super simple sourdough discard bread, you don’t need a ton of fancy stuff. We’re going with bread flour because it gives us that lovely chewy crumb we’re after. And of course, active sourdough starter and your discard – because they’re the heart and soul! The hydration here is around 75%, which is pretty standard and gives us that nice, soft dough. Just a little heads-up: if your starter is super runny, you might need a tiny splash more water, or if it’s super thick, a little less. Trust me, you’ll get the hang of it!
Here’s what you’ll need:
- 400 grams of bread flour
- 100 grams of active sourdough starter (make sure it’s fed and bubbly!)
- 300 grams of water
- 10 grams of salt
- 100 grams of sourdough discard (the stuff you usually toss or feed away!)
Step-by-Step Guide to Your Easy Sourdough Method
Alright, let’s get this dough party started! Making this quick sourdough bread is way simpler than you think. The key is just letting the dough do most of the work. We’re not going for fancy shaping here, just pure, rustic goodness. And trust me, this whole process is designed to be super chill, perfect for jumping into the world of sourdough. We’ll even throw in a little sourdough starter tip from my own kitchen adventures – you can find more on how to maintain your starter here!
Mixing the Dough for Your Beginner Sourdough Recipe
First things first, grab a nice big bowl. Toss in your bread flour, that bubbly active sourdough starter, and the water. Give it a good stir with your hands or a spatula until it’s all just coming together. It’ll look kinda shaggy and messy, and that’s exactly what we want! Cover it up and let it chill for about 30 minutes. This little rest helps the flour soak up all that liquid.
Incorporating Salt and Discard
Now, time for even more flavor! Sprinkle your salt right over the dough and then add in your sourdough discard. Squish and mix everything together really well. Make sure there are no dry bits of salt or pockets of discard hiding. This is where the magic really starts to build the flavor!

Bulk Fermentation and Stretch and Folds
This is where we build strength without any actual kneading! For the next couple of hours, we’re going to do “stretch and folds.” Every 30 minutes, wet your hands a little, grab one side of the dough, gently stretch it up, and fold it over the center. Turn the bowl and repeat for all four sides. You’ll do this for about two hours total. Then, let that dough just hang out at room temperature for another 1-2 hours. You’re looking for it to get nice and doubled, looking all puffy and bubbly. It’s pretty neat to see! This whole bulk fermentation stage is key for that airy texture without any hard work.
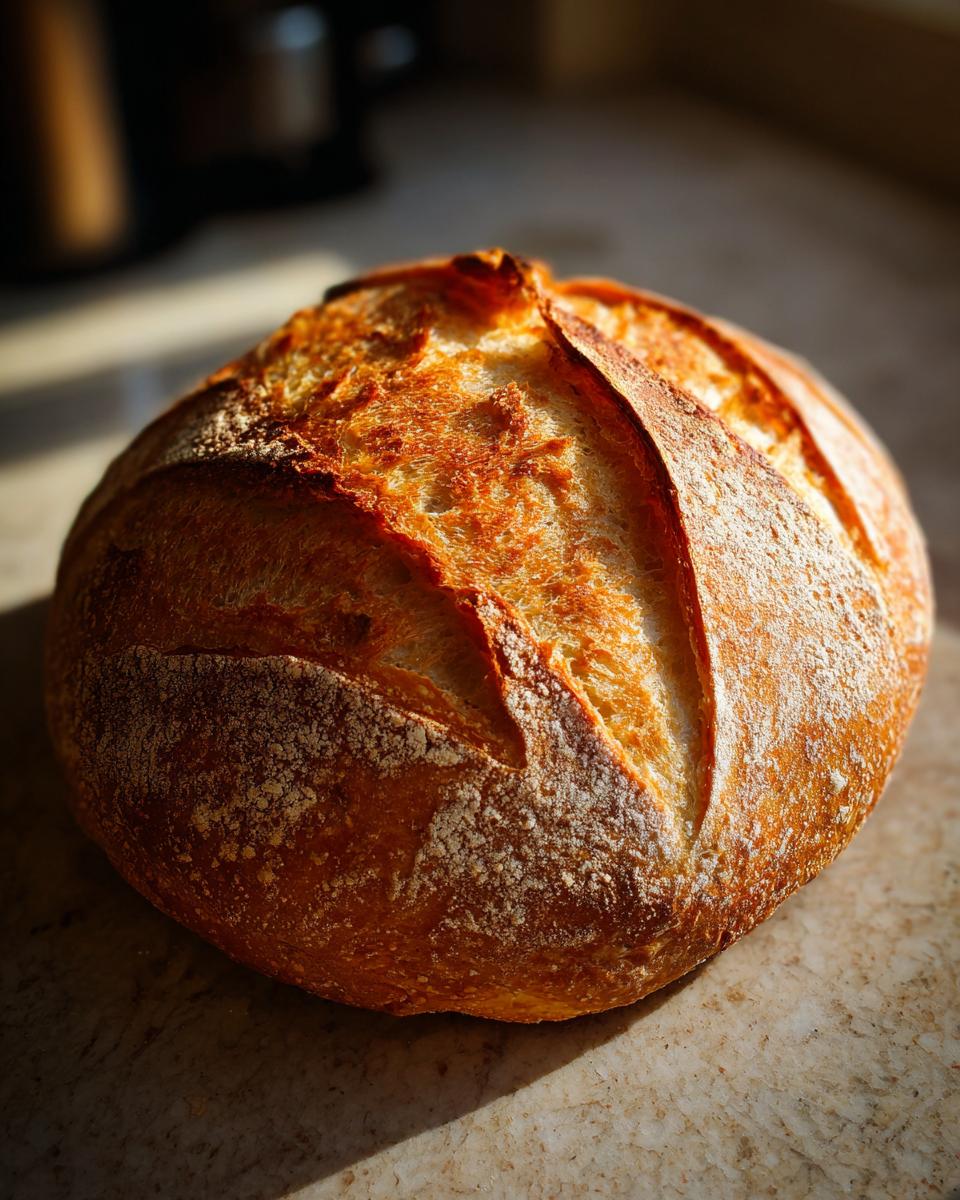
Shaping Your Rustic Sourdough Loaf
Okay, gentle hands now! Turn that beautiful, airy dough out onto a lightly floured surface. We want minimal handling here. Just coax it into a round or an oval shape. Think rustic, not perfect! That’s the charm of this easy sourdough method. Then, gently place it into your proofing basket or a bowl lined with a tea towel that you’ve floured really well.

The Final Proof for Your One Day Sourdough
Pop a cover over your dough or place it into a plastic bag. Let it proof at room temperature for about 1-2 hours. You’ll know it’s ready when it looks noticeably puffier and lighter. It should feel delicate and ready to bake!
Baking Your Quick Sourdough Bread
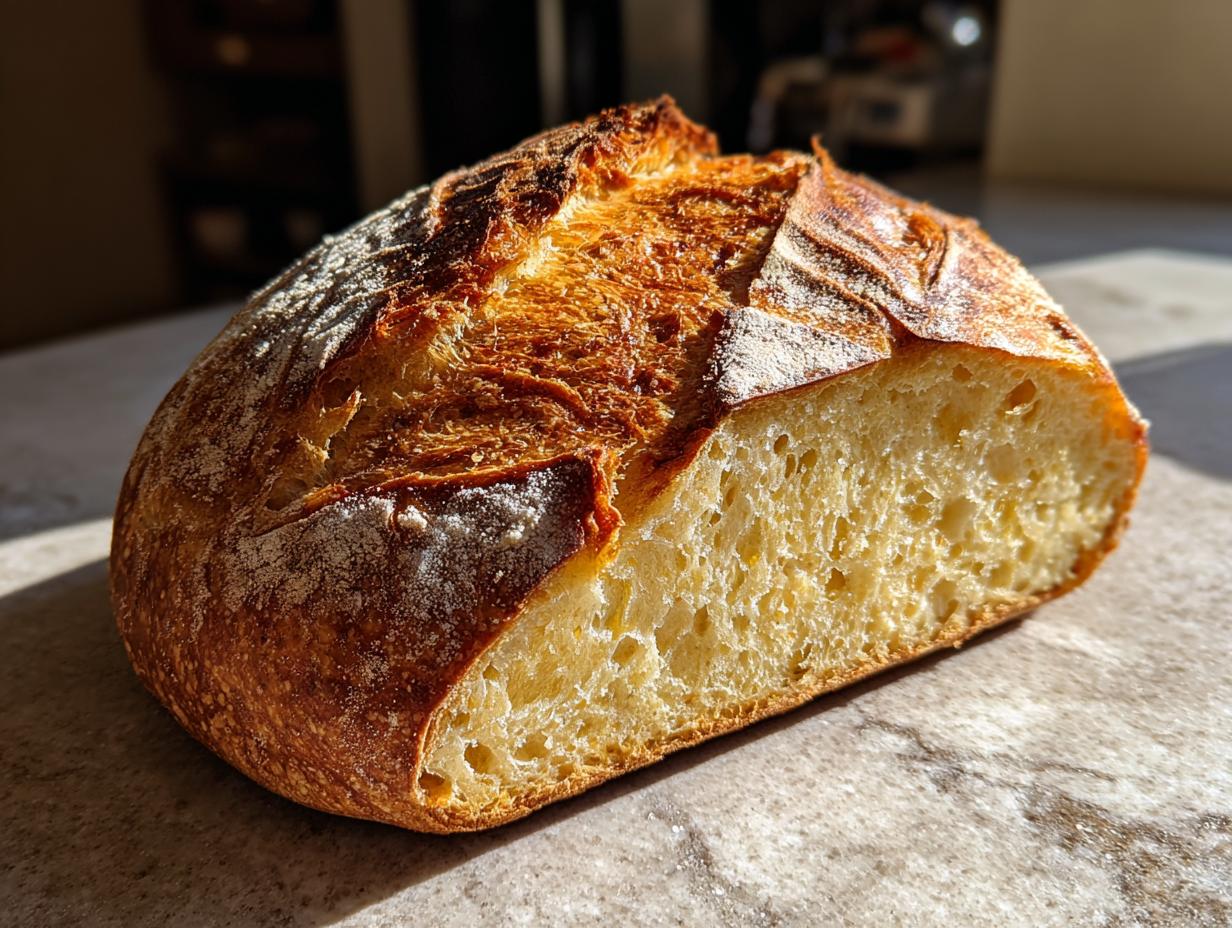
This is the moment! Preheat your oven to a hot 450°F (230°C), and don’t forget to put your Dutch oven inside for at least 30 minutes to get super hot. Carefully take that screaming-hot Dutch oven out of the oven. Gently lift your proofed loaf and pop it right in. Now, take a sharp knife or a lame and score the top of your loaf – just a simple slash or two will do. Put the lid back on the Dutch oven and bake for about 20 minutes. This traps the steam and helps it rise beautifully. Then, remove the lid and bake for another 20-25 minutes until it’s a deep, gorgeous golden brown. You’re looking for an internal temperature of around 200-210°F (93-99°C). Oh, the smell!
Tips for Sourdough Unloaf Bread Success
Okay, so you’ve made your beautiful sourdough unloaf bread, but maybe it’s not *quite* what you expected the first time around? Don’t you worry one bit! Every baker has those moments. I’ve learned a thing or two over the years, and I’m happy to share to make sure your next loaf is a stunner. Remember, the goal is always delicious, rustic bread with minimal stress!
Understanding Dough Consistency
The dough for this beginner sourdough recipe should feel soft and a little sticky, thanks to that 75% hydration. If it feels way too wet and hard to handle even with wet hands, you can add a tablespoon more bread flour. If it seems too dry and stiff, a tiny splash more water can work wonders. It’s all about getting it pliable but not a sticky mess!
Achieving the Perfect Crust
That crackly, golden crust? It’s largely thanks to the Dutch oven and that initial steam. Keeping the lid on traps all that wonderful moisture. Once you take the lid off, your oven gets really hot, which helps that crust get perfectly deep and gorgeous. Don’t be afraid of a dark crust – that’s where the best flavor is!
Serving and Storing Your Simple Sourdough Recipe
Oh, the best part! This simple sourdough recipe is amazing warm, right after it cools a bit. My favorite is slathering it with good butter and a sprinkle of flaky sea salt – pure heaven! You can also load it up with your favorite cheese for grilled cheese, or use it for fantastic toast. To keep it fresh, just store any leftovers in a paper bag on the counter for a day or two. If it gets a little stale, don’t toss it! Just pop slices in the toaster or briefly warm them in the oven to bring back some of that crusty goodness.
Frequently Asked Questions about Sourdough Unloaf Bread
Got questions about this awesome sourdough unloaf bread? I’ve got answers!
Can I make this sourdough discard bread without a Dutch oven?
Absolutely! While a Dutch oven gives you that amazing crust and helps trap steam, you can totally make this sourdough discard bread without one. Just preheat a baking sheet or a pizza stone in your oven. When it’s time to bake, carefully place your proofed loaf directly onto the hot surface. You might want to toss a few ice cubes into a separate pan on the bottom rack right as you put the bread in – that steam helps a lot!
What is sourdough discard and how do I use it?
Sourdough discard is basically the part of your active sourdough starter that you remove before feeding it. It’s packed with flavor! Instead of tossing it, you can use it in so many things. This recipe is perfect for it, giving your bread that extra tang. You can also use it in pancakes, waffles, crackers, and even cookies! You can learn more about all the fun ways to use discard right here.
How long does this same day sourdough take from start to finish?
This same day sourdough is designed to be speedy! From mixing to baking, you’re looking at roughly 3-4 hours of active time, including resting periods and stretch and folds. The actual baking is about 45 minutes. So, you can honestly start it in the morning and have fresh bread for lunch or dinner!
Estimated Nutritional Information
Just a heads-up, these numbers are estimates, okay? Different flours, starters, and even how much you slice it will change things a bit! But generally, for one slice of this amazing sourdough unloaf bread, you’re looking at about 250 calories, 3g of fat, 8g of protein, and 50g of carbs, with about 3g of fiber and 400mg of sodium. Pretty good for a slice of homemade heaven!
PrintEasy Sourdough Unloaf Bread

A simple, same-day sourdough bread recipe perfect for beginners, using sourdough discard for a rustic, bakery-style loaf with minimal effort.
- Prep Time: 30 min
- Cook Time: 45 min
- Total Time: 75 min
- Yield: 1 loaf 1x
- Category: Bread
- Method: Baking
- Cuisine: American
- Diet: Vegetarian
Ingredients
- 400g bread flour
- 100g active sourdough starter
- 300g water
- 10g salt
- 100g sourdough discard
Instructions
- In a large bowl, combine the bread flour, active sourdough starter, and water. Mix until just combined, forming a shaggy dough.
- Cover the bowl and let it rest for 30 minutes.
- Add the salt and sourdough discard to the dough. Mix thoroughly until the salt and discard are fully incorporated.
- Perform a series of stretch and folds every 30 minutes for the next 2 hours.
- After the stretch and folds, let the dough rest at room temperature for another 1-2 hours, or until it has increased in volume and looks bubbly.
- Gently turn the dough out onto a lightly floured surface. Shape it into a round or oval loaf with minimal handling.
- Place the shaped dough into a floured proofing basket or a bowl lined with a floured tea towel.
- Cover the dough and let it proof at room temperature for 1-2 hours, or until it looks puffy.
- Preheat your oven to 450°F (230°C) with a Dutch oven inside for at least 30 minutes.
- Carefully remove the hot Dutch oven from the oven. Gently transfer the proofed dough into the Dutch oven.
- Score the top of the loaf with a sharp knife or lame.
- Cover the Dutch oven and bake for 20 minutes.
- Remove the lid and continue baking for another 20-25 minutes, or until the crust is deep golden brown and the internal temperature reaches 200-210°F (93-99°C).
- Remove the bread from the Dutch oven and let it cool completely on a wire rack before slicing.
Notes
- Hydration is around 75% (400g flour + 100g starter + 300g water + 100g discard = 900g total dough weight, with 700g water/starter/discard = 77.8% hydration). Adjust water slightly if your starter is very wet or dry.
- Look for the dough to be airy and jiggly after the bulk fermentation.
- The final proof should result in a dough that is visibly increased in size and feels light.
- A longer, cold proof in the refrigerator for 12-24 hours can develop more flavor, but this recipe is designed for same-day results.
Nutrition
- Serving Size: 1 slice
- Calories: 250
- Sugar: 2g
- Sodium: 400mg
- Fat: 3g
- Saturated Fat: 0.5g
- Unsaturated Fat: 2.5g
- Trans Fat: 0g
- Carbohydrates: 50g
- Fiber: 3g
- Protein: 8g
- Cholesterol: 0mg