
Oh my gosh, if there is one thing that instantly makes my house feel like the happiest place on earth, it’s the smell of homemade Italian bread baking in the oven. Seriously, that warm, yeasty aroma is just pure comfort, right? If you’ve ever looked at those gorgeous loaves at the bakery and thought, “No way can I make that,” I’m here to tell you: yes, you absolutely can! This is genuinely the easiest, crustiest Italian bread recipe I’ve developed for beginners.
We aren’t doing anything complicated here. Because at Food Dexterity, we focus on achievable home cooking, my goal is always to give you that beautiful, bakery-style result without the fuss. You are going to get that crackly, golden exterior and a perfectly soft, chewy inside every single time. Trust me, you’ll wonder why you ever bought it from a store! And hey, if you love quick bread things, you have to check out my guide on easy 1-hour copycat breadsticks while you wait for this dough to rise.
- Why This is the Best Italian Bread Recipe for Your Kitchen
- Simple Ingredients for Homemade Italian Bread
- Step-by-Step Instructions for Your Crusty Italian Bread
- Tips for Success When Making Artisan Loaf at Home
- Serving Suggestions for Your Warm Homemade Bread
- Storing and Reheating Your Italian Bread
- Frequently Asked Questions About Homemade Italian Bread
- Estimated Nutritional Data for This Italian Bread Loaf
- Share Your Golden Brown Loaf
Why This is the Best Italian Bread Recipe for Your Kitchen
I know there are a million ways to tackle Homemade Italian Bread, but I promise you, this one is geared specifically for success, even if you’re labeling yourself deep into Beginner Bread Baking territory. The payoff is huge: that beautiful contrast between a Soft Inside Crusty Outside Bread and minimal actual hands-on work. If you’ve ever struggled with no-yeast recipes, don’t worry, this one uses the active dry yeast method perfectly. You can see my other easy soda bread recipe with no yeast if you ever want to try that later, but for this rustic loaf, yeast is key!
We skip the fancy poolish or overnight proofing that can intimidate new bakers. Everything here is straightforward, designed to build your confidence so you are ready to tackle more complex artisan loaves later.
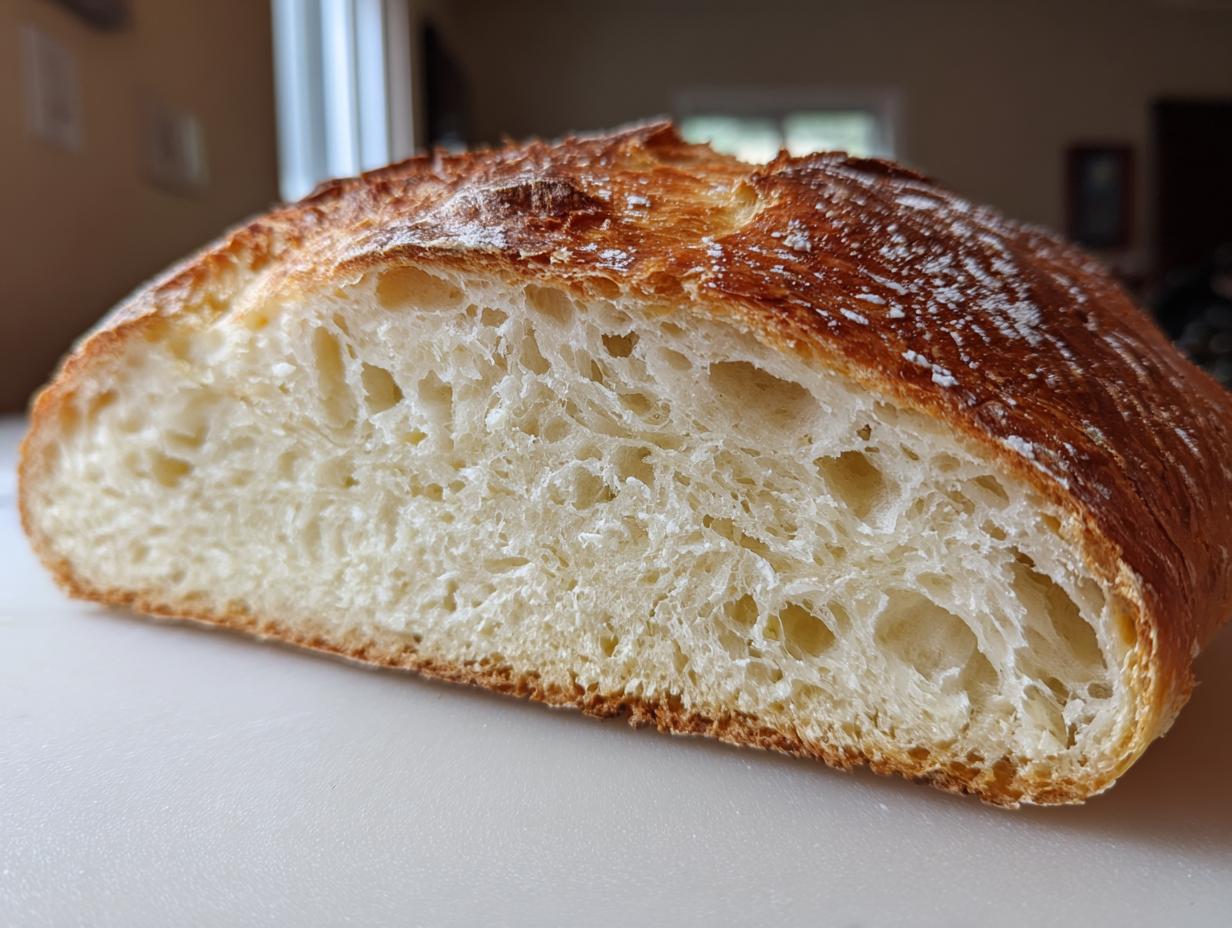
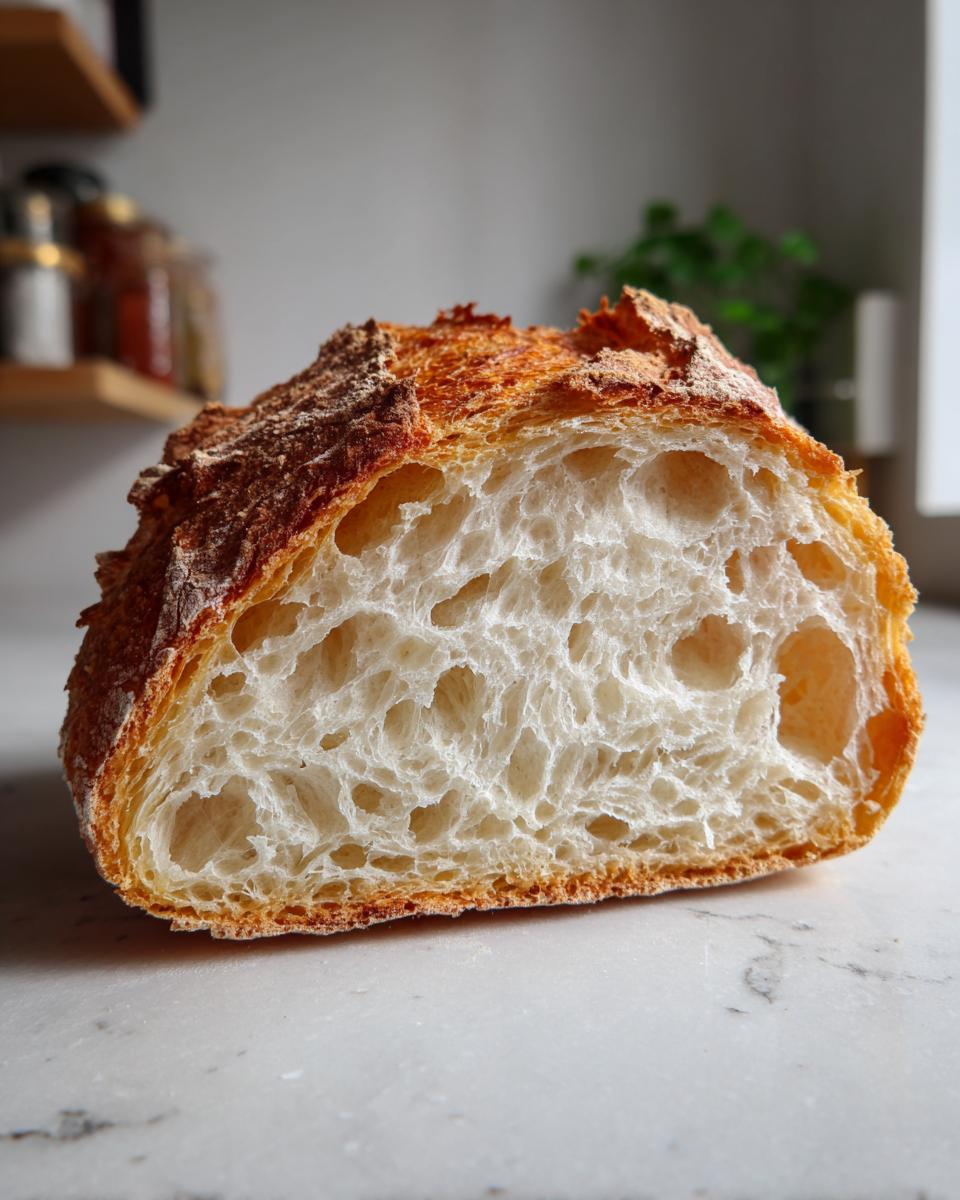
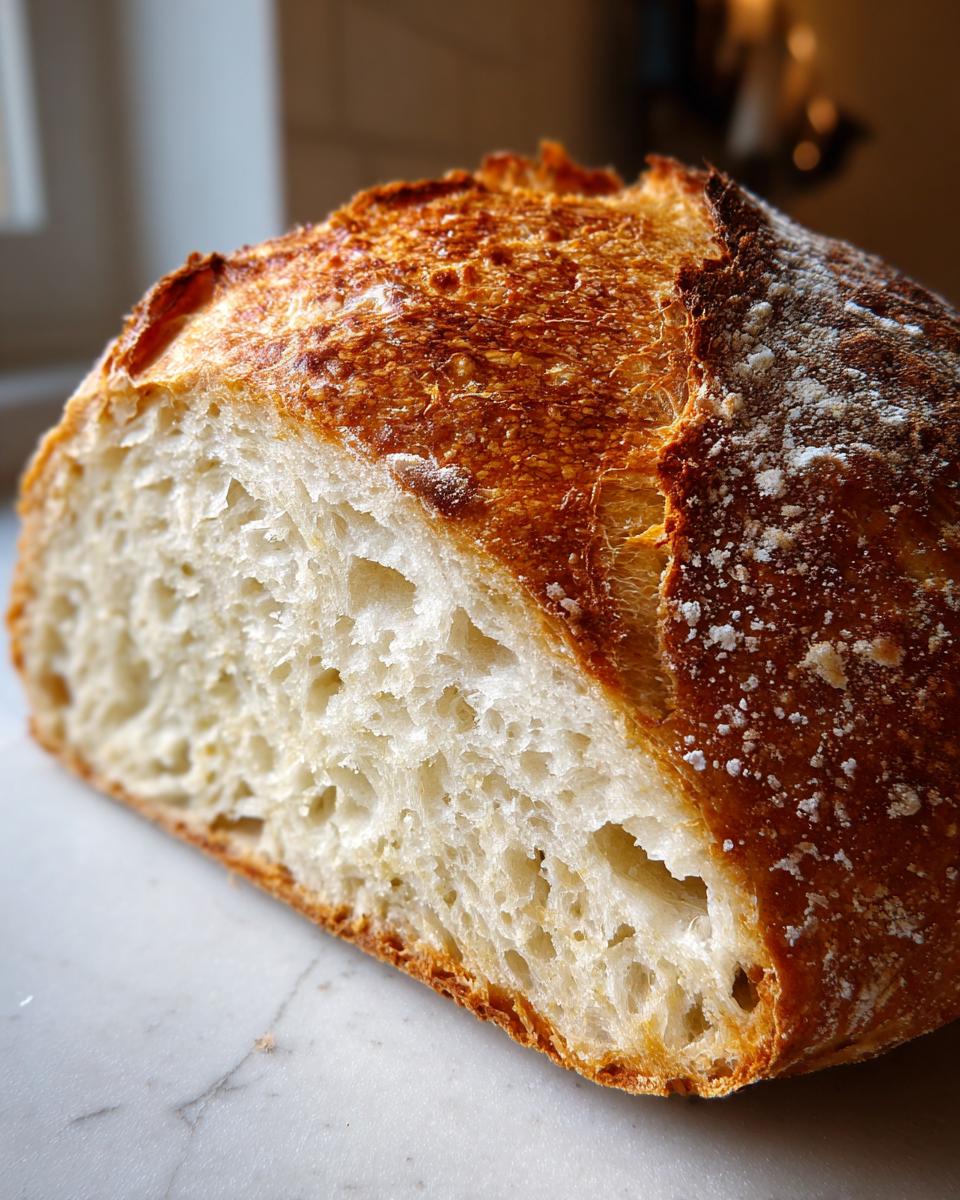
Achieving the Perfect Crusty Bread Recipe Texture
That satisfying *crack* when you slice into the loaf? That comes entirely from steam! I’m going to have you introduce a little puff of hot water into the oven right before the bread goes in. The moisture keeps the crust supple during the initial bake, letting the dough expand fully, and then when that moisture burns off, you are left with that phenomenal, crispy layer we all crave.

Quick Italian Bread with Minimal Effort
When I say this is an Easy Homemade Bread, I mean it. Once the yeast blooms—which is your major quality check—the process is mostly waiting time, not working time. We do a solid 8 to 10 minutes of kneading until it feels right, and then the dough takes care of the heavy lifting for us while it rises peacefully on the counter.
Simple Ingredients for Homemade Italian Bread
One of the best parts about making this Italian bread is realizing you don’t need a fancy pantry setup. We’re using Simple Ingredients Bread staples—the kind of things you probably have right now for breakfast or dinner! This recipe is all about leveraging standard items like all-purpose flour and active dry yeast to bring a rustic loaf right to your table. No specialty flours needed here, which keeps things approachable.
Here’s what you’ll need for one large, beautiful, Golden Brown Loaf:
- 3 1/2 cups all-purpose flour
- 1 1/2 teaspoons salt
- 1 teaspoon granulated sugar
- 2 1/4 teaspoons active dry yeast (that’s one standard packet!)
- 1 1/4 cups warm water (we’ll talk about this in a second!)
- 2 tablespoons olive oil, plus more for coating the bowl
Ingredient Notes and Substitutions
Okay, let’s chat water temperature, because this is the make-or-break step for beginners. When you mix that yeast with the sugar, your water needs to be between 105°F and 115°F. If it’s too cold, the yeast just chills out and won’t wake up. If it’s too hot, oops, you kill it! You want it to feel pleasantly warm, not hot, against your wrist. That five-minute foam check proves your yeast is ready to work miracles.
As for the oil, I strongly prefer using good quality olive oil for that classic Italian flavor that really shines through. If you absolutely don’t have any, you can use melted, unsalted butter in a pinch, but know that the final taste profile will lean slightly less rustic, if that makes sense.
Step-by-Step Instructions for Your Crusty Italian Bread
Alright, let’s get our hands dusty! This process is totally manageable when you break it down. We go from mixing sticky stuff to having a beautiful, Golden Brown Loaf ready for dinner. Just follow the steps, trust the timing, and remember that warm spot in your kitchen is going to be your best friend for the rising stages.
You want to get your oven up to temperature early so it’s roaring hot when the dough is ready for its final proof and bake. Preheating is non-negotiable for that perfect crust! For the final bake, we’re using the steam trick—it’s the key to that bakery feel. If you’re looking for amazing ways to use this bread once it’s done, my homemade alfredo sauce recipe is absolutely perfect for dipping!
Mixing and Kneading the Italian Bread Dough
First things first: get that yeast happy. Mix your warm water, sugar, and yeast and let it sit for about 5 to 10 minutes. If you see foam—like a bubbly latte on top—cheers! Your yeast is alive and ready to go. If nothing happens, you need to start that part over because your yeast is probably dead. Oops!
After adding the liquids and about half the flour, you’ll mix until you get what I call ‘shaggy dough.’ It’s messy and looks like it won’t ever come together, but keep faith! Turn it out onto your counter and knead it like you mean it for a solid 8 to 10 minutes. When you’re done, the dough should be smooth, elastic, and not stick to your hands anymore. That smooth texture is going to give you that wonderfully soft, chewy interior.

The Secret to a Bakery Style Loaf: Steam Injection
This is where we trick the oven into thinking it’s a professional setup. Step 9 is critical: Preheat your oven to 400°F, but toss an empty, shallow metal pan onto the lowest rack while it heats up. Seriously, get that rack scorching hot!
Once your dough has had its second puff and is ready to bake, brush the top lightly with water—this helps the crust set properly. Now, quickly slide your shaped loaf onto the baking sheet inside the oven. IMMEDIATELY, pour about a cup of hot water into that hot pan you preheated underneath. Stand back a bit, because it will create a huge cloud of steam! Close the door fast. That steam hangs in the oven, keeping the surface of the dough moist so it can expand to its fullest potential (that’s the oven spring!). After about 10 minutes, carefully remove the steam pan and let it bake until golden brown.
Tips for Success When Making Artisan Loaf at Home
You’ve got the dough kneaded and rising beautifully—now let’s talk about nudging this into true Artisan Loaf at Home territory. Making great bread is really about small details that add up to a huge difference! I want you to feel totally confident pulling this out of the oven looking like you bought it from a little shop downtown.
Remember that steam pan we used? If you want that *extra* shatteringly crisp crust, here’s a secret tip: in the first 10 minutes of baking, open the oven door quickly (don’t let too much heat escape!) and spritz the oven walls with a spray bottle filled with water. Do that maybe twice. It adds even more steam right when the crust is setting up. Be careful if you do this; things are hot!
Also, avoid peeking too much early on, especially before that first rise is done. Yeast likes a calm, warm environment. If you’re constantly opening the door to check, you bring the temperature down and slow it all down. Patience here really pays off for that soft, chewy center. For great advice on getting dramatic crusts on other things, check out my fluffy Yorkshire pudding recipe—the principles of heat expansion are similar!
Serving Suggestions for Your Warm Homemade Bread
Oh, the best part! Once this Warm Homemade Bread cools just enough so you don’t totally burn your tongue, it’s ready to shine. Honestly, slicing into that golden loaf—the aroma alone is worth the effort—is a treat all by itself. My favorite simple Bread Dipping Recipe is just good quality olive oil with a shake of pepper and dried oregano. Don’t judge me, but I could eat half a loaf just like that!
But seriously, this makes the most incredible Italian Dinner Side Bread. It’s sturdy enough to stand up to chunky pasta sauces, or use it to build an epic, giant sandwich. You know how much I love a good side, so serve it alongside my Copycat Olive Garden Salad for the ultimate comfort meal. Or, if you want to amp up the appetizer game, you absolutely must try using slices of this bread for my Bruschetta Dip. I love that crunch! If you need more ideas on how to serve up crusty loaves, check out this great resource on how to get the perfect crust!
Storing and Reheating Your Italian Bread
Now, this is where reality sets in. As glorious as that fresh, crisp crust is right out of the oven, I hate to say it, but it’s not going to stay that way. That magnificent crust softens up quickly once it cools, which is just how bread works! If you have leftovers (lucky you!), don’t just let them sit there getting soft.
The trick to resurrecting those day-old loaves is heat! Wrap your cooled Italian bread in foil—loose foil, not sealed tight—and pop it back into a 350°F oven for about 8 to 10 minutes. The foil traps just enough moisture to soften the inside again, and the heat blasts that crust back into being crispy. It’s like magic for your Homemade Italian Bread!
Frequently Asked Questions About Homemade Italian Bread
It’s totally normal to have questions when you’re moving from store-bought to baking your own Homemade Italian Bread! Baking is science, but it’s also instinct, and sometimes you just need a little nudge to get that perfect result. Here are the things folks ask me most often about this Crusty Bread Recipe. If you end up with a gorgeous loaf perfect for dipping, you should totally pair it with my easy Caesar chicken recipe!
Can I make this Italian bread without an oven rack steam pan?
You absolutely can! That steam pan is my secret weapon for getting that true, shatteringly crisp exterior that makes this Italian bread feel artisanal. But if you don’t have an extra shallow pan to sacrifice to the heat gods, don’t stress. You won’t get that intense crunch, but you can help things along. Right before that loaf goes into the oven, use a spray bottle full of water and lightly mist the dough surface really well. It won’t create the same environment as sitting in steam, but it encourages a nice, thin crust instead of a dull one. It’ll still be delicious!
How long does it take to make this Quick Italian Bread?
When I call this Crusty Bread Recipe ‘quick,’ I’m talking about the active, hands-on time. Kneading takes maybe ten minutes total, and shaping is fast. However, you do have to account for rising time. Your active time is really just about 20 minutes spread out! The total time, including both rises (which are mostly hands-off!), clocks in around two hours and five minutes. So, while you aren’t doing much work, you do need to plan about two hours for the dough to do its thing so you can get that perfect Bakery Style Loaf.
My bread didn’t rise well. What went wrong with my yeast?
Ugh, the dreaded flat dough moment. This almost always comes back to Step 1 and the temperature of your water. If the water was too hot—say, over 130°F—it basically boiled the yeast to death, and now you just have flavored water, not active bubbles. If it didn’t rise, you probably didn’t see that key foam after 5 to 10 minutes. This recipe is designed to be a Foolproof Bread Recipe, so the foam check is my way of telling you, “Stop right there and test your water temp!” If you see that foam, you know your yeast is happy and ready to make your Soft Inside Crusty Outside Bread nice and airy!
Estimated Nutritional Data for This Italian Bread Loaf
Now, before you go ahead and slice up that beautiful, aromatic loaf, I always like to include a little note about the nutrition! Remember, these numbers are based on the specific ingredients I listed out in the recipe—things like the exact brand of flour or the amount of olive oil you use can make things shift a tiny bit. So, take this as a great guide, but not a hard and fast guarantee, okay?
This general breakdown is calculated based on the whole loaf yielding about 13 good-sized slices. It’s a simple carbohydrate bread, perfect for soaking up sauce, but it keeps the fat content surprisingly low due to using minimal oil in the dough itself!
- Serving Size: 1 slice
- Calories: 140
- Fat: 2 grams
- Saturated Fat: 0.3 grams
- Carbohydrates: 27 grams
- Protein: 4 grams
- Sugar: 0.5 grams
- Sodium: 250 mg
It’s honestly pretty straightforward stuff! We keep the sugar extremely low since it’s just there to wake up the yeast, not for sweetness. Enjoy that slice, knowing you made something spectacular from totally basic stuff!
Share Your Golden Brown Loaf
Well, look at you! You’ve successfully navigated yeast blooming, gentle kneading, and you’ve probably filled your entire house with the most amazing fresh baked bread aroma imaginable. Now that you have this stunning, crusty Italian bread cooling on the rack, I need to know everything! Seriously, come back and tell me how it performed.
Did you get that satisfying crackle when you tapped the side? Was the inside soft and perfectly chewy, ready for dipping into olive oil or soaking up leftover sauce? Don’t be shy! I want to hear all about your results. Please take a second to leave a rating for this Best Italian Bread Recipe—a big five stars if you loved it! It really helps other beginner bakers see just how achievable this Bakery Style Loaf truly is.
And if you managed to resist eating the whole thing in one sitting, snap a picture! Tag me on social media so I can see your gorgeous Golden Brown Loaf. Seeing your success is honestly the best part of sharing these recipes. If you are on Pinterest, check out all the inspiration folks have shared using this recipe, like this beautiful gal who baked hers right up!
Once you’ve devoured your first loaf, maybe you need a sweet ending to the meal? You should definitely try my easy apple cobbler recipe next! Happy baking, friend!
PrintEasy Crusty Italian Bread Recipe for Beginners

Bake bakery-style Italian bread at home with this simple recipe. You get a golden, crispy crust and a soft, chewy interior using basic ingredients.
- Prep Time: 20 min
- Cook Time: 35 min
- Total Time: 2 hours 5 minutes
- Yield: 1 large loaf 1x
- Category: Dinner Side
- Method: Baking
- Cuisine: Italian
- Diet: Vegetarian
Ingredients
- 3 1/2 cups all-purpose flour
- 1 1/2 teaspoons salt
- 1 teaspoon granulated sugar
- 2 1/4 teaspoons active dry yeast (1 packet)
- 1 1/4 cups warm water (about 105-115°F)
- 2 tablespoons olive oil, plus more for the bowl
Instructions
- In a large bowl, mix the warm water, sugar, and yeast. Let this stand for 5 to 10 minutes until it becomes foamy. This shows the yeast is active.
- Add the olive oil, salt, and half of the flour to the yeast mixture. Mix until just combined.
- Gradually add the remaining flour, mixing until a shaggy dough forms.
- Turn the dough out onto a lightly floured surface. Knead the dough for 8 to 10 minutes until it becomes smooth and elastic.
- Lightly oil a clean bowl. Place the dough in the bowl and turn it over to coat the surface with oil. Cover the bowl with plastic wrap or a clean kitchen towel.
- Let the dough rise in a warm place for 1 to 1.5 hours, or until it has doubled in size.
- Gently punch down the risen dough. Shape it into a long, oval loaf.
- Place the loaf on a baking sheet lined with parchment paper or in a lightly oiled loaf pan. Cover it loosely and let it rise again for 30 to 45 minutes, or until puffy.
- Preheat your oven to 400°F (200°C). Place a shallow pan on the bottom rack to create steam.
- Before baking, lightly brush the top of the loaf with water. You can score the top with a sharp knife if you wish.
- Carefully pour about 1 cup of hot water into the shallow pan on the bottom rack to create steam, then quickly close the oven door.
- Bake for 30 to 35 minutes, or until the crust is deep golden brown and sounds hollow when tapped.
- Remove the bread from the oven and let it cool completely on a wire rack before slicing. Enjoy the aroma of fresh baked bread.
Notes
- For an extra crispy crust, spray the inside walls of the oven with water two times during the first 10 minutes of baking.
- If you want a softer crust, skip the steam pan and brush the loaf with melted butter immediately after removing it from the oven.
- This bread is excellent for dipping in olive oil or serving alongside pasta dishes.
Nutrition
- Serving Size: 1 slice
- Calories: 140
- Sugar: 0.5
- Sodium: 250
- Fat: 2
- Saturated Fat: 0.3
- Unsaturated Fat: 1.7
- Trans Fat: 0
- Carbohydrates: 27
- Fiber: 1
- Protein: 4
- Cholesterol: 0