

Oh my goodness, there is nothing in the world that smells better than fresh bread baking, right? That warm, yeasty, slightly toasted perfume just fills the entire house and makes you feel instantly cozy. Forget fighting the crowds at the bakery because today, we are making the best french bread you’ve ever had, and I promise you, it is totally achievable in less than two hours! This recipe hits that sweet spot: you get the gorgeous, crackly crust people dream about, but the inside stays beautifully soft and fluffy. That’s the Food Dexterity promise—we skip the complicated steps and focus on giving you simple recipes for real-life kitchens, ensuring you get that authentic, delicious result every single time you bake. It’s time to bring that satisfying aroma home! For more on how we approach making baking approachable, check out our philosophy here.
- Why This Easy Homemade French Bread Recipe Works for You
- Gathering Ingredients for Your Homemade French Bread Recipe
- Step-by-Step Instructions for Quick French Bread Recipe
- Tips for Baking Homemade Bread Success
- Serving Suggestions for Your Fresh French Bread
- Storage and Reheating Instructions for Perfect French Bread
- Frequently Asked Questions About Making French Bread
- Nutritional Estimates for Homemade French Bread
- Share Your Soft French Bread at Home Creations
Why This Easy Homemade French Bread Recipe Works for You
I know what you’re looking for: that stunning, bakery style bread that tastes incredible served warm alongside something hearty, like my black bean soup. The best part about this version of easy French bread is that we nail the texture payoff without needing to hang around all day waiting for dough to rise twice. We are shooting for that perfect combination of soft and fluffy on the inside while still delivering that satisfying crunch on the outside. It’s completely possible to make soft French bread at home that rivals what you buy, and we do it in under two hours total. It’s all about smart steps, not complicated ingredients!
Achieving Bakery Style Bread Texture Simply
Getting that contrast between a crusty exterior bread and a light, tender crumb bread inside used to feel like black magic, but it’s actually super simple. The secret weapon here, besides the short rise time, is the steam in your oven. Don’t worry, you don’t need one of those fancy professional bread ovens! Simply adding a pan of hot water underneath your loaves creates a moist environment initially. This keeps the surface of the dough soft long enough to expand fully, which guarantees that fluffy middle, before locking in that lovely crispness as it bakes.
Gathering Ingredients for Your Homemade French Bread Recipe
Okay, let’s talk about what you need before we dive into the mixing bowl. For this Homemade French Bread Recipe, we are sticking to the absolute basics. You should be able to find everything right in your pantry or at your local grocery store! When you see the list of ingredients below, know that precision matters, even with simple baking. I’m spelling out exactly what works best so we don’t end up with a dud loaf. If you follow this exact list, you’ll have two beautiful loaves of bread ready for baking!
Here’s what you need on your counter:
- 3 cups all-purpose flour
- 1 teaspoon salt
- 1 packet (2 1/4 teaspoons) active dry yeast
- 1 1/4 cups warm water (about 105-115°F)
- 1 tablespoon sugar
- 1 egg white, lightly beaten (for wash)
Ingredient Notes and Beginner Substitutions
The water temperature is seriously important here—don’t guess! It needs to be warm, right between 105 and 115 degrees Fahrenheit. If it’s too cold, the yeast won’t wake up, and if it’s too hot, you’ll kill it dead. Oops! That single tablespoon of sugar isn’t for sweetness; it’s simply the breakfast the yeast needs to get active and foamy. We’re using all-purpose flour because it makes for a lovely, easy loaf. If you really want to push for that slightly chewier texture in this Simple Yeast Bread, you *can* swap maybe a half cup of the AP flour for bread flour, but honestly, the standard flour gives us the great result we are looking for today.
Step-by-Step Instructions for Quick French Bread Recipe
Alright, time for the fun part! This is where we turn simple ingredients into that beautiful, golden french bread. I’ve laid out the steps so you can tackle this Quick French Bread Recipe without any stress. Remember, patience during the rising times is key, but the active work time is really minimal, setting us up for success in under two hours! Everything here is designed to build confidence, just like when you learn to make other great loaves, like my Italian bread.
Activating Yeast and Mixing the French Bread Dough
First things first, we need happy yeast! Once your warm water and sugar are mixed, sprinkle that yeast right on top. We let this sit until it looks foamy—that’s your visual cue that the yeast is alive and ready to work its magic. Once foamy, toss in your flour and salt. Mix it up with a sturdy spoon until it looks shaggy, kind of messy. Don’t worry if it looks strange; that’s totally normal before you get your hands in there. You are essentially just binding the ingredients together at this stage.
Shaping and Second Rise for Fluffy Loaf Recipe
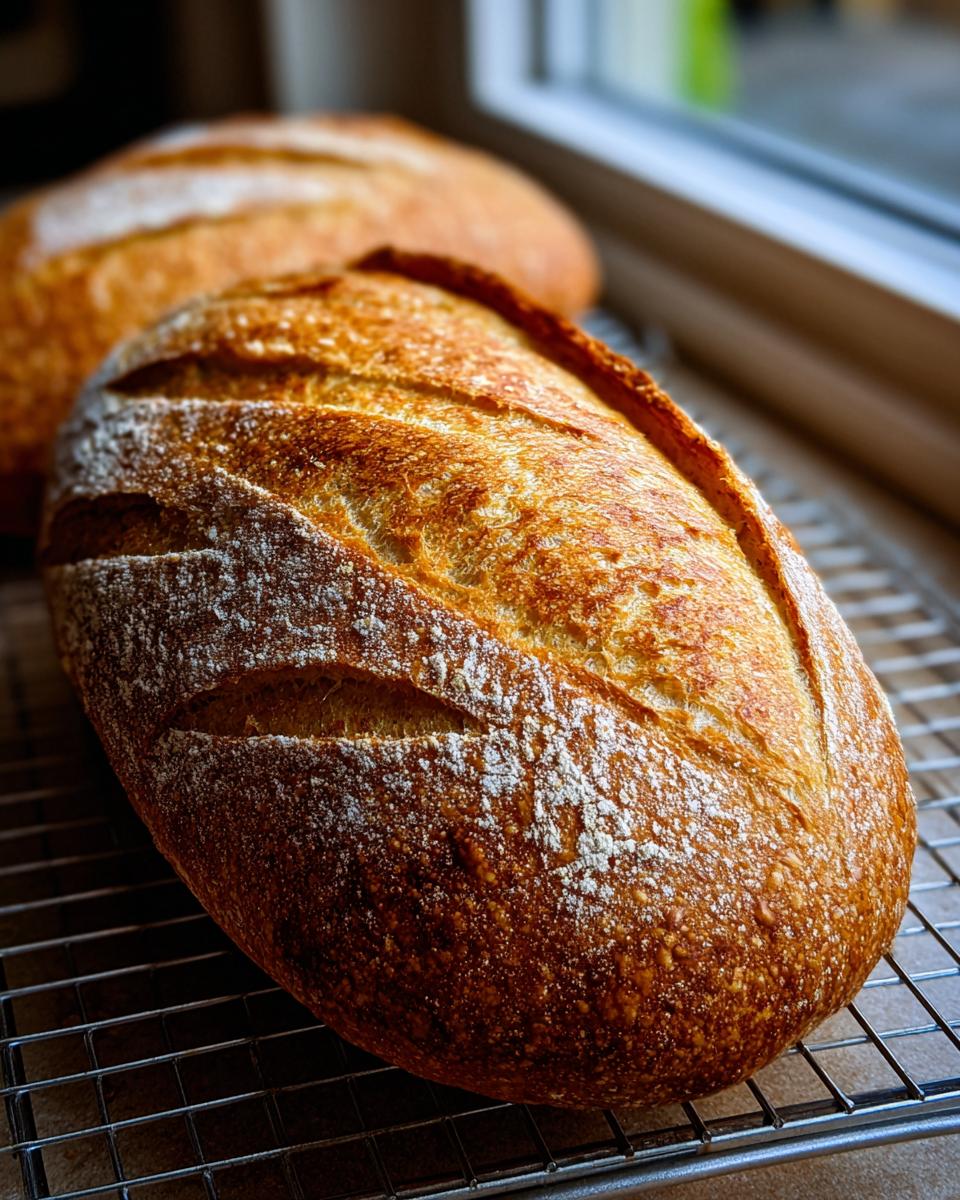
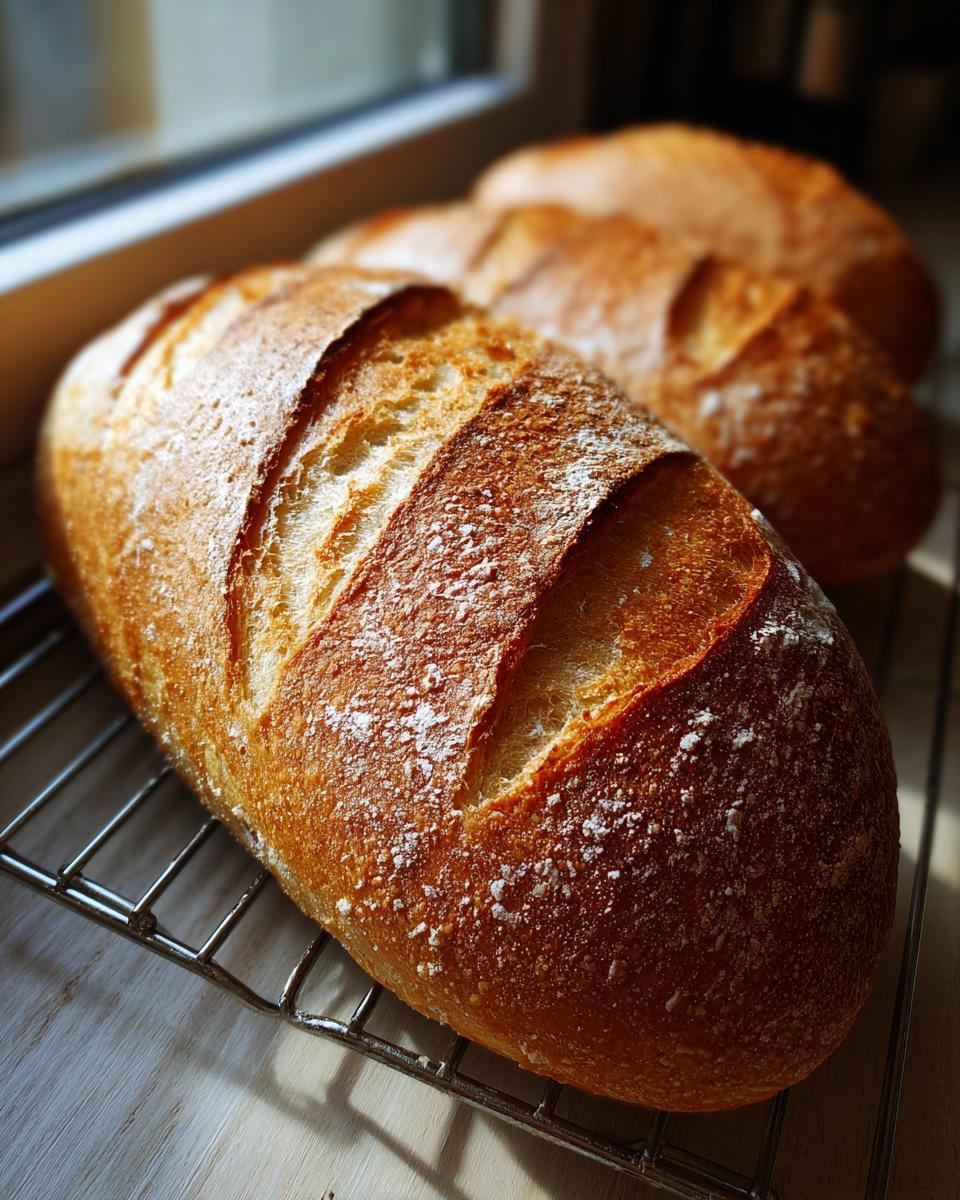
Once your dough has doubled (that’s the 60-minute first rise!), gently punch it down to release that air—it feels so satisfying! Now, divide that lovely dough in half evenly. I always try to roll mine out into long, skinny logs, about 12 to 14 inches long. Try to keep them uniform in thickness so they bake evenly. Once shaped and placed on your prepared sheet, cover them loosely and let them relax for a second, shorter rise—about 20 minutes. This little rest period really helps develop that fluffy loaf recipe texture we love so much.
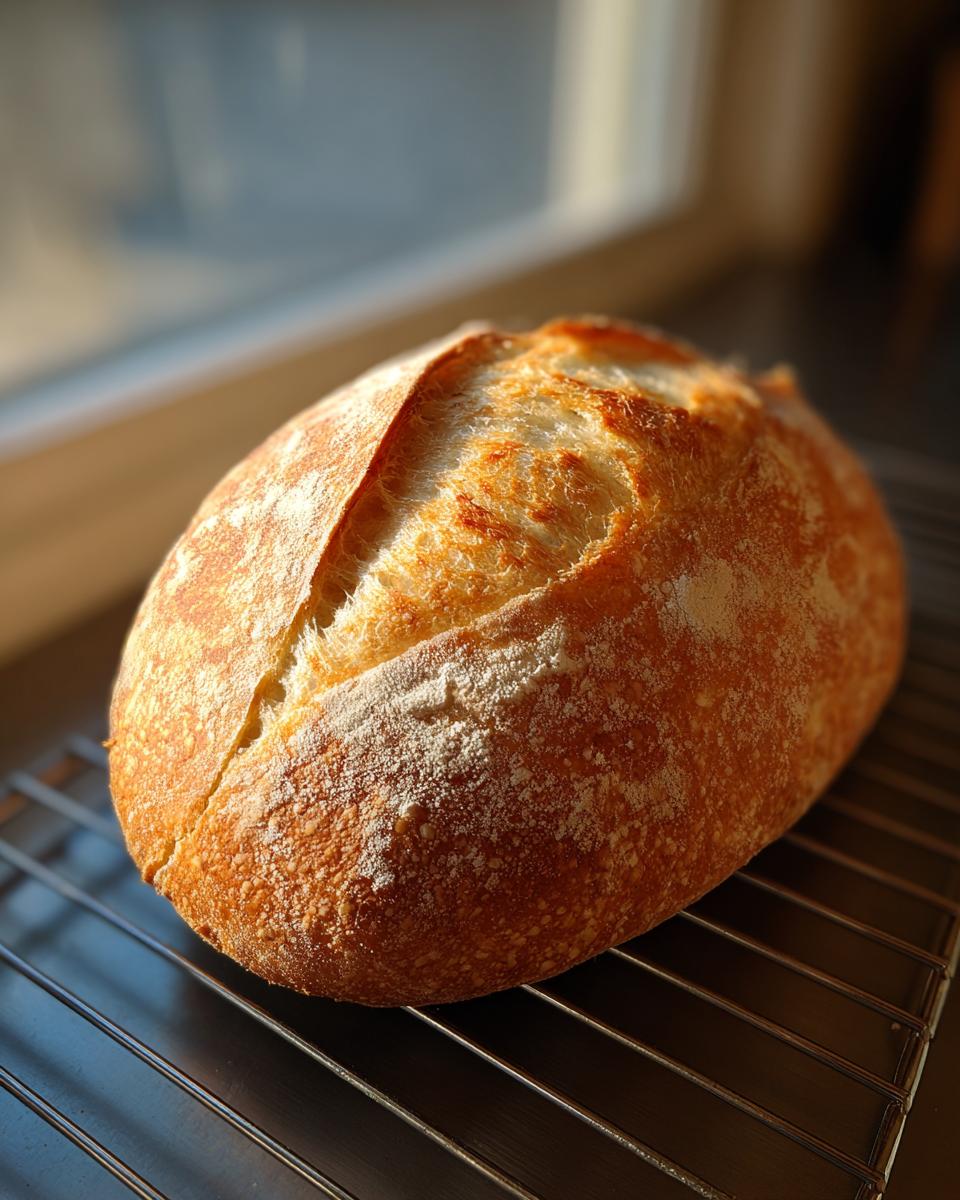
Creating the Perfect Crusty Exterior Bread
Before that 20-minute rest is up, get your oven cranking up to 400°F! And remember that steam we talked about? Place a shallow pan on the bottom rack now so it gets nice and hot. When your loaves are rested, brush the tops lightly with the beaten egg white—this gives you that beautiful, golden sheen when it’s done. Then, use a very sharp knife to make three quick diagonal slashes across the top of each loaf. This is called scoring, and it helps the bread expand nicely rather than ripping open randomly. Right before they go in, carefully pour about half a cup of boiling water into that hot bottom pan, quickly shut the door, and bake for 20 to 25 minutes. You’re making crusty exterior bread right in your home oven!

Tips for Baking Homemade Bread Success
Even with a straightforward Homemade French Bread Recipe, sometimes things just don’t look exactly like the picture, and that’s okay! When you’re just starting out with beginner bread baking, these little hiccups happen to everyone. I’ve gathered a few vital baking homemade bread tips that really help you diagnose what’s happening inside that oven, making sure your next loaf is even better. Speaking of delicious pairings, once you have this amazing bread, you simply have to try serving it with my whipped hot honey ricotta dip!
Troubleshooting Common French Bread Issues
If your loaf came out flat as a pancake, chances are one of two things happened: either you didn’t knead it quite long enough to build up that necessary gluten structure, or you let it proof way too long during that first rise. Stick to that 60-minute mark and really feel that dough—it should have some spring back when you poke it! Conversely, if your bread is tough or feels heavy instead of fluffy, your crumb is too dense. This usually means your water was too cold, so the yeast didn’t activate properly, or you didn’t knead enough to trap those air bubbles. Don’t stress about it if it happens once; just adjust your water temperature next time!
Serving Suggestions for Your Fresh French Bread
Now that you’ve pulled that gorgeous, golden loaf out of the oven, what are you going to do with it? Because this is such a fantastic, neutral-flavored french bread, it really shines as the ultimate dinner side bread. Seriously, just slice it thick, toast it lightly, and slather it with some good salted butter—perfection! But if you’re looking to turn it into something more substantial, this is my go-to base for killer sandwiches. It’s sturdy enough to hold up to wet ingredients, so pile on the fixings for a hearty lunch. Try pairing a slice with a big bowl of my creamy tortellini soup, or use it to scoop up leftover sauces. Honestly, it’s also the perfect vehicle for dipping into homemade spreads, like my best homemade burger sauce if you’re feeling extra!
Storage and Reheating Instructions for Perfect French Bread
The hardest part is letting it cool, but you absolutely must get this loaf onto a wire rack immediately after it comes out of that steamy oven! If you leave it cooling on the counter or in the pan, the bottom traps moisture, and bye-bye, lovely crisp crust! Seriously, avoid the fridge at all costs; refrigeration turns bread stale faster than anything imaginable. If you have leftovers—which I doubt you will—the best way to revive it is to wrap the whole loaf snugly in aluminum foil and warm it in a 350°F oven for about 8 to 10 minutes. That little bit of trapped heat steams it back to life and refreshes the crust beautifully!
Frequently Asked Questions About Making French Bread
I get so many questions about this recipe, especially from folks making their first loaf of homemade bread! We cover the basics of time and texture here. If you’re looking for more inspiration on how to use your results for speedy meals, check out my guide to easy weeknight dinners!
Can I make this French Bread Recipe without an Egg Wash
You absolutely can skip the egg wash! The beaten egg white is mostly there to give you that gorgeous, shiny, professional-looking crust when it comes out of the oven. If you leave it off, your french bread will still bake up perfectly fine—don’t you worry about that. It will just have a more matte, duller finish instead of a deep golden shine. It also tends to lead to a slightly softer crust, which some people actually prefer for their dinner side bread!
How do I get a Chewier French Bread Texture
Chewiness is all about the structure, my friend! If you want to push that texture toward the slightly chewy side, you need to focus on the flour and the kneading. While all-purpose flour works great for a soft French bread at home, you can swap about half of it out for bread flour, which has higher protein content. More protein means more gluten development, which makes it chewier. Also, make absolutely sure you hit that full 7 minutes of dedicated kneading time. That’s what aligns those gluten strands perfectly to trap the gas when it rises and bakes!
Is this recipe really a Quick French Bread Recipe
Yes, I truly promise it is! When I developed this recipe, speed was a huge priority because I know life gets busy. We cut down on the rising time by demanding a nice warm spot for the dough and utilizing the right yeast concentration. While traditional loaves might need hours of rising, we get this dough doubled, shaped, rested again, and baked in under two hours. It’s one of the quickest ways to get truly great, crusty artisan bread without sacrificing that lovely soft interior.
Can I use this dough to make small dinner rolls instead
Oh, that’s a brilliant idea! You totally can. If you use this dough for rolls, cut the second shaping rest time down a bit—say, 15 minutes instead of 20. Because the rolls are smaller, they bake much faster, usually in about 15 to 18 minutes total at that 400°F heat. They come out with awesome crusty exterior bread on the outside, but the inside stays so soft. They’re just perfect for a dinner side bread!
Nutritional Estimates for Homemade French Bread
So, let’s talk fuel! While my focus is usually just getting that delicious flavor into your hands, I know some of you like to keep track of what you’re eating. Since this is an estimate, remember that the final numbers can shift slightly depending on the exact brand of flour or sugar you toss in there. But based on the standard measurements, here is a rough idea of what you get per slice of this amazing french bread. As you can see, it’s a great staple—low in fat but nicely balanced with carbs to keep you going!
- Calories: 150
- Fat: 1g
- Protein: 4g
- Carbohydrates: 31g
Just keep in mind that these estimates don’t account for the butter you lovingly slather on top afterwards—and let’s be honest, that’s the best part! These figures are just for the bread itself, baked according to this Homemade French Bread Recipe. Treat this as a good guideline for enjoying your soft French bread at home guilt-free!
Share Your Soft French Bread at Home Creations
We did it! You pulled the loaves out, you heard that lovely hollow sound when you tapped the bottom, and now you’ve got gorgeous, bakery-quality french bread sitting on the cooling rack. I truly hope you feel proud because making this Homemade French Bread Recipe is a real accomplishment!
Now, I insist you tell me all about it! Did you manage that perfect crackle on the crust? Drop a comment below, give the recipe a rating, and please, please send me pictures of what you’re serving with your fresh loaves! You can always reach out through my contact page if you have follow-up questions. Happy baking, everyone!
PrintEasy Homemade Soft and Crusty French Bread (Ready in Under 2 Hours)

Make soft, fluffy French bread at home with a crispy exterior. This simple recipe uses basic ingredients and guides you through the steps for beginner bakers, delivering bakery-style loaves perfect for dinner or sandwiches in under two hours.
- Prep Time: 20 min
- Cook Time: 25 min
- Total Time: 1 hour 45 min
- Yield: 2 loaves 1x
- Category: Dinner
- Method: Baking
- Cuisine: French
- Diet: Vegetarian
Ingredients
- 3 cups all-purpose flour
- 1 teaspoon salt
- 1 packet (2 1/4 teaspoons) active dry yeast
- 1 1/4 cups warm water (about 105-115°F)
- 1 tablespoon sugar
- 1 egg white, lightly beaten (for wash)
Instructions
- In a large bowl, dissolve the sugar in the warm water. Sprinkle the yeast over the top and let it sit for 5 to 10 minutes until foamy.
- Add the flour and salt to the yeast mixture. Mix with a wooden spoon or stand mixer until a shaggy dough forms.
- Turn the dough out onto a lightly floured surface and knead for 5 to 7 minutes until the dough is smooth and elastic.
- Place the dough in a lightly oiled bowl, turning once to coat. Cover the bowl with plastic wrap or a clean towel and let it rise in a warm place for 60 minutes, or until doubled in size.
- Gently punch down the dough. Divide it in half. Shape each half into a long, even loaf shape, about 12 to 14 inches long.
- Place the shaped loaves on a baking sheet lined with parchment paper. Cover loosely and let them rest for a second rise for 20 minutes.
- Preheat your oven to 400°F (200°C). Place a shallow pan on the bottom rack for steam.
- Brush the tops of the loaves lightly with the beaten egg white. Use a sharp knife to make three diagonal slashes across the top of each loaf.
- Carefully pour about 1/2 cup of hot water into the shallow pan on the bottom rack to create steam. Quickly close the oven door.
- Bake for 20 to 25 minutes, or until the crust is deep golden brown and the bread sounds hollow when tapped.
- Transfer the French bread to a wire rack to cool completely before slicing.
Notes
- For a crispier crust, you can lightly spritz the loaves with water a few times during the first 10 minutes of baking.
- If you want a softer crust, skip the egg white wash and bake without adding steam to the oven.
- This bread is excellent served warm with butter or used for making sandwiches.
Nutrition
- Serving Size: 1 slice
- Calories: 150
- Sugar: 1
- Sodium: 250
- Fat: 1
- Saturated Fat: 0
- Unsaturated Fat: 1
- Trans Fat: 0
- Carbohydrates: 31
- Fiber: 1
- Protein: 4
- Cholesterol: 0