

Oh, honey, sometimes only the most gloriously over-the-top dessert will cut it, right? When that craving hits for something truly special, chocolate, caramel, and coconut—all wrapped up in creamy perfection—I have the answer: the Samoa Cheesecake. Forget complicated baking; this is one of those spectacular, showstopper desserts that looks like it took days, but I promise, it’s totally achievable. That’s my whole philosophy here at Food Dexterity; we make impressive treats accessible for your real, busy life. You can find more easy ideas in my collection of simple dessert recipes. This recipe layers that familiar Girl Scout cookie magic into the creamiest cheesecake foundation you’ve ever made. You’re going to love how this turns out!
- Why This Samoa Cheesecake is Your Next Showstopper Dessert
- Gathering Ingredients for Your Samoa Cheesecake Recipe
- Step-by-Step Instructions for Your Baked Samoa Cheesecake
- Tips for the Best Samoa Cheesecake Success
- Ingredient Notes and Substitutions for Your Samoa Cheesecake
- Serving Suggestions for This Indulgent Sweet Treat
- Storage and Reheating Instructions for Leftover Samoa Cheesecake
- Frequently Asked Questions About Samoa Cheesecake
- Estimated Nutrition for Your Creamy Coconut Caramel Dessert
- Share Your Samoa Cheesecake Creation
Why This Samoa Cheesecake is Your Next Showstopper Dessert
If you’re looking for the ultimate baked good to bring to a party or just to conquer a serious sweet tooth, stop scrolling. This is easily one of the most requested Girl Scout Inspired Desserts I have ever made. Seriously, it’s decadent, layered, and absolutely unforgettable.
- It delivers on every flavor promise: rich chocolate base, silky cheesecake, gooey caramel, and that perfect crunch of toasted coconut.
- It looks fancy, but don’t worry, the steps are totally manageable.
- These are truly some of the most Decadent Cheesecake Recipes out there!
The Perfect Fusion of Flavors
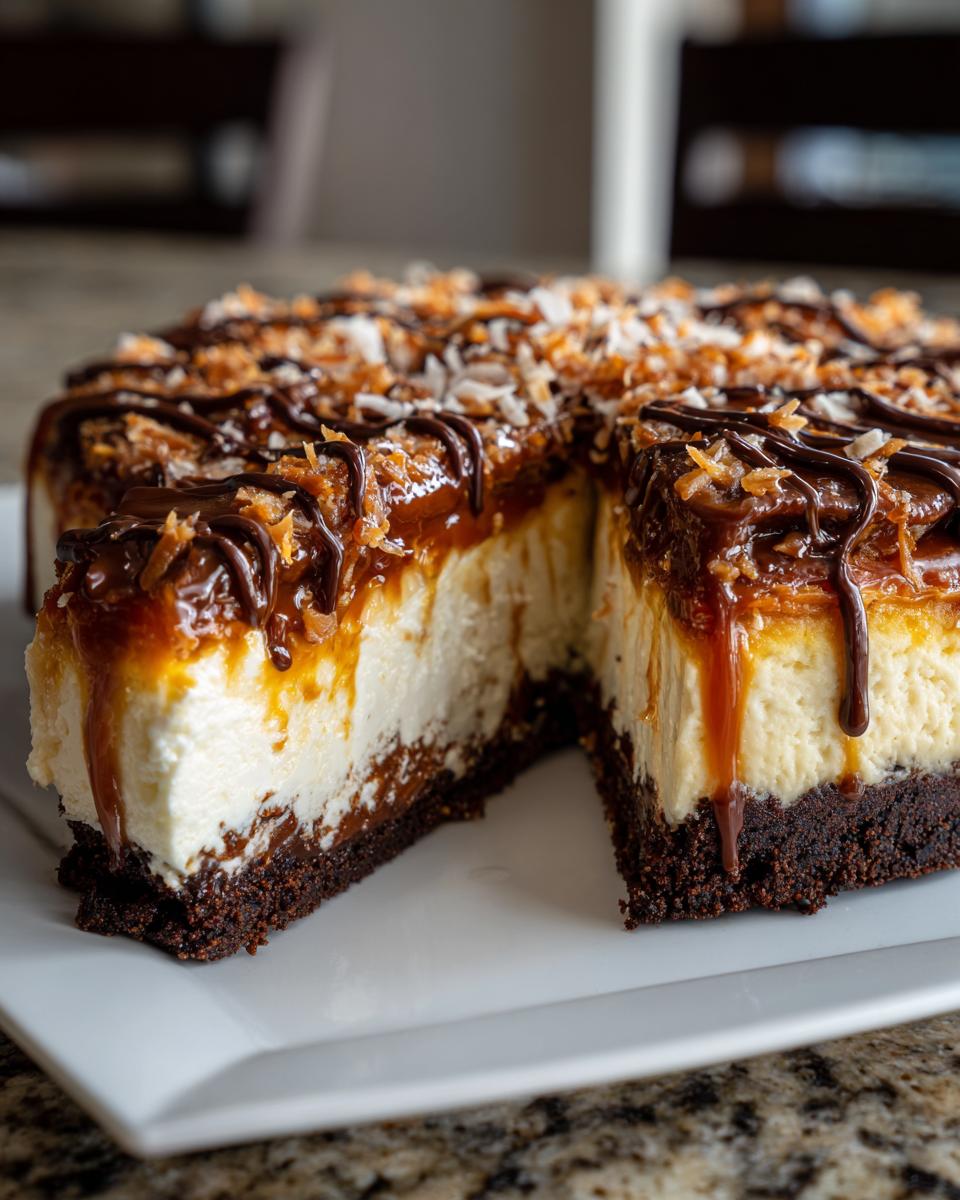
We start bold with that familiar chocolate sandwich cookie crust, which is crunchy and just a little salty. Then comes the smooth, creamy vanilla cheesecake filling—it’s the perfect calm space before the storm of topping hits. Oh, that topping! It’s a tidal wave of sticky-sweet caramel mixed with crunchy pecans and golden, toasted coconut. It’s pure bliss.

Achieving the Best Samoa Cheesecake Texture
The secret to making sure this Samoa Cheesecake isn’t just good, but downright silky, is trusting the process, especially the water bath. Don’t skip it! That gentle, steamy baking environment keeps the cheesecake batter from getting harsh edges, ensuring your slice has that melt-in-your-mouth texture every time. You can check out some of my other streamlined recipes that save you time when you need them, like my easy weeknight dinners.
Gathering Ingredients for Your Samoa Cheesecake Recipe
Okay, so this is where the magic starts, and trust me, having everything measured and ready before you turn on the mixer is just good kitchen sense. I always lay out my ingredients like little soldiers, especially for something layered like this Samoa Cheesecake Recipe. Sometimes, if I’m feeling extra lazy, I just make up a huge batch of oreo balls instead of just crushing them! Let’s look at what you need to gather.
For the Chocolate Cookie Crust
This is the foundation, so make sure your cookies are fully crushed—I mean dust! You need:
- 1 1/2 cups crushed chocolate sandwich cookies (the whole cookie, filling and all—that’s the flavor!)
- 6 tablespoons unsalted butter, melted
For the Creamy Vanilla Cheesecake Filling
This next set is crucial for that beautiful, smooth texture. My biggest piece of advice here? Your cream cheese absolutely must be truly softened, not just “room temperature-ish.” If it’s even a little cold, you’ll get lumps, and nobody wants a bumpy cheesecake!
- 3 (8 ounce) packages cream cheese, fully softened
- 1 1/2 cups granulated sugar
- 1 teaspoon vanilla extract
- 1/4 cup sour cream (this is important for that slight tang!)
- 3 large eggs, room temperature is best
For the Caramel Coconut Topping and Chocolate Drizzle
Get ready for the components that make this the ultimate Samoa Cheesecake experience! You’ll want to toast the coconut before you even think about assembling, as it deepens that flavor component beautifully.
- 1 cup granulated sugar (for the caramel base)
- 1/2 cup heavy cream
- 1/4 cup unsalted butter
- 1 cup sweetened shredded coconut
- 1/2 cup pecans or walnuts (totally optional, but please try them!)
- 4 ounces semi-sweet chocolate, chopped (for the final drizzle)
Step-by-Step Instructions for Your Baked Samoa Cheesecake
Alright, put on your favorite apron! This is where we turn those lovely ingredients into our big star dessert. Don’t let the layers scare you; we’re taking this slow and steady, just like I learned to handle big catering orders back in the day. We want this cheesecake to be unbelievably creamy, so pay attention to those mixing tips.
Preparing the Crust and Setting Up the Water Bath
First things first, get your oven preheated to 325°F (160°C). Since we want a clean release, take a 9-inch springform pan and wrap the outside bottom and sides really snugly in heavy-duty foil—I usually do two layers just to be safe from any rogue water seepage. Mix your crushed cookies and melted butter, press that firmly into the bottom, and pop it in the oven for 10 minutes. Once you pull that out, set up your water bath! Place the foil-wrapped pan inside a larger roasting pan before you pour in the batter next!
Mixing the Perfect Cheesecake Filling
Grab your softened cream cheese and beat it until it looks like fluffy clouds—zero lumps allowed! Then, gently introduce the sugar, just mixing until it’s combined. Now, add your flavor—vanilla and sour cream. The eggs go in last, and this is key: add them one at a time, mixing only on the lowest speed until you *just* see the yolk disappear. Overmixing the eggs is how you introduce air, which leads to cracks later. We want smooth, not airy!
Baking and Cooling the Samoa Cheesecake
Pour that beautiful batter over your cooled crust. Carefully place the roasting pan into the oven and pour hot water into the outer pan until it comes about halfway up the side of the springform. Bake this lovely Samoa Cheesecake for about 55 to 65 minutes. You’re looking for firm edges but a little shimmy left in the center—it means it’s nearly done. Once it hits that spot, turn the oven *off*, crack the door open, and leave it in there to cool slowly for a full hour. This temperature transition is vital! After an hour, remove it and let it cool completely on a rack before you chill it for at least four hours—overnight is best for the ultimate texture.
Creating the Caramel Sauce and Toasting Coconut
While it chills, let’s make the good stuff! For the caramel, melt that 1 cup of sugar in a saucepan over medium heat. Be patient; let it turn a deep, gorgeous amber color before you gently whisk in the heavy cream and butter; be careful, it will bubble up fiercely! Remove that and let it cool down a bit. For the coconut, spread it on a sheet and bake at 350°F (175°C) for about 5 to 8 minutes until it’s golden. Keep your eyes peeled; coconut goes from toasty to burned in about four seconds! If you want to see my deep dive on making caramel perfect every time, check out my guide on homemade caramel sauce for cheesecake.
Assembling Your Layered Cheesecake with Caramel Topping
Once your cheesecake is totally chilled, you can finally decorate! Spread that cooled caramel sauce evenly across the top. Next, sprinkle on that toasted coconut and any optional nuts you decided to toast up. Finally, take your melted chocolate and drizzle it all over in a pretty pattern. This final assembly ties everything together for the perfect Samoa Cheesecake. Pop it back in the fridge for 30 minutes to let the toppings set up before you serve those amazing slices!

Tips for the Best Samoa Cheesecake Success
Even with the best recipe, sometimes a cheesecake decides to be temperamental! Don’t sweat it; these are the little tricks I picked up over the years making these Creamy Coconut Caramel Desserts that make a huge difference in the final result. We want perfection, or at least, delicious near-perfection!
Preventing Cracks in Your Samoa Cheesecake
Remember how I talked about the water bath? That’s your non-negotiable step one for preventing cracks. It keeps the heat gentle and even. But the second secret is the cooling process. Never, ever take that cheesecake straight from a hot oven to a cold kitchen counter! Leaving it in the cooling oven with the door cracked for a full hour lets it relax slowly. It builds confidence when you see that smooth, uncracked surface!
Achieving Gooey Caramel Texture
When you pull that homemade caramel sauce off the heat, I know you’re tempted to pour it over that perfectly chilled cheesecake right away. Resist that urge! If the caramel is too hot, it will just run right off the sides and pool at the bottom wrapper junction. Let it cool on the counter until it’s thick enough to spoon slowly—it should still be pourable, but definitely not watery. That gives you those perfect thick ribbons of caramel on your finished Samoa treat. If you are looking for more ways to use those sweet skills, you might enjoy my easy homemade soft chewy garlic naan bread recipe.
If you want to see how another great baker handles this, check out the tips over at My Cooking Corner!
Ingredient Notes and Substitutions for Your Samoa Cheesecake
I am a huge champion of flexibility in the kitchen, truly I am! Sometimes you open your pantry door and realize you are totally out of chocolate cookies, or maybe you just prefer a lighter base flavor. Since this Samoa Cheesecake is so flavor-forward with the topping, it handles substitutions really well. We want to make sure you have everything you need, even if the grocery store was missing one thing! I have a great recipe for pudding cookies if you are looking to bake your own base ingredients next time, too.
Crust Variations: Beyond Chocolate Cookies
If you aren’t feeling the dark chocolate crust, don’t panic! You have fantastic alternatives. You can use plain graham crackers instead of the chocolate sandwich cookies. Just swap them 1:1 by volume for the crushed amount. You might need to add just a tiny bit more melted butter to help everything bind together because graham crackers are a little drier.
Honestly, shortbread cookies make a spectacular crust here too, giving the whole dessert a buttery background rather than a chocolatey one. Whichever you choose, just remember to press it firmly into the pan. A loose crust leads to a messy slice later, and we want neat layers!
Exploring a No Bake Samoa Cheesecake Option
I know some folks are terrified of the oven, or maybe you just need to save oven space for dinner! You absolutely can make a No Bake Samoa Cheesecake variation. The process changes a bit, though. First, you skip the 10-minute bake on the crust and just chill it while you whip up the filling.
For the filling, since you aren’t baking it, that creamy texture needs help setting up. I suggest beating in about 1 or 2 teaspoons of dissolved gelatin along with your sour cream, or you can swap the sour cream for whipped topping folded in at the very end. Either way, you’ll need a much longer chill time—we’re talking 6 to 8 hours, minimum, before you even think about smothering it with that amazing caramel and coconut topping!
Serving Suggestions for This Indulgent Sweet Treat
When you serve a cake this rich, you need a beverage that can cut through that sweetness just a little bit, you know? You don’t want anything too heavy competing with that caramel and coconut goodness. I find a strong, black coffee is the absolute perfect counterpoint—it just refreshes your palate between bites of pure decadence.
If you’re serving this after dinner, though, a little something creamy pairs nicely too. If you’ve got kids, whip up some whipped hot chocolate—it’s fun! For the adults, skip the heavy red wine and go for something clean, like a really crisp, cold glass of Sauvignon Blanc, or even just sparkling water with a twist of lemon to balance out the richness of the Cheesecake with Caramel Topping.

Storage and Reheating Instructions for Leftover Samoa Cheesecake
This is one of those Indulgent Sweet Treats that actually tastes *better* the next day once those caramel and coconut flavors have really settled into the cheesecake. Store any leftovers tightly covered in the refrigerator. It stays perfectly fresh and delicious for a good three to four days. That’s my rule for anything rich like this!
Now, don’t even think about reheating it! Cheesecake is designed to be served chilled or maybe just slightly tempered if you let it sit out for 15 minutes. If you try to microwave it, you’ll end up with sad, weeping caramel and a mushy center.
For slicing, always use that hot knife trick—run a thin, sharp knife under hot water, wipe it dry, and then slice your piece. Wipe and re-heat the knife between every single cut. It keeps those lovely layers looking sharp. If you’re looking for other creamy desserts that hold up well, check out my instructions for an easy custard pie!
Frequently Asked Questions About Samoa Cheesecake
It’s totally normal to have a few questions bubbling up when you’re tackling a big, beautiful dessert like this! Cheesecake is a bit different than baking a quick cake, so here are the things I get asked most often about making the Best Samoa Cheesecake.
Can I make this Caramel Coconut Cheesecake ahead of time?
Yes, you absolutely can, which makes it perfect for party planning! I highly recommend baking and chilling the plain cheesecake base completely—at least overnight. But here’s the trick: wait until the day you plan to serve it before you add the caramel sauce, toasted coconut, and chocolate drizzle. If you put the wet, sticky toppings on too early, the coconut can get soggy, and that’s just sad!
What is the best way to slice this Layered Cheesecake Dessert?
Oh, this is the key to keeping those stunning layers looking sharp; nobody wants a messy slice when they cut into this showstopper! You must use the hot knife method. Heat a sharp, thin-bladed knife under very hot running water for about 30 seconds. Wipe it completely dry, slice that piece, and then repeat: heat, wipe, slice. It melts through the caramel and the creamy filling beautifully. For more dessert ideas perfect for gathering and holidays, you might enjoy my holiday cheesecakes post!
Can I use store-bought caramel sauce in this Samoa Cheesecake Recipe?
You totally can if you are in a bind! Using a jarred sauce is a massive time saver, so no shame there. It means you skip the entire step of making the caramel from scratch, which gets you to that delicious Cheesecake with Caramel Topping faster. However, my homemade sauce is richer and has that deep, slightly burnt sugar flavor that really elevates the whole experience. If you use store-bought, just make sure it’s thick! Warm it gently before spreading so it moves nicely over the Creamy Coconut Caramel Dessert.
If you’re looking for other ideas that are easy to manage, I have a great easy cheesecake fruit salad recipe too!
Estimated Nutrition for Your Creamy Coconut Caramel Dessert
Now, I always like to give you a heads-up on the nutrition for treats like this Creamy Coconut Caramel Dessert because, let’s be real, this isn’t exactly a kale salad! These estimates are based on the full recipe breakdown for one generous slice. Remember, these numbers are just a guideline, especially if you use different cookie brands or add extra chocolate drizzling. You can find some of my healthier ideas over at my healthy breakfast ideas section when your sweet tooth needs a break!
- Serving Size: 1 slice
- Calories: 550
- Sugar: 45g
- Fat: 35g
Bottom line: Enjoy every single bite! This is meant to be a special occasion indulgence, not an everyday thing.
Share Your Samoa Cheesecake Creation
Okay, you’ve done the hard work—you’ve survived the water bath, meticulously layered that caramel, and maybe even wrestled with the hot knife for a clean slice. Now, the best part: telling me all about it! I genuinely love seeing how my recipes come to life in your kitchens.
Did you manage to get those perfect toasted coconut edges? Did your chocolate drizzle look better than mine? Don’t be shy! Head down to the comments section below and give this Samoa Cheesecake recipe a star rating for others to see. Seriously, your feedback helps me make sure the next recipe I share is even better. If you managed to snap a killer photo of your finished masterpiece, tag me on social media—I’d be thrilled to show off your baking skills. Or, if you had a technical question, you can always reach out via my contact page!
And if you’re looking for another recipe that gets rave reviews, check out the folks over at Recipes Dairies, they have some fantastic party treats too. Happy baking, sweet friends!
PrintDecadent Samoa Cheesecake Recipe

Create this showstopper Samoa Cheesecake, inspired by the classic Girl Scout cookie. You get a creamy vanilla cheesecake base topped with toasted coconut, gooey caramel sauce, and a rich chocolate drizzle.
- Prep Time: 30 min
- Cook Time: 65 min
- Total Time: 5 hours 35 min
- Yield: 12 servings
- Category: Dessert
- Method: Baking
- Cuisine: American
- Diet: Vegetarian
Ingredients
- For the Crust: 1 1/2 cups crushed chocolate sandwich cookies (like Oreos), 6 tablespoons unsalted butter, melted
- For the Cheesecake Filling: 3 (8 ounce) packages cream cheese, softened, 1 1/2 cups granulated sugar, 1 teaspoon vanilla extract, 1/4 cup sour cream, 3 large eggs
- For the Topping: 1 cup granulated sugar, 1/2 cup heavy cream, 1/4 cup unsalted butter, 1 cup sweetened shredded coconut, 1/2 cup pecans or walnuts (optional), 4 ounces semi-sweet chocolate, chopped
Instructions
- Preheat your oven to 325°F (160°C). Wrap the outside bottom of a 9-inch springform pan tightly with heavy-duty aluminum foil.
- Prepare the crust: Mix the crushed cookies and melted butter until combined. Press the mixture firmly into the bottom of the prepared springform pan. Bake for 10 minutes. Let cool slightly.
- Prepare the filling: Beat the softened cream cheese with an electric mixer until smooth. Gradually add the sugar, mixing until just combined. Beat in the vanilla extract and sour cream. Add the eggs one at a time, mixing on low speed after each addition until just incorporated. Do not overmix.
- Pour the cheesecake batter over the cooled crust. Place the springform pan inside a larger roasting pan. Carefully pour hot water into the roasting pan to reach halfway up the sides of the springform pan (this creates a water bath).
- Bake for 55 to 65 minutes, or until the edges are set but the center still jiggles slightly. Turn off the oven, crack the door open, and let the cheesecake cool in the oven for 1 hour. Remove from the water bath and cool completely on a wire rack. Chill in the refrigerator for at least 4 hours, or preferably overnight.
- Prepare the caramel sauce: In a medium saucepan over medium heat, melt the 1 cup of sugar until it turns a deep amber color. Do not stir initially; swirl the pan if needed.
- Carefully whisk in the heavy cream and butter until smooth. Remove from heat and let cool slightly.
- Toast the coconut: Spread the shredded coconut on a baking sheet. Bake at 350°F (175°C) for 5 to 8 minutes, watching closely until golden brown. If using nuts, toast them alongside the coconut.
- Assemble the cheesecake: Once the cheesecake is chilled, spread the cooled caramel sauce evenly over the top. Sprinkle generously with toasted coconut and nuts (if using).
- Melt the chocolate in a microwave-safe bowl in 30-second intervals, stirring until smooth. Drizzle the melted chocolate over the coconut and caramel layer.
- Chill the finished Samoa Cheesecake for another 30 minutes before slicing and serving.
Notes
- For a cleaner slice, run a thin knife under hot water and wipe dry between cuts.
- If you prefer a no-bake version, use a graham cracker crust and chill the cream cheese mixture until firm instead of baking.
- You can substitute the chocolate sandwich cookies with graham crackers for a lighter crust flavor.
Nutrition
- Serving Size: 1 slice
- Calories: 550
- Sugar: 45g
- Sodium: 350mg
- Fat: 35g
- Saturated Fat: 20g
- Unsaturated Fat: 15g
- Trans Fat: 0.5g
- Carbohydrates: 55g
- Fiber: 2g
- Protein: 8g
- Cholesterol: 110mg