

You know those incredibly decadent, restaurant-quality desserts that look impossible to recreate at home? Well, I’m here to tell you that’s just not true anymore! I’ve taken everything I learned about making complicated food approachable—even when my life gets hectic—and poured it into this recipe. Forget everything you thought you knew about baking cheesecakes that crack. This foolproof baked white chocolate raspberry cheesecake is my personal guarantee that you will achieve that perfectly creamy, silken texture every single time. It’s rich, it’s beautiful, and honestly, it tastes better than what you get at those famous chain restaurants. If you loved how simple we made coffee cake in the recipe on sour cream coffee cake streusel, you’re going to nail this one too. Get ready to wow everyone!
- Why This White Chocolate Raspberry Cheesecake is Your New Showstopper Dessert Recipe
- Essential Ingredients for Your White Chocolate Raspberry Cheesecake
- Building the Buttery Graham Cracker Crust Recipe
- The Foolproof No Crack Cheesecake Technique: Water Bath Baking
- Baking and Slow Cooling for the Best White Chocolate Raspberry Cheesecake
- Serving Suggestions for This Decadent Cheesecake Desserts
- Storage and Reheating Instructions for Your White Chocolate Raspberry Cheesecake
- Frequently Asked Questions About Making a White Chocolate Cheesecake Recipe
- Share Your Showstopper Dessert Success
Why This White Chocolate Raspberry Cheesecake is Your New Showstopper Dessert Recipe
When people see this cheesecake come out, they think I spent three days slaving over it. And while I definitely gave it my full attention, the steps are truly about technique, not magic! That’s the dexterity I want to share with you. This white chocolate raspberry cheesecake is destined to be the star of your next gathering, whether it’s Christmas or just a Tuesday night when you feel like treating yourself.
Here’s why this recipe jumps straight to the top tier of your recipe collection:
- It delivers that incredible, luxurious, restaurant-quality texture. Seriously, it’s better than the famous copycat versions!
- We use the water bath method alongside slow cooling, which is my secret handshake for a guaranteed, crack-free top. No more surface anxiety!
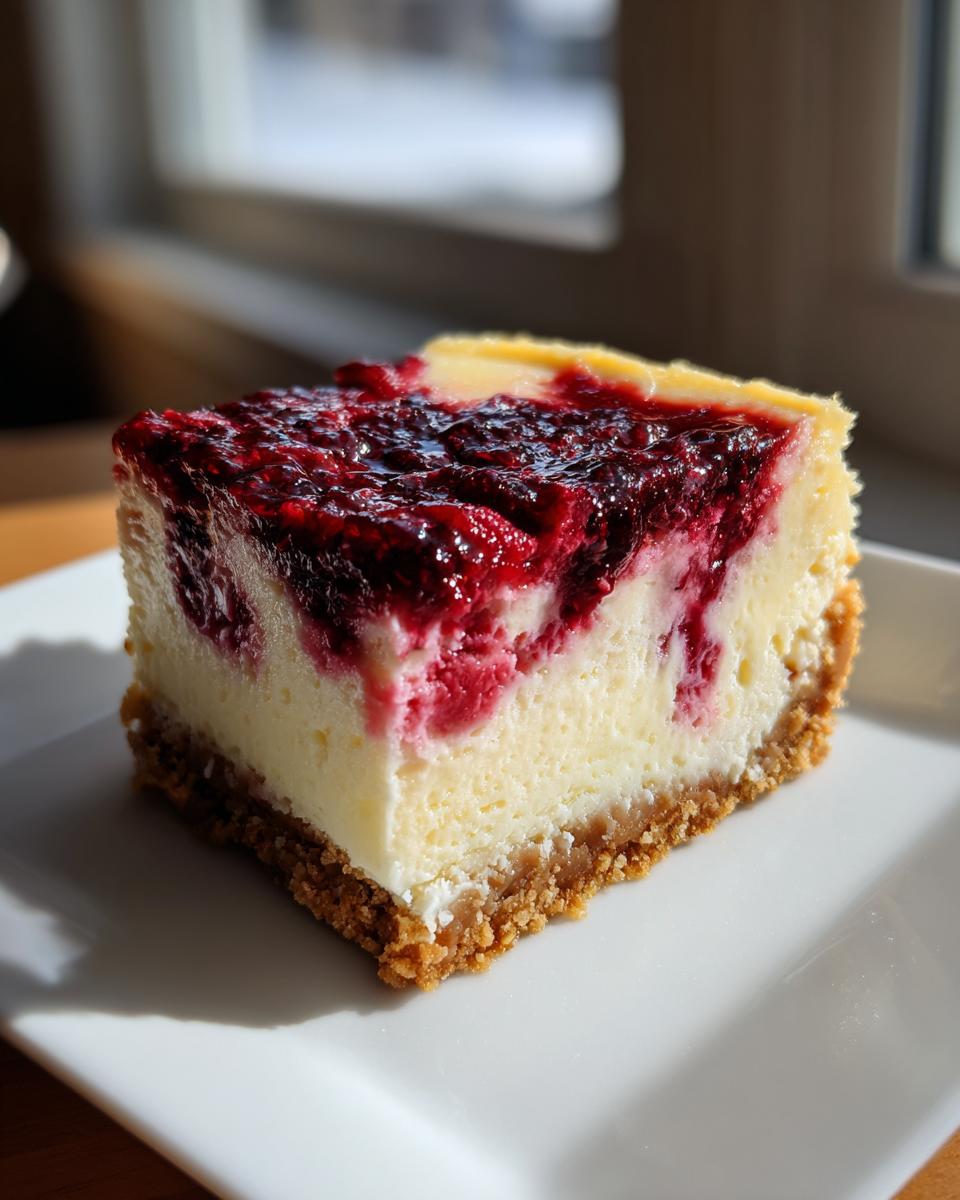
- The contrast between the sweet white chocolate filling and the tart raspberry swirl is just stunning. It creates the ultimate showstopper dessert.
This piece on apple pie cheesecake recipe covers another showstopper if you ever need a different flavor!
Achieving That Silken Cheesecake Texture
Texture is everything when it comes to cheesecake, right? We aren’t going for cakey or grainy here; we want that smooth, silken melt-in-your-mouth feeling. That happens for two big reasons. First, never, ever put cold dairy into your mixer. Your cream cheese, eggs, and sour cream must be totally relaxed—room temperature! This eliminates lumps before you even turn the mixer on.
Second, the water bath. It sounds intimidating, I know, but it’s just hot water surrounding the cake pan. That steam creates a gentle, moist environment, preventing the outside edges from baking too fast while the middle catches up. It’s the secret weapon for a creamy baked cheesecake that truly lives up to the hype.
Essential Ingredients for Your White Chocolate Raspberry Cheesecake
Okay, let’s get down to the good stuff: what you actually need to buy! Getting the right bits is half the battle, trust me. For this white chocolate raspberry cheesecake, organization is key. We group things by what part of the cake they belong to, so you don’t accidentally put the filling sugar in the crust mix. This recipe uses classic components to give you that restaurant quality dessert at home feel. Before you start, think about whipping up some creamy homemade white hot chocolate later!
For the crust, grab:
- 1 1/2 cups graham cracker crumbs
- 1/4 cup granulated sugar
- 6 tablespoons unsalted butter, melted
For the ultra-creamy filling, make sure everything is room temperature! You’ll need:
- 3 (8 ounce) packages cream cheese, softened to room temperature
- 1 1/2 cups granulated sugar
- 1 teaspoon vanilla extract
- 1/4 teaspoon salt
- 1 cup white chocolate, melted and slightly cooled
- 4 large eggs, room temperature
- 1/2 cup sour cream, room temperature
And for that gorgeous color and tang in your raspberry swirl dessert:
- 1 cup raspberry sauce or puree (homemade or store-bought!)
Ingredient Notes and Substitutions for White Chocolate Raspberry Swirl
Listen, the quality of your white chocolate matters massively here because it carries so much of the flavor profile! Don’t skimp; look for bars or chips that list cocoa butter high up on the ingredient list, not just sugar and vegetable oils. That’s the secret to avoiding a waxy filling texture.
Also, let’s talk temperature one more time. If your cream cheese is cold, you’re going to end up beating it forever trying to get rid of those ugly lumps. Same with the eggs and sour cream! Give them an hour on the counter before you start. It’s vital preparation for that silken cheesecake texture.
If you feel like shaking things up, you can totally swap out the graham crackers for about two cups of finely crushed Oreo cookies. Keep the butter amount the same, and you get a chocolatey base that pairs wonderfully with the raspberry. See? Dexterity!
Building the Buttery Graham Cracker Crust Recipe
We have to start with a strong foundation, right? A weak crust equals a sad ending, so we are building a buttery graham cracker crust recipe that is sturdy enough to hold up to all that glorious, creamy filling we are about to pour on top. This part is super fast, so you can get it in the oven while you start prepping those room-temperature ingredients for the filling.
First, preheat that oven to 325°F (160°C). Remember, we are baking this beauty in a water bath later, so while the oven is warming up, you need to wrap your 9-inch springform pan. I mean *tightly* wrap it—use heavy-duty foil, cover the bottom and go way up the sides. You don’t want even a single sneaky drop of water getting in there to ruin our masterpiece!
Now for the mix! In a bowl, combine your graham cracker crumbs and that 1/4 cup of granulated sugar. Pour in the 6 tablespoons of melted unsalted butter. Mix it all up. You are looking for a texture that looks like wet sand—you should be able to squeeze a bit in your hand and have it hold its shape perfectly. If it crumbles apart, splash in maybe half a teaspoon of water or a tiny bit more butter.
Press that mixture firmly into the bottom of your foil-wrapped pan. I mean, press it down hard! Use the bottom of a measuring cup or just your knuckles to really compact it. We want this base dense! Pop that pan into the oven and give it a quick 10-minute pre-bake. This sets the crust so it doesn’t get soggy underneath the wet filling tomorrow… well, later today!
Once those 10 minutes are up, pull it out and just let it hang out on a cooling rack while you move on to the filling. Cooling it down slightly before adding the heavy batter keeps that crust crisp.
If you’re looking for other easy bases, I’ve got a great recipe for ultimate cornbread stuffing recipe, but trust me, for this white chocolate raspberry cheesecake, the graham crackers are the way to go!
The Foolproof No Crack Cheesecake Technique: Water Bath Baking
Alright, let’s talk about the absolute game-changer for any creamy baked cheesecake recipe: the water bath, or what I like to call the ‘No Crack Insurance Policy.’ I know you’ve seen people skip this step, usually ending up with a cracked, rustic-looking top, but for a beautiful, elegant white chocolate raspberry cheesecake suitable for holidays, we need perfection.
You already wrapped your springform pan super tight in foil in the previous step, right? Good! That tightly wrapped pan is now going to sit inside a much larger roasting pan. It sounds dramatic, but it’s simple physics doing the heavy lifting for us. We place the cheesecake pan—which is protected by all that foil—into the roasting pan.
Now for the magic part. Carefully, and I mean *carefully*, pour really hot water—I usually just boil a kettle first—into the outer roasting pan until the water level comes about halfway up the sides of the cheesecake pan itself. Why? Because the steam created by that hot water surrounding the cheesecake keeps the entire oven cavity humid. This moist heat cooks the cheesecake gently and evenly from the sides and bottom, preventing that harsh dry heat from turning your soft center into rubber on top. This gentle steam guarantees we get that beautiful, smooth surface readers look for when searching for the no crack cheesecake technique.
Once the water bath is set, the whole heavy roasting pan goes into that 325°F oven. While that’s happening, let’s get our filling mixed up perfectly!
Mixing the Creamy White Chocolate Raspberry Cheesecake Filling
This is where you want to relax and move slowly. We are actively trying *not* to incorporate air into this filling because air bubbles expand, create steam pockets, and inevitably lead to cracking when they shrink upon cooling. Remember how we talked about using room-temperature ingredients? This is where that pays off!
Start with your beautifully softened cream cheese and sugar. Beat them together on *low speed* until they look perfectly smooth. Stop, scrape down the sides of the bowl so nothing misses out. Then, add your vanilla and salt.
Next comes the melted white chocolate. Listen closely: it needs to be melted, yes, but it must also be slightly cooled down—almost lukewarm. If it’s hot, it can actually start to cook the cream cheese! Mix that in gently. After that, it’s the eggs, one at a time, mixing only until the yolk disappears. No whipping! Finally, fold in the sour cream gently by hand with a rubber spatula. You want a beautifully uniform, glossy batter representing your white chocolate cheesecake recipe binder.
Creating the Perfect Raspberry Swirl Dessert
Now for the art! We’re layering this to get those stunning lines. Pour about half of your gorgeous, smooth filling right over that pre-baked crust. Don’t worry if it’s not perfectly smooth yet; that’s the point!
Take half of your thick raspberry sauce—and I mean thick! A watery sauce sinks or bleeds too much. Drizzle it randomly over the batter. Grab a thin knife or a wooden skewer and gently drag it through the batter once or twice to create those gorgeous veins. We aren’t mixing it up; we are just swirling!
Then, you repeat the process: pour the rest of the filling over the top, drizzle the remaining raspberry sauce, and give it one final, gentle swirl. Keep your swirls broad and intentional. This technique is what makes it a true raspberry swirl cheesecake that looks almost too pretty to eat. Almost!
For more ideas on great flavor pairings, you might enjoy looking at my thoughts on easy roasted chicken juicy crispy skin—because perfect main courses deserve perfect desserts like this one!
Baking and Slow Cooling for the Best White Chocolate Raspberry Cheesecake
It’s time for the bake, and this is where we put our faith in the water bath we set up so carefully. Remember, this white chocolate raspberry cheesecake is delicate, so we aren’t blasting it with high heat. We bake at 325°F (160°C) for right around 60 to 75 minutes. Don’t rely on the clock alone, though; you have to watch the jiggle test!
When it’s done, the edges should look completely set, like firm meringue, but that center—the inner two inches—should still have a noticeable, beautiful slight jiggle when you gently nudge the pan. It should look like gelatin that hasn’t quite settled yet. That wobble means you have achieved pure, silken cheesecake texture in the middle, and it’s ready to take the journey out of the heat.
And this next part is non-negotiable if you want that flawless, uncracked top so you can show off your white chocolate raspberry swirl. We turn the oven off. Seriously, turn it off! Then, crack the oven door open—just a little sliver, maybe stick a wooden spoon handle in the door to keep it propped. We are going to let the cheesecake cool down slowly inside the residual heat of the oven environment for a full hour.
This slow, gradual temperature drop is critical. It stops the cake from shrinking too fast, which is the main reason those ugly fissures appear! Think of it as letting your body cool down slowly after a workout instead of jumping straight into an ice bath. After that hour of gentle cooling, we take the roasting pan out of the oven and lift the cheesecake pan out of the water bath. Let it finish cooling completely on a wire rack at room temperature before you even think about covering it and hiding it in the fridge overnight. Patience now gives you the most amazing elegant baked dessert later!

If you followed these steps, you’ll be making dessert for all the special occasions. Speaking of which, if you need an idea for a great main course to lead into this spectacular cheesecake, check out my recipe for easy Caesar chicken recipe!
Serving Suggestions for This Decadent Cheesecake Desserts
Okay, your white chocolate raspberry cheesecake is finally set—it’s firm, it’s cool, and it is absolutely ready to shine! Since this is such a rich, showstopper dessert, you actually don’t need much else on the plate. Remember, the search data told us that chilling it properly enhances the flavor and the texture, so make sure it’s good and cold before you slice into it. That’s when you really get that pure, creamy satisfaction.
When I serve this, especially around the holidays like Valentine’s Day or Christmas, I like to keep the plating simple so the swirls are the star. A delicate dusting of powdered sugar over the top right before serving always looks lovely and adds just a little extra sweetness without overpowering the filling. A few fresh raspberries scattered artfully around the plate also give it a beautiful color pop. Honestly, one slice of this decadent cheesecake dessert is usually more than enough!

If you are serving this after a lighter meal, maybe skip the heavy sides. But if you are going all out and need a suggestion for something fruit-forward to balance the richness, you might want to check out my recipe for southern peach cobbler recipe. That one is totally different but brings delicious, homey comfort to the table!
If you end up having leftover slices—which is doubtful, by the way—they are heavenly paired with a strong, hot cup of coffee or espresso. The bitterness cuts through the white chocolate perfectly. I also saw some great inspiration over at Tasty with Lara showing ways to serve slices, which is great if you need visuals!
Storage and Reheating Instructions for Your White Chocolate Raspberry Cheesecake
I know you’re going to want to dig into your gorgeous white chocolate raspberry cheesecake immediately after you finish all that careful cooling, but listen to me: you have to fight the urge! The flavor, the set, the entire experience hinges on adequate chilling time. This isn’t like a quick cake; this needs time to firm up into that perfect, luxurious block we’re aiming for.
You absolutely must let this chill for a minimum of six hours, but—and this is important—overnight is always the best bet. Seriously, wrap that cooled cake very well in plastic wrap (after it’s completely cooled on the counter, of course!). Keeping it covered tightly in the refrigerator stops it from absorbing any weird fridge smells or drying out. Once chilled, it should slice like a dream. If I see any sneaky plastic wrap leaks, I’ll use some aluminum foil over the plastic for extra protection. Good storage means this delicate flavor lasts!

Now, about reheating? Don’t even think about it! Cheesecake is designed to be served cold or at cool room temperature. Any attempt to microwave or heat this rich dessert will melt that beautiful structure we worked so hard to keep crack-free. You’ll just end up with thick, sweet raspberry soup! It’s meant to be enjoyed chilled straight from the fridge. If you need another fantastic make-ahead dessert that *can* be reheated gently, try my recipe for easy moist date nut bread recipe; that one is perfect for popping in the toaster oven!
Kept properly covered and cold, this white chocolate raspberry swirl creation will taste fantastic for about four to five days. Just be careful when slicing into it—pulling the slices out of the fridge right before serving ensures the cleanest cuts possible!
Frequently Asked Questions About Making a White Chocolate Cheesecake Recipe
It’s normal to have questions when you tackle a big, beautiful dessert like this! Cheesecake baking has a couple of quirks, but once you know the secrets—like the water bath—it’s truly foolproof. I pulled together the most common things people ask when making this white chocolate cheesecake recipe so you can bake with confidence and make this a regular part of your special occasion cakes lineup.
Is this truly a Cheesecake Factory Copycat Dessert?
Yes! You bet it is! So many people search for the The Cheesecake Factory Copycat Dessert because their texture is that perfect blend of dense and creamy. We nail that texture by making sure our white chocolate is high quality and, most importantly, by gentle mixing. If you follow the room temperature and low-speed mixing rules, the texture will mimic something you’d pay $15 for in a restaurant!
Can I make this white chocolate raspberry cheesecake without a water bath?
Oh, honey, I strongly, strongly advise against it if you want that smooth, picture-perfect top. The water bath is the cornerstone of our no crack cheesecake technique. If you absolutely cannot do it—maybe your roasting pan isn’t big enough—then you have to drastically lower your temperature. Bake it at 300°F (150°C) instead of 325°F, and you’ll have to bake it longer. Be prepared to watch it like a hawk, because you lose the gentle steam protection. It’s just not worth the risk of cracking on your perfect showstopper dessert recipe!
What is the best way to get a truly creamy baked cheesecake?
It boils down to two things we covered: temperature and mixing speed. Always use room temperature cream cheese, eggs, and sour cream. Cold ingredients force you to overmix to smooth them, and overmixing equals air, which means cracks! Once those ingredients are warm, beat them slowly until they are just combined and glossy. That’s how you guarantee that luxurious, silken cheesecake texture that makes this white chocolate raspberry cheesecake so amazing.
What kind of crust works best besides graham cracker?
The classic buttery graham cracker is what I used and what pairs best with the tart raspberry, but you absolutely have options! If you want a richer flavor, you can crush 2 cups of Oreos (cream filling and all) for a chocolate cookie crust—that turns it into a fantastic white chocolate raspberry swirl treat. Or, if you prefer a bit of crunch without the strong flavor, digestive biscuits work wonderfully too. Just follow the same butter ratios we used for the crust instructions!
If you’re looking for non-cheesecake recipes that come together easily for a weekend brunch, check out my french toast casserole recipe—it’s another great one for feeding a crowd!
Share Your Showstopper Dessert Success
And there you have it! You’ve conquered the potentially tricky world of baked cheesecake and emerged victorious with the most visually stunning, unbelievably creamy white chocolate raspberry cheesecake. Seriously, how good does that raspberry swirl look? I hope that this recipe proves that you absolutely have the dexterity to create restaurant-quality desserts right in your own kitchen.
I would genuinely love to hear how it went for you! Did you find the water bath easy? Did the slow cool work its magic? Please drop a star rating below if you loved this recipe, and definitely leave a comment telling me what special occasion you made this for. If you snapped a picture of that gorgeous, velvety top, make sure to tag us on social media! Showing off your success is my favorite part of sharing these recipes.
Keep building that cooking confidence, and don’t forget to check out my recipe for easy creamy white chicken chili recipe when you need a comforting meal that balances out all this incredible sweetness!
PrintFoolproof Baked White Chocolate Raspberry Cheesecake (Showstopper Dessert)
Make a creamy, restaurant-quality White Chocolate Raspberry Cheesecake at home. This recipe uses a water bath technique to prevent cracking, giving you a silken texture and a beautiful raspberry swirl on a buttery graham cracker crust. It is a perfect showstopper dessert for holidays or special occasions.
- Prep Time: 30 min
- Cook Time: 75 min
- Total Time: 9 hours 45 min
- Yield: 12 servings 1x
- Category: Dessert
- Method: Baking
- Cuisine: American
- Diet: Vegetarian
Ingredients
- 1 1/2 cups graham cracker crumbs
- 1/4 cup granulated sugar (for crust)
- 6 tablespoons unsalted butter, melted
- 3 (8 ounce) packages cream cheese, softened
- 1 1/2 cups granulated sugar (for filling)
- 1 teaspoon vanilla extract
- 1/4 teaspoon salt
- 1 cup white chocolate, melted and slightly cooled
- 4 large eggs, room temperature
- 1/2 cup sour cream, room temperature
- 1 cup raspberry sauce or puree (store-bought or homemade)
Instructions
- Preheat your oven to 325°F (160°C). Wrap the outside of a 9-inch springform pan tightly with heavy-duty aluminum foil, covering the bottom and sides completely to prepare for the water bath.
- Prepare the crust: Mix graham cracker crumbs, 1/4 cup sugar, and melted butter until combined. Press the mixture firmly into the bottom of the prepared springform pan. Bake for 10 minutes. Let cool while you prepare the filling.
- Prepare the white chocolate: Melt the white chocolate using a double boiler or microwave in short intervals, stirring until smooth. Set aside to cool slightly.
- Prepare the filling: In a large bowl, beat the softened cream cheese with 1 1/2 cups sugar until completely smooth. Scrape down the sides. Beat in the vanilla extract and salt.
- Beat in the slightly cooled melted white chocolate until just combined. Do not overmix.
- Add the eggs one at a time, mixing on low speed after each addition until just incorporated. Mix in the sour cream until the batter is smooth.
- Pour half of the cheesecake batter over the cooled crust. Gently drizzle half of the raspberry sauce over the batter. Use a knife or skewer to gently swirl the sauce into the batter.
- Pour the remaining cheesecake batter over the first layer. Top with the remaining raspberry sauce and create swirls.
- Place the foil-wrapped springform pan inside a larger roasting pan. Carefully pour hot water into the roasting pan until the water reaches halfway up the sides of the springform pan. This is the water bath.
- Bake for 60 to 75 minutes. The edges should look set, but the center 2 inches should still have a slight jiggle.
- Turn off the oven, crack the oven door open slightly, and let the cheesecake cool inside the oven for 1 hour. This slow cooling prevents cracking.
- Remove the cheesecake from the water bath and foil. Cool completely on a wire rack at room temperature. Once cool, cover and refrigerate for at least 6 hours, or preferably overnight, before serving.
Notes
- Use room temperature ingredients for the cream cheese, eggs, and sour cream; this prevents lumps and ensures a smooth texture.
- For the best swirl, use a thick raspberry sauce rather than a thin jam.
- If you do not want to use a water bath, bake at a lower temperature (300°F or 150°C) and watch carefully for doneness.
Nutrition
- Serving Size: 1 slice
- Calories: 450
- Sugar: 35g
- Sodium: 250mg
- Fat: 30g
- Saturated Fat: 18g
- Unsaturated Fat: 12g
- Trans Fat: 0.5g
- Carbohydrates: 40g
- Fiber: 1g
- Protein: 8g
- Cholesterol: 120mg